# INTEGRAL Universaali Alakeskusprosessori

Jos kokoaminen ei ole tuttua hommaa, lue ensin **YLEISKATSAUS**

# Valmistelevia työvaiheita

Näitä työvaiheita voi tehdä, ennen kuin on olemassa tilausta. Nopeuttaa tuotantoa.

-moduulien ohjelmointi

-CPU-SoM ohjelmointi

-osien täydentäminen työpisteen hyllyyn

-kotelon aukotuksen tarkistuksia (mutta ei paljoa, jos SIM-kortin paikka vaihtuu piankin)

# Moduulien ohjelmointi etukäteen

<p class="callout warning">Moduulien ohjelmointiin on erillinen, valmiiksi kasattu Integral, jossa on oranssi kansi.</p>


### 1. Ohjelmointi-Integralin kytkeminen Workbench/Testbenchiin


[![PIENdevice-setup-setup.jpg](https://wiki.bithouse.fi/uploads/images/gallery/2026-02/scaled-1680-/piendevice-setup-setup.jpg)](https://wiki.bithouse.fi/uploads/images/gallery/2026-02/piendevice-setup-setup.jpg)
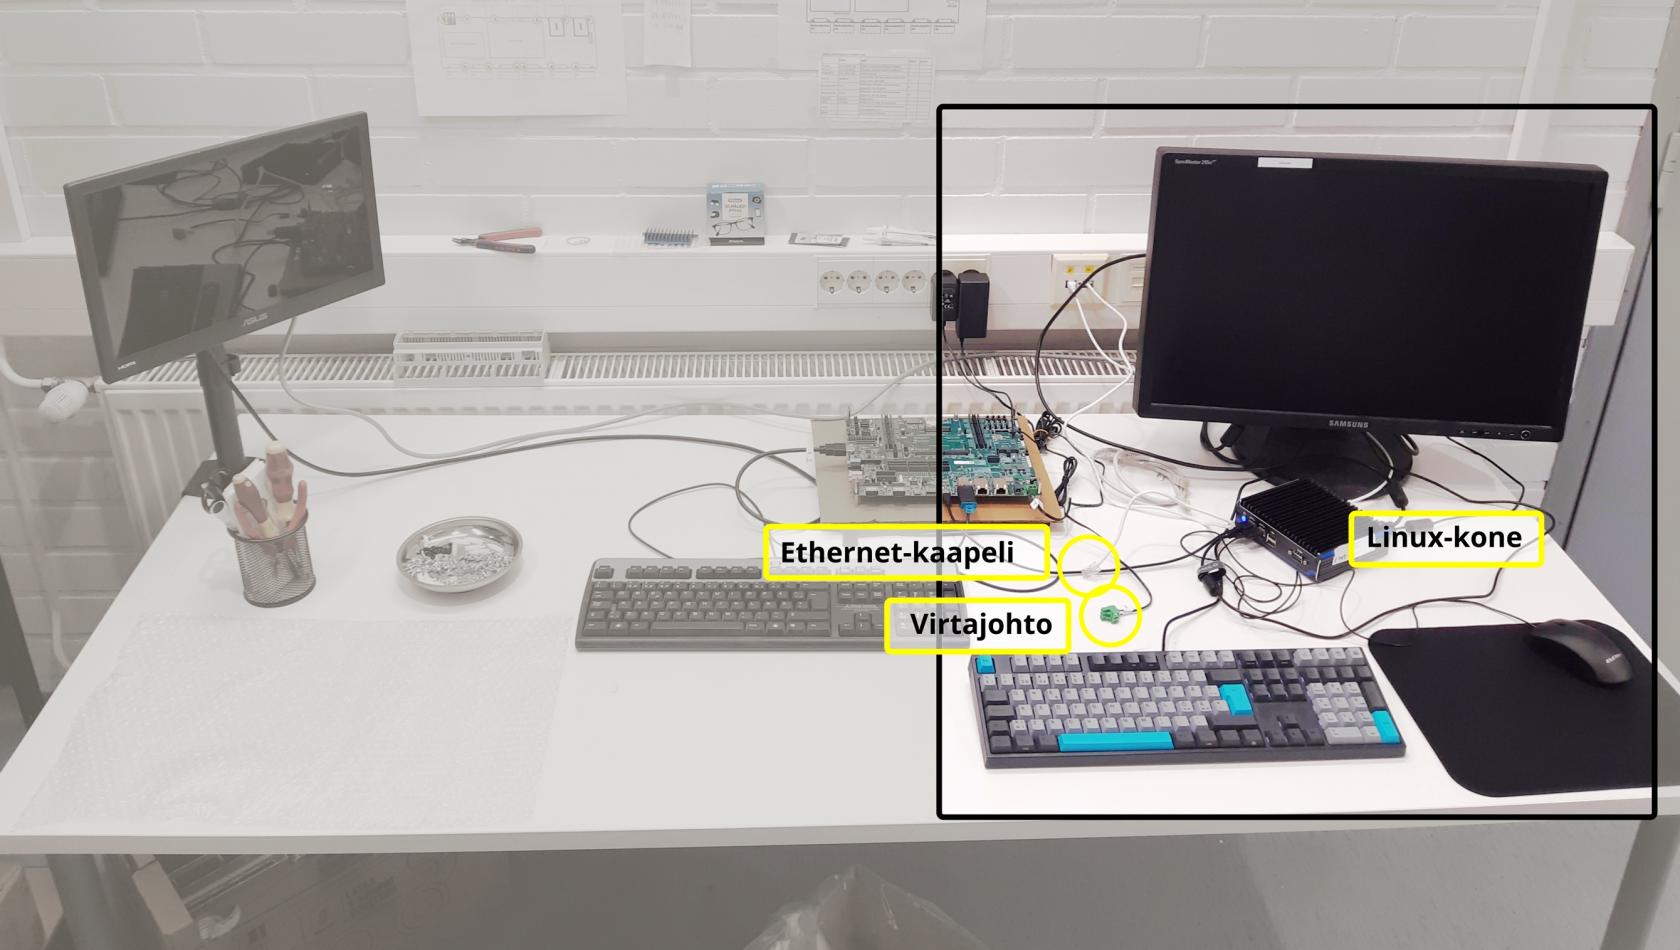
[![ohjelmointilaite.jpg](https://wiki.bithouse.fi/uploads/images/gallery/2026-08/scaled-1680-/ohjelmointilaite.jpg)](https://wiki.bithouse.fi/uploads/images/gallery/2026-08/ohjelmointilaite.jpg)
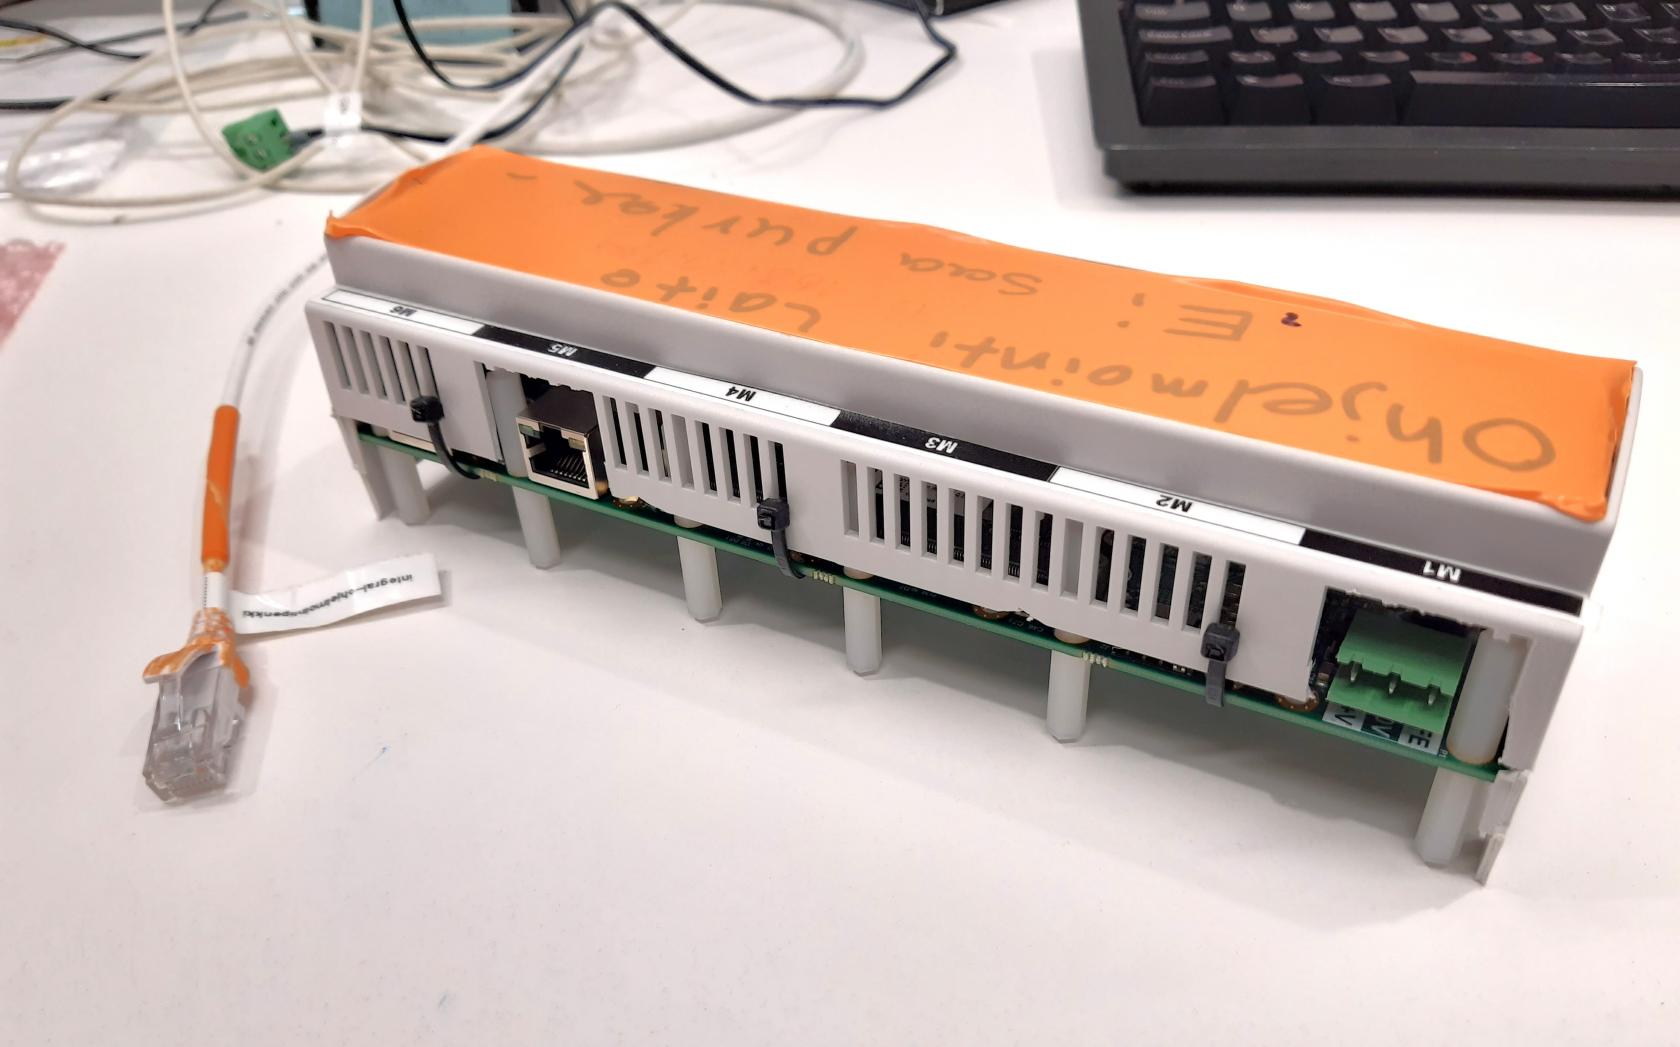

##### 1.2.1 Kytkennät

- Kytke virtajohdin virtaliittimestä pistorasiaan. 
    - **Ensin** virtaliitin
    - Sitten pistorasiaan
- Eth1-porttiin syttyy oranssi valo. **Odota**, että valo sammuu.
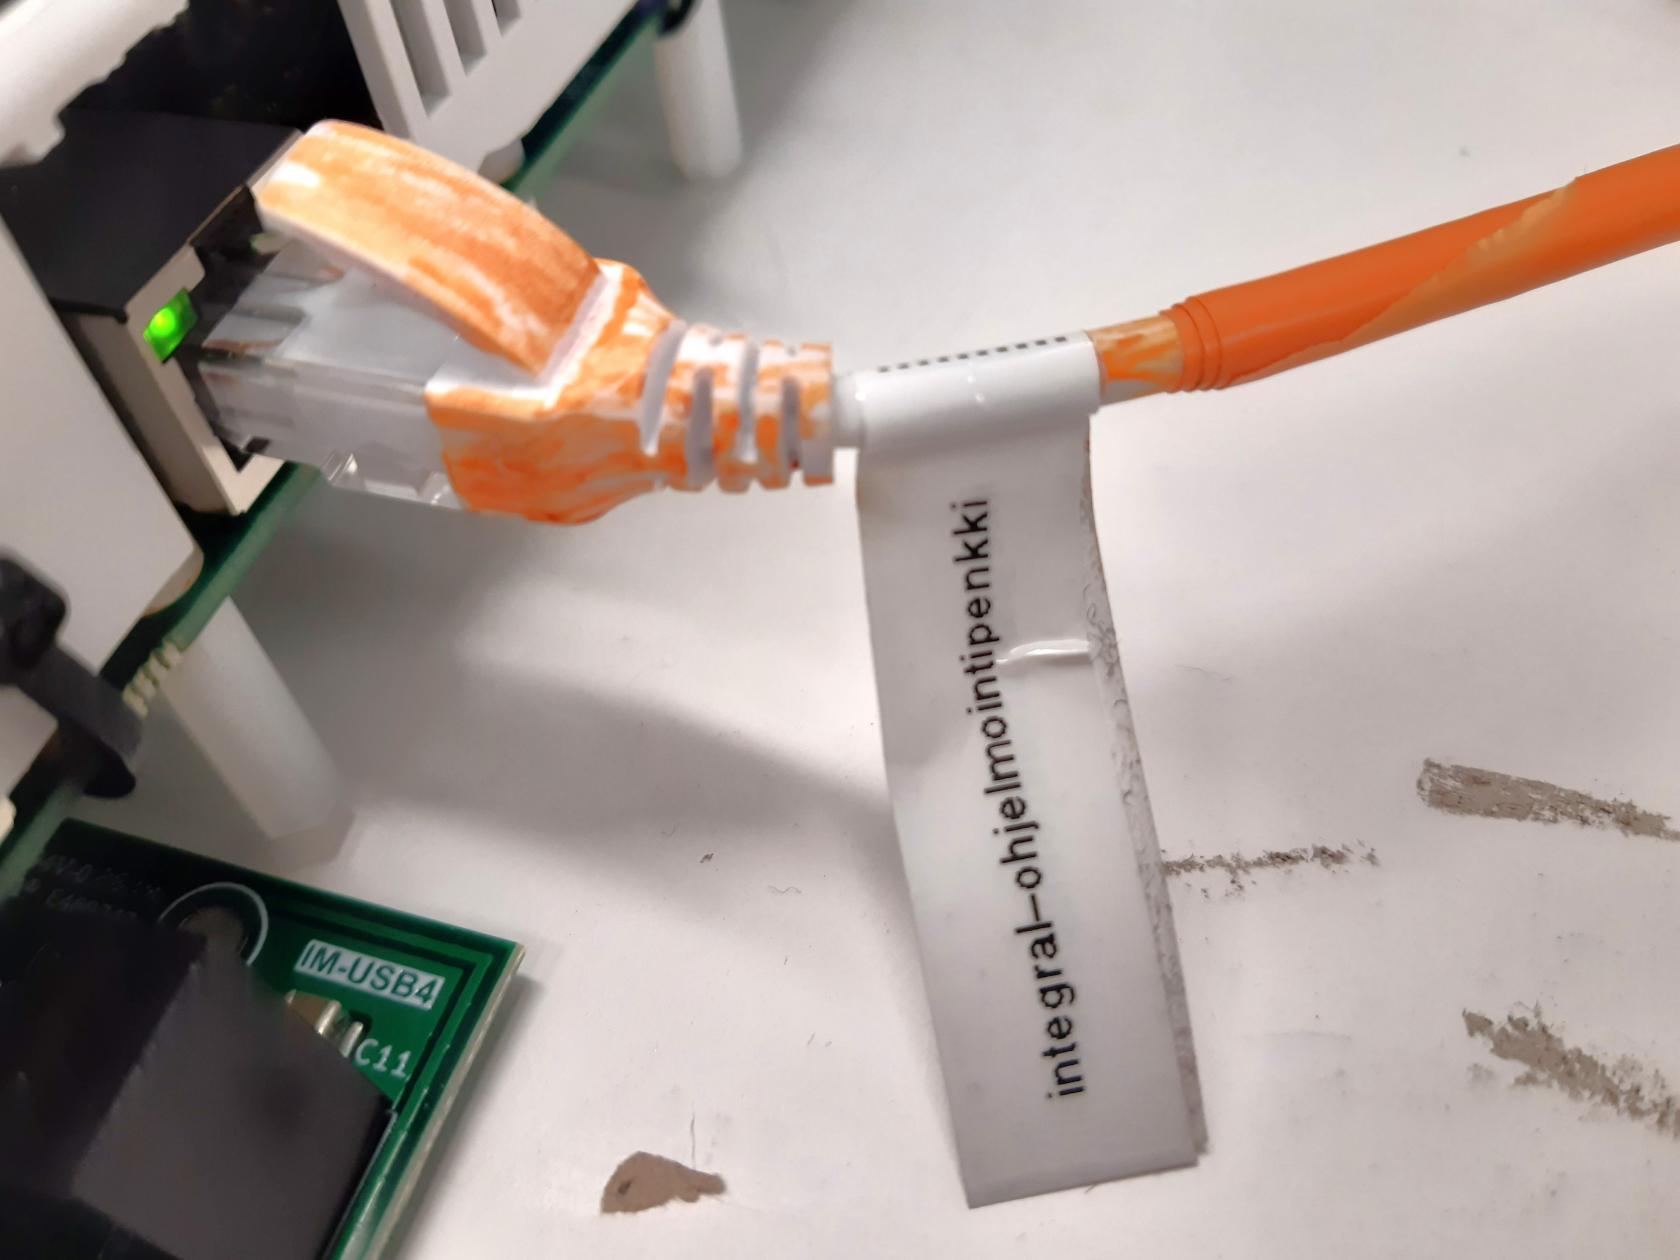
- Kytke ORANSSILLA MERKITTY Ethernet-kaapeli Linux-koneesta Eth1-porttiin

[![oranssi_piuha.jpg](https://wiki.bithouse.fi/uploads/images/gallery/2026-07/scaled-1680-/oranssi-piuha.jpg)](https://wiki.bithouse.fi/uploads/images/gallery/2026-07/oranssi-piuha.jpg)
##### 1.2.2 Selainikkunan avaaminen

- Linux-koneelta: 
    - [![Workbench-server-icon.png](https://wiki.bithouse.fi/uploads/images/gallery/2026-02/scaled-1680-/workbench-server-icon.png)](https://wiki.bithouse.fi/uploads/images/gallery/2026-02/workbench-server-icon.png) Käynnistä Integral Workbench Server (mustavihreä ikoni). Avautuu teksti-ikkuna.
    - [![Workbench-user-mode-icon.png](https://wiki.bithouse.fi/uploads/images/gallery/2026-02/scaled-1680-/workbench-user-mode-icon.png)](https://wiki.bithouse.fi/uploads/images/gallery/2026-02/workbench-user-mode-icon.png) Käynnistä Workbench user mode (turkoosi vasara). Avautuu selainikkuna.
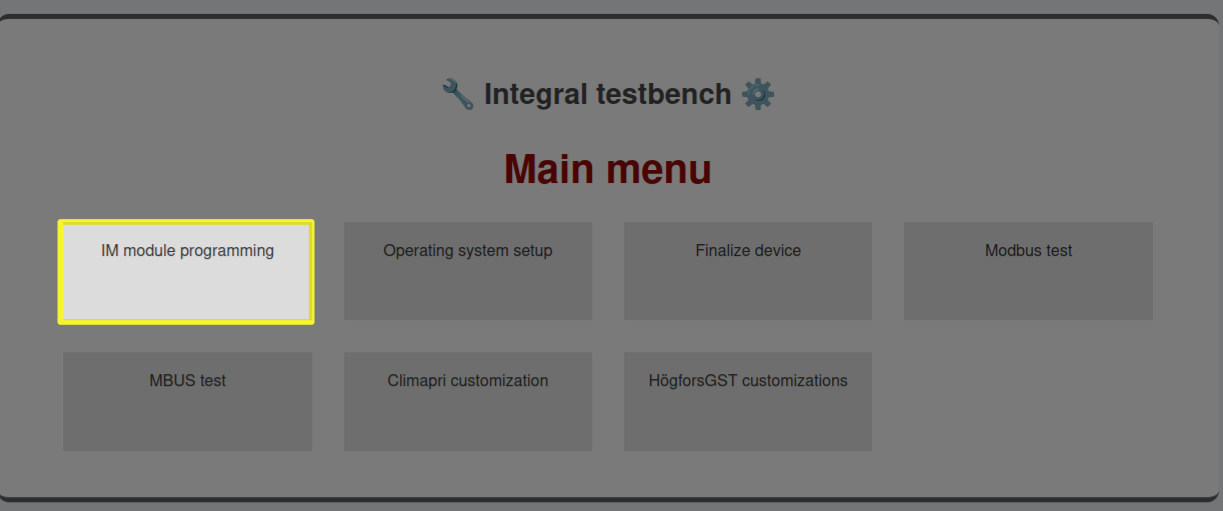
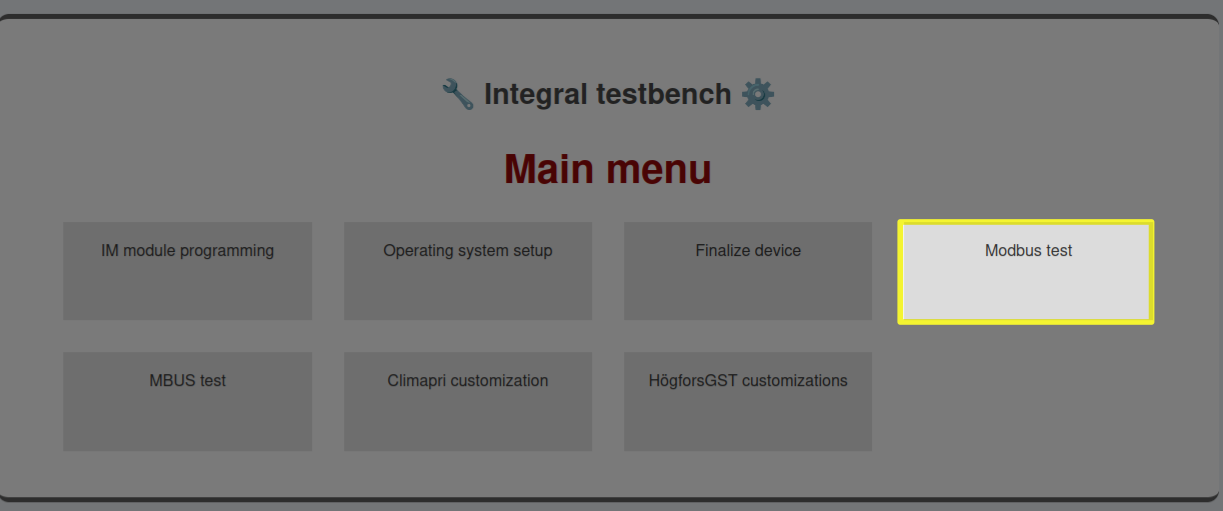
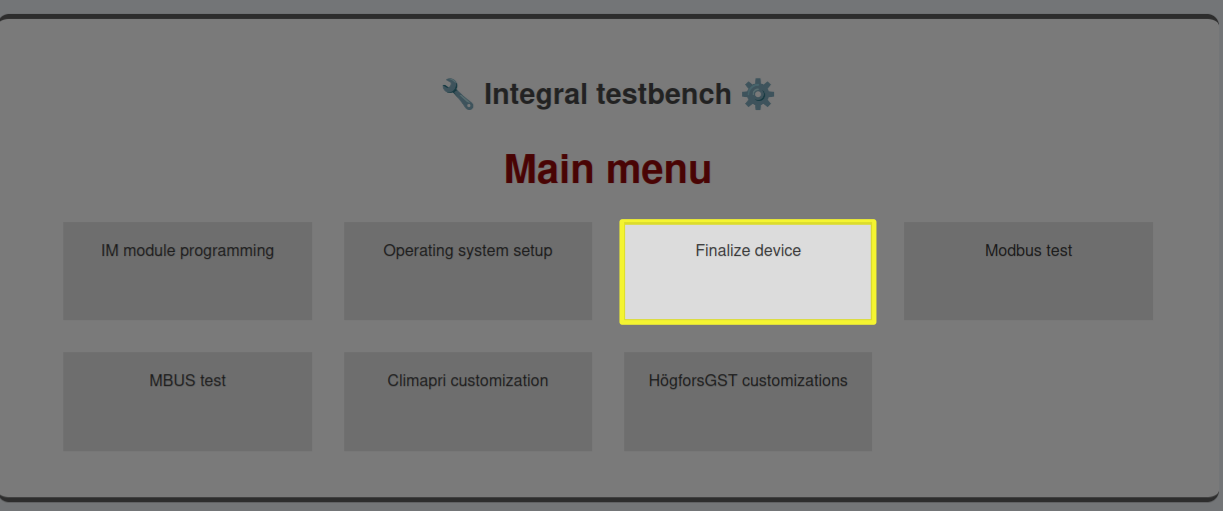
[![mainmenu.png](https://wiki.bithouse.fi/uploads/images/gallery/2026-04/scaled-1680-/mainmenu.png)](https://wiki.bithouse.fi/uploads/images/gallery/2026-04/mainmenu.png)
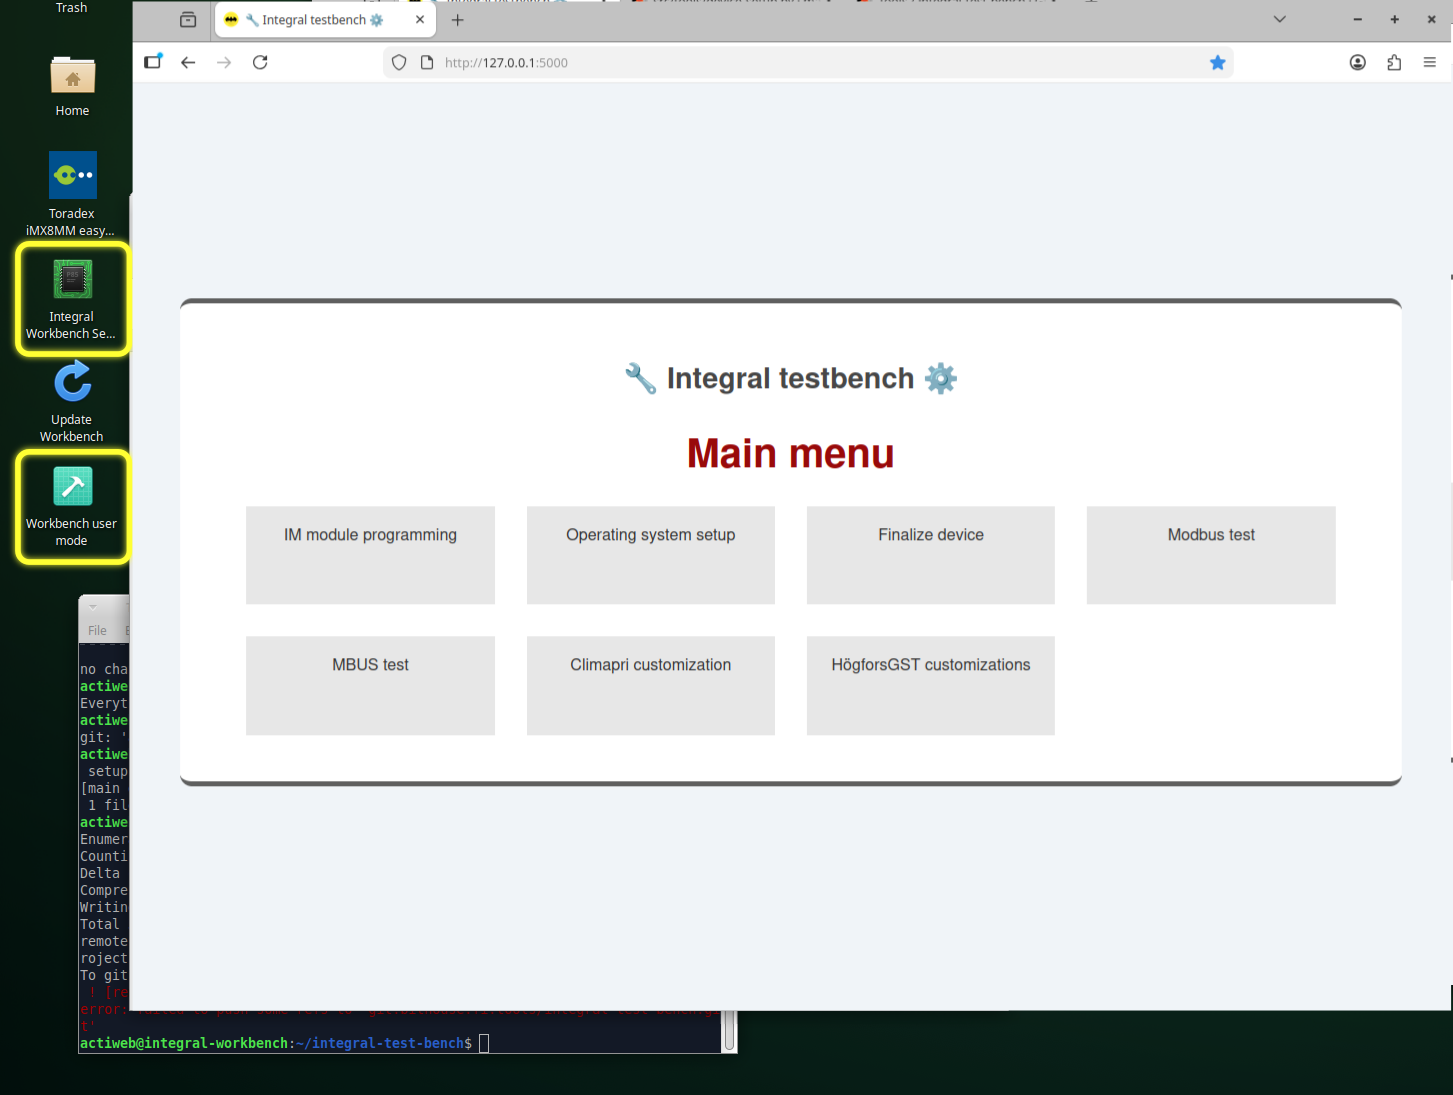
<p class="callout success">Olet nyt Integral testbenchin Main menussa, ja Ohjelmointi-Integral on kytketty koneeseen.</p>


### <span style="background-color: rgb(194, 224, 244);">2. Moduulien ohjelmointi</span>

[![mainmenu-moduleprogramming.png](https://wiki.bithouse.fi/uploads/images/gallery/2026-04/scaled-1680-/mainmenu-moduleprogramming.png)](https://wiki.bithouse.fi/uploads/images/gallery/2026-04/mainmenu-moduleprogramming.png)

- Klikkaa **Run**

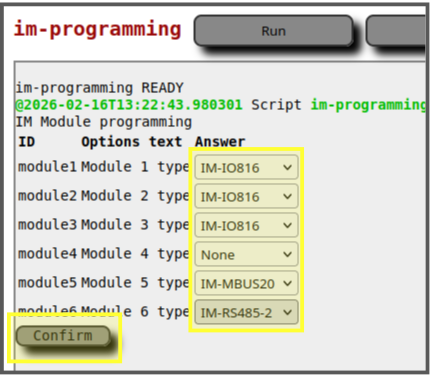
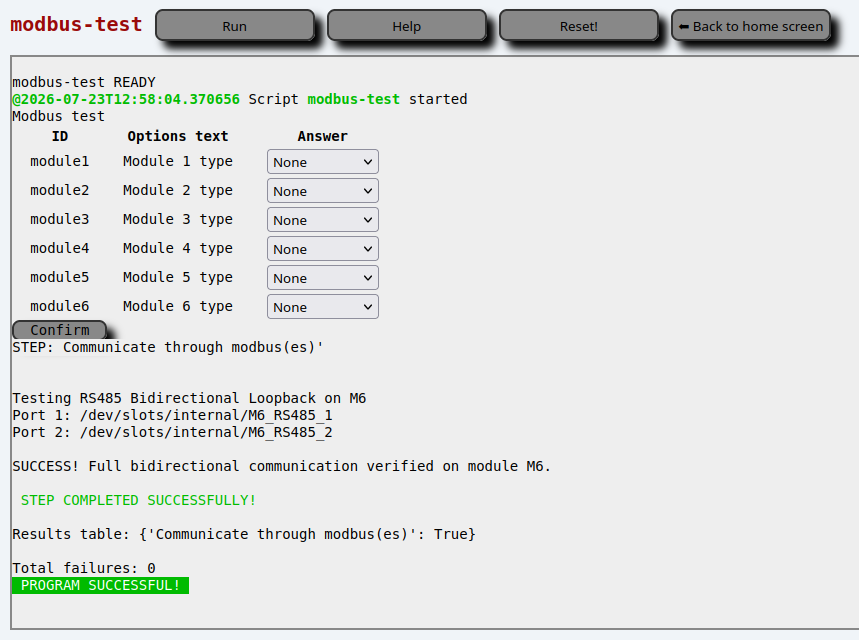
**[![module-programming-2.png](https://wiki.bithouse.fi/uploads/images/gallery/2026-02/scaled-1680-/module-programming-2.png)](https://wiki.bithouse.fi/uploads/images/gallery/2026-02/module-programming-2.png)**

- Valitse Integral-moduulit alasvetovalikosta kuhunkin moduulipaikkaan.

<p class="callout warning">Jos ohjelmoit eri moduulityyppejä, huomioi oikeat moduulipaikat!</p>

<p class="callout warning">**USB-C-4P-**moduulia ei ohjelmoida missään vaiheessa.</p>

[![module-programming-3 - rajattu.png](https://wiki.bithouse.fi/uploads/images/gallery/2026-03/scaled-1680-/module-programming-3-rajattu.png)](https://wiki.bithouse.fi/uploads/images/gallery/2026-03/module-programming-3-rajattu.png) [![moduulipaikat-simple.png](https://wiki.bithouse.fi/uploads/images/gallery/2026-03/scaled-1680-/moduulipaikat-simple.png)](https://wiki.bithouse.fi/uploads/images/gallery/2026-03/moduulipaikat-simple.png)
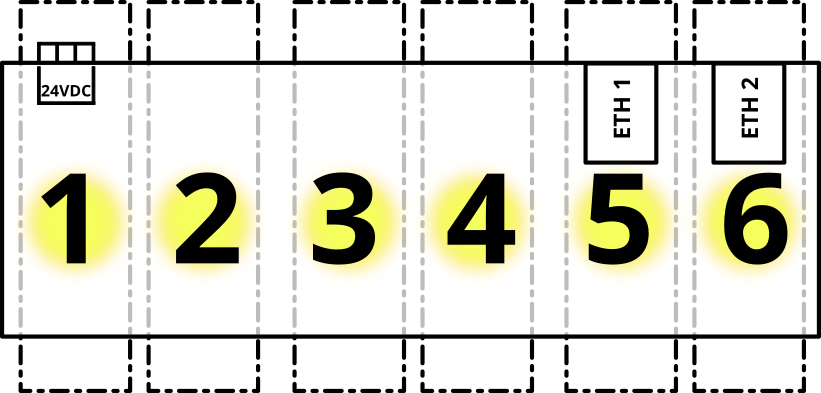
- Klikkaa **Confirm**
    - Ohjelma hakee Dropboxista uusimmat firmwaret ja asentaa ne vastaaviin moduuleihin.
    - Lisäksi ohjelma luo laitteelle sarjanumeron tai tarkistaa että laitteella on jo sarjanumero.

[![module-programming-4.png](https://wiki.bithouse.fi/uploads/images/gallery/2026-02/scaled-1680-/module-programming-4.png)](https://wiki.bithouse.fi/uploads/images/gallery/2026-02/module-programming-4.png)

- Klikkaa **Back to home screen**

### **[![module-programming-5.png](https://wiki.bithouse.fi/uploads/images/gallery/2026-02/scaled-1680-/module-programming-5.png)](https://wiki.bithouse.fi/uploads/images/gallery/2026-02/module-programming-5.png)**

##### <span style="background-color: rgb(194, 224, 244);">2.1 Moduulien uudelleenohjelmointi</span>

Jos joudut ohjelmoimaan moduulit uudestaan, paina im-programming -ikkunassa RESET, ja suorita samat vaiheet kuin ensimmäiselläkin kerralla.

# YLEISKATSAUS + työvaiheet järjestyksessä

[![YLEISKATSAUS KOKOAMISEEN tiivistetty.png](https://wiki.bithouse.fi/uploads/images/gallery/2026-07/scaled-1680-/yleiskatsaus-kokoamiseen-tiivistetty.png)](https://wiki.bithouse.fi/uploads/images/gallery/2026-07/yleiskatsaus-kokoamiseen-tiivistetty.png)

1. **Alkutoimet**
    - [Katsotaan tuotekoodin mukaan](https://wiki.bithouse.fi/books/integral-universaali-alakeskusprosessori/page/tarvittavat-osat-tuotekoodin-mukaan "Tarvittavat osat tuotekoodin mukaan"), että on kaikki tarvittavat osat hyllyssä käden ulottuvilla 
        - [Täydennetään tarvittaessa](https://wiki.bithouse.fi/books/integral-universaali-alakeskusprosessori/page/osien-varastopaikkoja-jos-puuttuu-kokoamispisteen-hyllysta) kokoamispisteen viereiseen hyllyyn
    - Katsotaan, tuleeko SIM-kortti (tilauslomakkeesta tai mistä?)
    - Tarvittaessa [näytön liimaus](https://wiki.bithouse.fi/books/integral-universaali-alakeskusprosessori/page/nayton-liimaus "Näytön liimaus")
        - Kuivumisaika 24 h
    - Varmistetaan [kotelon aukotus](https://wiki.bithouse.fi/books/integral-universaali-alakeskusprosessori/page/kotelon-aukot "Kotelon aukot")
        - SIM-kortin aukko pitää tehdä käsin, jos ei oo valmiina tehtyjä
2. **Ohjelmointi 1**
    - [CPU-SoM](https://wiki.bithouse.fi/books/integral-universaali-alakeskusprosessori/page/prosessorimoduulin-cpu-som-ohjelmointi "Prosessorimoduulin (CPU-SoM) ohjelmointi")
3. **Kokoaminen**   
    
    - [Vakio-osat](https://wiki.bithouse.fi/books/integral-universaali-alakeskusprosessori/page/kokoamisohje-vakio-osat "Kokoamisohje: vakio-osat")  
        
        - CPU-SoM
        - paristo
        - moduuli(t)
    - [Tarvittaessa](https://wiki.bithouse.fi/books/integral-universaali-alakeskusprosessori/page/kokoamisohje-tarvittaessa-asennettavat "Kokoamisohje: tarvittaessa asennettavat")
        - näyttö (lisäkortin kytkentä näyttöön)
        - SIM-kortti
        - modeemi+antenni
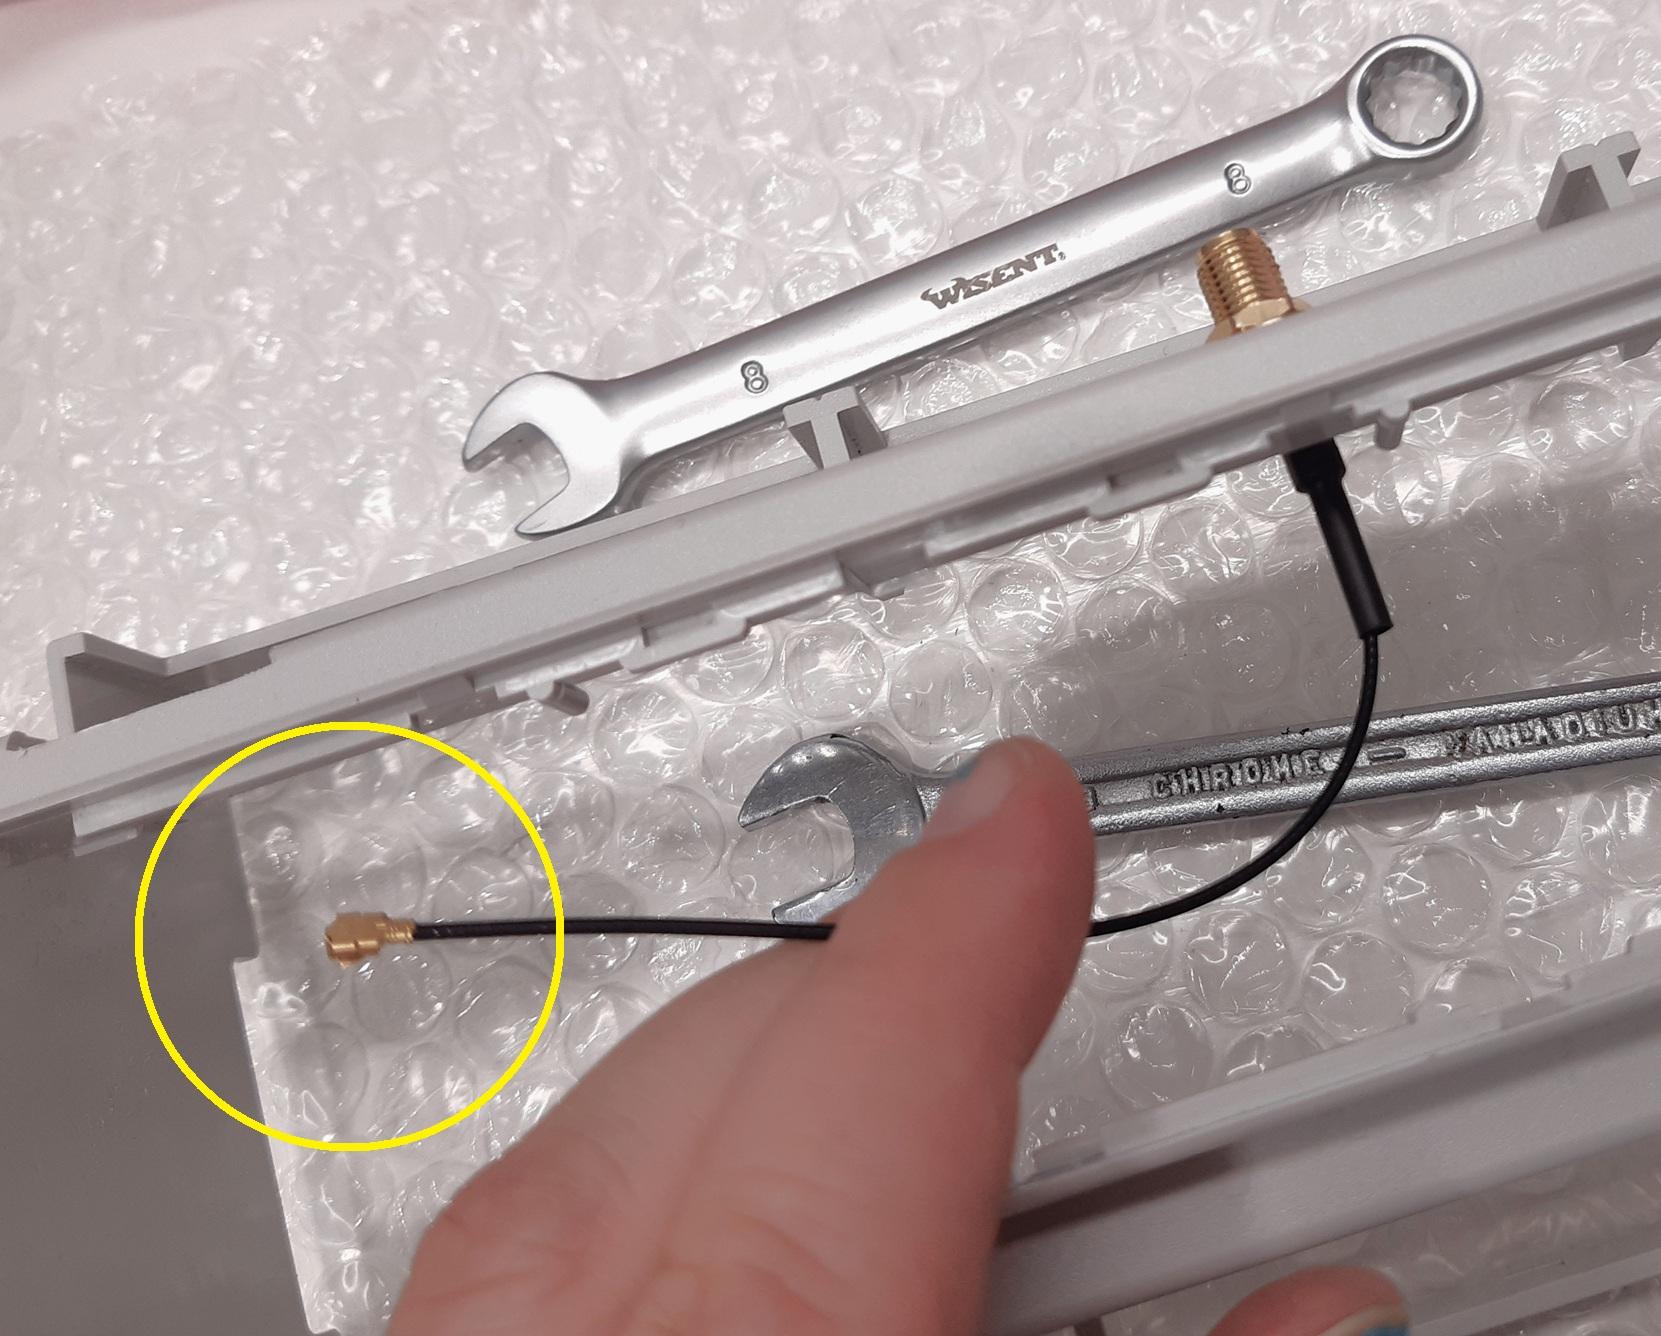
    - [Laite koteloon ja antennipiuha kiinni modeemiin](https://wiki.bithouse.fi/books/integral-universaali-alakeskusprosessori/page/kotelo-ja-kansinaytto#bkmrk-4.3-laite-koteloon%5B)
    - [Kansi tai näyttö kiinni](https://wiki.bithouse.fi/books/integral-universaali-alakeskusprosessori/page/kotelo-ja-kansinaytto#bkmrk-6.-n%C3%A4ytt%C3%B6-tai-kansi)
4. **Ohjelmointi 2**  
    
    - Moduulit: [ohjelmointi](https://wiki.bithouse.fi/books/integral-universaali-alakeskusprosessori/page/moduulien-ohjelmointi-device-setup-ja-moduulien-testaus#bkmrk-5.-set-up-1)
    - [Set-up](https://wiki.bithouse.fi/books/integral-universaali-alakeskusprosessori/page/moduulien-ohjelmointi-device-setup-ja-moduulien-testaus#bkmrk-5.4-device-setup-%5B%3D%5D)
    - Moduulit: [testaus](https://wiki.bithouse.fi/books/integral-universaali-alakeskusprosessori/page/moduulien-ohjelmointi-device-setup-ja-moduulien-testaus#bkmrk-3.-testaukset-%28niill)
    - [VPN](https://wiki.bithouse.fi/books/integral-universaali-alakeskusprosessori/page/vpn-ja-customization-asiakaskohtaiset-asennukset#bkmrk--90)
    - [Customize](https://wiki.bithouse.fi/books/integral-universaali-alakeskusprosessori/page/vpn-ja-customization-asiakaskohtaiset-asennukset#bkmrk-5.3-asiakaskohtaiset)
        - Högfors
        - ClimaPri
5. **Viimeistely**
    - [Finalize](https://wiki.bithouse.fi/books/integral-universaali-alakeskusprosessori/page/finalize-vasta-kun-on-varmaa-etta-kaikki-on-ok "FINALIZE VASTA KUN ON VARMAA ETTÄ KAIKKI ON OK") (VASTA KUN ON VARMA)
    - Production Databaseen tiedot 
        - tarvittaessa uuden laitemallin luominen
    - [Sarjanumerotarran tulostus](https://wiki.bithouse.fi/books/integral-universaali-alakeskusprosessori/page/production-database-liittimet-ja-tarrat#bkmrk-7.3-sarjanumerotarra)
    - [Liittimet ja tarrat](https://wiki.bithouse.fi/books/integral-universaali-alakeskusprosessori/page/production-database-liittimet-ja-tarrat#bkmrk-7.2-liittimet-%5B%3D%5D)
    - Kirjaus tuotanto-Exceliin
    - Laitetaan sinne minne valmiit laitetaan

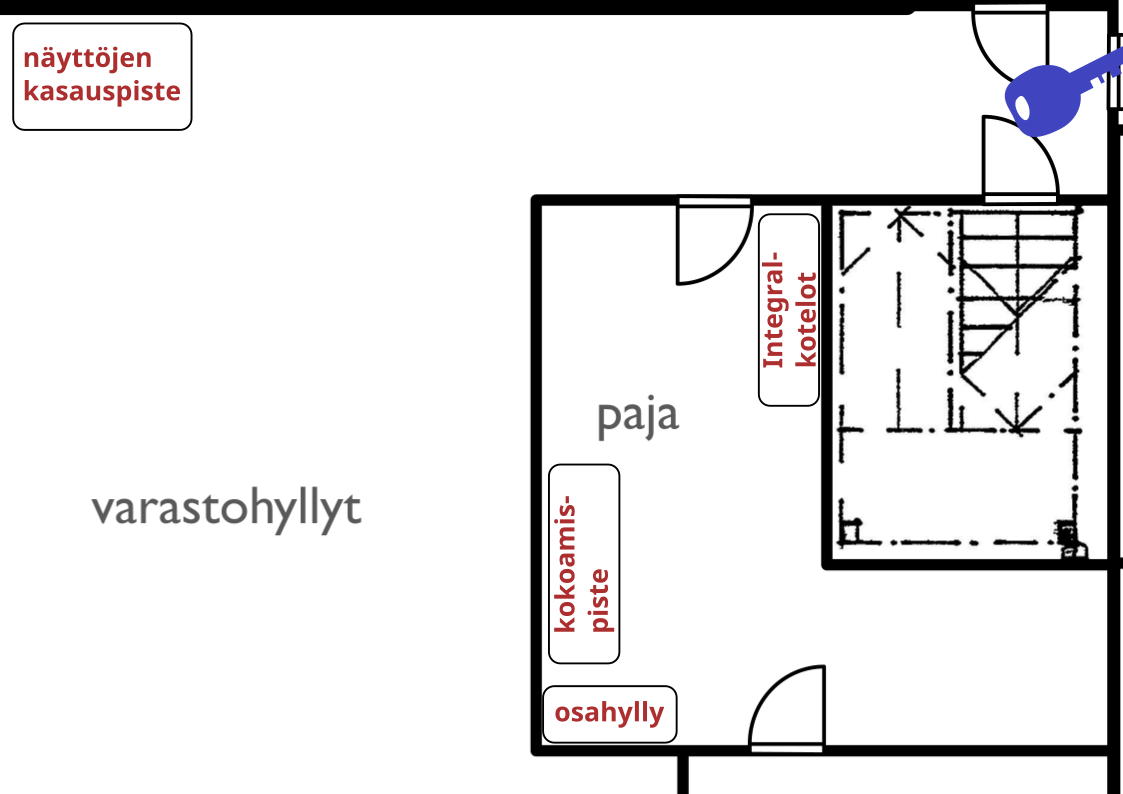
#### Sijainnit pajalla/hallissa

[![pohjapiirros_kokoamispisteet.png](https://wiki.bithouse.fi/uploads/images/gallery/2026-08/scaled-1680-/pohjapiirros-kokoamispisteet.png)](https://wiki.bithouse.fi/uploads/images/gallery/2026-08/pohjapiirros-kokoamispisteet.png)
# ALKUTOIMET

# Tilauksen tiedot; tuotekoodi, SIM-kortti jne.

Tuotanto-Excel kertoo, mitä Integraleja on tilattu. Tilauslomakkeesta näkee tarkemmat tiedot.

tähän kuva tilauslomakkeesta; missä näkyy tuotekoodi, asiakas, tuleeko SIM-kortti. jne.

Mikäli ei käytetä tilauslomaketta vaan muuta tapaa, niin se sitten tähän. Joka tapauksessa se, että mikä on se ensimmäinen asia, joka katsotaan, jonka perusteella tiedetään, mitä laitetta aletaan kokoamaan, ja mitä se sisältää.

# Tarvittavat osat tuotekoodin mukaan

**Tilauksen tuotekoodi** on muodossa:

**<span style="background-color: rgb(241, 196, 15);">INTEGRAL</span> <span style="background-color: rgb(242, 131, 119);">D</span><span style="background-color: rgb(45, 194, 107);">6</span><span style="background-color: rgb(251, 238, 184);">??</span> <span style="background-color: rgb(248, 202, 198);"><span style="text-decoration: underline; background-color: rgb(255, 255, 255);"><span style="background-color: rgb(236, 202, 250);">D</span><span style="background-color: rgb(191, 237, 210);">M</span></span></span><span style="background-color: rgb(255, 255, 255);"> - <span style="background-color: rgb(194, 224, 244);">X-X-X-X-X-X</span></span>**

jossa

1. **<span style="background-color: rgb(241, 196, 15);">Integral </span><span style="background-color: rgb(191, 237, 210);"><span style="background-color: rgb(242, 131, 119);">D</span><span style="background-color: rgb(45, 194, 107);">6 </span></span><span style="background-color: rgb(255, 255, 255);">= <span style="background-color: rgb(241, 196, 15);">tuotteen nimike,<span style="background-color: rgb(194, 224, 244);"><span style="background-color: rgb(242, 131, 119);"> DIN-koteloitu laite,</span><span style="background-color: rgb(45, 194, 107);"> kuudella moduulipaikalla</span></span></span></span>**
2. <span style="background-color: rgb(251, 238, 184);">**??** = prosessorin tunnus</span>
3. <span style="background-color: rgb(236, 202, 250);">**D** = tuleeko näyttö ( D=kyllä, tyhjä=ei )</span>
4. <span style="background-color: rgb(191, 237, 210);">**M** = tuleeko modeemi ( M=kyllä, tyhjä=ei )</span>
5. <span style="background-color: rgb(194, 224, 244);"> **X-X-X-X-X-X** = moduulipaikat järjestyksessä M1-M6</span>

#### 1. Yhteiset osat<span style="background-color: rgb(241, 196, 15);"> </span><span style="background-color: rgb(242, 131, 119);"> </span><span style="background-color: rgb(45, 194, 107);"> </span>


<table border="1" cellpadding="0" cellspacing="0" id="bkmrk-%C2%A0-koodi-nimi%C2%A0-m%C3%A4%C3%A4r%C3%A4--1" style="border-collapse: collapse; width: 711px; border-width: 1px; border-spacing: 0px; border-color: rgb(0, 0, 0); height: 360px;" width="885"><thead><tr style="height: 0.466675px;"><td class="xl71" height="40" style="height: 40.9333px; width: 122.533px; border-width: 1px; border-color: rgb(0, 0, 0);"> </td><td class="xl72" style="width: 126.2px; border-width: 1px; border-color: rgb(0, 0, 0); height: 40.9333px;">**Koodi**</td><td class="xl73" style="width: 273.2px; border-width: 1px; border-color: rgb(0, 0, 0); height: 40.9333px;">**Nimi** </td><td class="xl72" style="width: 62.2px; border-width: 1px; border-color: rgb(0, 0, 0); height: 40.9333px;">**Määrä**</td><td class="xl74" style="width: 192.2px; border-width: 1px; border-color: rgb(0, 0, 0); height: 40.9333px;">**Huom!**</td></tr></thead><tbody><tr style="height: 29.7167px;"><td class="xl69" height="20" style="height: 29.7167px; border-width: 1px; border-top: 1px rgb(0, 0, 0); border-color: rgb(0, 0, 0); width: 122.533px;">POHJA</td><td class="xl68" style="border-width: 1px; border-top-style: none; border-left: 1px rgb(0, 0, 0); border-color: rgb(0, 0, 0); height: 29.7167px; width: 126.2px;">P05120201F.BL</td><td class="xl68" style="border-width: 1px; border-top-style: none; border-left: 1px rgb(0, 0, 0); border-color: rgb(0, 0, 0); height: 29.7167px; width: 273.2px;">PANEL MODULBOX WITHOUT FRAME</td><td class="xl68" style="border-width: 1px; border-top-style: none; border-left: 1px rgb(0, 0, 0); border-color: rgb(0, 0, 0); height: 29.7167px; width: 62.2px;">1</td><td class="xl75" style="border-width: 1px; border-top-style: none; border-left: 1px rgb(0, 0, 0); width: 192.2px; border-color: rgb(0, 0, 0); height: 29.7167px;">mustat "klipsut" myös</td></tr><tr style="height: 29.7167px;"><td class="xl69" height="20" style="height: 29.7167px; border-width: 1px; border-top: 1px rgb(0, 0, 0); border-color: rgb(0, 0, 0); width: 122.533px;">KOTELO</td><td class="xl68" style="border-width: 1px; border-top-style: none; border-left: 1px rgb(0, 0, 0); border-color: rgb(0, 0, 0); height: 29.7167px; width: 126.2px;">25.1202000.BL</td><td class="xl68" style="border-width: 1px; border-top-style: none; border-left: 1px rgb(0, 0, 0); border-color: rgb(0, 0, 0); height: 29.7167px; width: 273.2px;"><span lang="EN-US">Modulbox XTS WITH VENTS 12MH53V-A</span></td><td class="xl68" style="border-width: 1px; border-top-style: none; border-left: 1px rgb(0, 0, 0); border-color: rgb(0, 0, 0); height: 29.7167px; width: 62.2px;">1</td><td class="xl75" style="border-width: 1px; border-top-style: none; border-left: 1px rgb(0, 0, 0); width: 192.2px; border-color: rgb(0, 0, 0); height: 29.7167px;"> </td></tr><tr style="height: 29.7167px;"><td class="xl69" height="20" style="height: 29.7167px; border-width: 1px; border-top: 1px rgb(0, 0, 0); border-color: rgb(0, 0, 0); width: 122.533px;">PÄÄKORTTI</td><td class="xl68" style="border-width: 1px; border-top-style: none; border-left: 1px rgb(0, 0, 0); border-color: rgb(0, 0, 0); height: 29.7167px; width: 126.2px;">Tora\_Web\_CPU</td><td class="xl68" style="border-width: 1px; border-top-style: none; border-left: 1px rgb(0, 0, 0); border-color: rgb(0, 0, 0); height: 29.7167px; width: 273.2px;">Tora\_Web\_CPU</td><td class="xl68" style="border-width: 1px; border-top-style: none; border-left: 1px rgb(0, 0, 0); border-color: rgb(0, 0, 0); height: 29.7167px; width: 62.2px;">1</td><td class="xl75" style="border-width: 1px; border-top-style: none; border-left: 1px rgb(0, 0, 0); width: 192.2px; border-color: rgb(0, 0, 0); height: 29.7167px;">tarkista kortin versio CPU-SoM-ohjelmointia varten</td></tr><tr style="height: 29.7167px;"><td class="xl69" height="20" style="height: 29.7167px; border-width: 1px; border-top: 1px rgb(0, 0, 0); border-color: rgb(0, 0, 0); width: 122.533px;">MODUULIKEHYS</td><td class="xl68" style="border-width: 1px; border-top-style: none; border-left: 1px rgb(0, 0, 0); border-color: rgb(0, 0, 0); height: 29.7167px; width: 126.2px;"><span style="background-color: rgb(206, 212, 217);">&lt;tulossa&gt;</span></td><td class="xl68" style="border-width: 1px; border-top-style: none; border-left: 1px rgb(0, 0, 0); border-color: rgb(0, 0, 0); height: 29.7167px; width: 273.2px;"> </td><td class="xl68" style="border-width: 1px; border-top-style: none; border-left: 1px rgb(0, 0, 0); border-color: rgb(0, 0, 0); height: 29.7167px; width: 62.2px;"> </td><td class="xl75" style="border-width: 1px; border-top-style: none; border-left: 1px rgb(0, 0, 0); width: 192.2px; border-color: rgb(0, 0, 0); height: 29.7167px;"> </td></tr><tr><td style="border-width: 1px; border-top: 1px rgb(0, 0, 0); border-color: rgb(0, 0, 0); width: 122.533px;">RUUVI</td><td style="border-width: 1px; border-top-style: none; border-left: 1px rgb(0, 0, 0); border-color: rgb(0, 0, 0); width: 126.2px;"><span style="background-color: rgb(206, 212, 217);">  
</span></td><td style="border-width: 1px; border-top-style: none; border-left: 1px rgb(0, 0, 0); border-color: rgb(0, 0, 0); width: 273.2px;">Ruuvit</td><td style="border-width: 1px; border-top-style: none; border-left: 1px rgb(0, 0, 0); border-color: rgb(0, 0, 0); width: 62.2px;">6</td><td style="border-width: 1px; border-top-style: none; border-left: 1px rgb(0, 0, 0); width: 192.2px; border-color: rgb(0, 0, 0);">kehyksen kiinnitys pääkorttiin</td></tr><tr style="height: 29.7167px;"><td class="xl69" height="20" style="height: 29.7167px; border-width: 1px; border-top: 1px rgb(0, 0, 0); border-color: rgb(0, 0, 0); width: 122.533px;">PARISTO</td><td class="xl75" style="border-width: 1px; border-top-style: none; border-left: 1px rgb(0, 0, 0); width: 126.2px; border-color: rgb(0, 0, 0); height: 29.7167px;"><span lang="EN-US">tähän oikee koodi</span></td><td class="xl75" style="border-width: 1px; border-top-style: none; border-left: 1px rgb(0, 0, 0); width: 273.2px; border-color: rgb(0, 0, 0); height: 29.7167px;"><span lang="EN-US">Nappiparisto</span></td><td class="xl75" style="border-width: 1px; border-top-style: none; border-left: 1px rgb(0, 0, 0); width: 62.2px; border-color: rgb(0, 0, 0); height: 29.7167px;">1</td><td class="xl75" style="border-width: 1px; border-top-style: none; border-left: 1px rgb(0, 0, 0); width: 192.2px; border-color: rgb(0, 0, 0); height: 29.7167px;"> </td></tr><tr style="height: 29.7167px;"><td class="xl69" height="20" style="height: 29.7167px; border-width: 1px; border-top: 1px rgb(0, 0, 0); border-color: rgb(0, 0, 0); width: 122.533px;">LIITIN</td><td class="xl68" style="border-width: 1px; border-top-style: none; border-left: 1px rgb(0, 0, 0); border-color: rgb(0, 0, 0); height: 29.7167px; width: 126.2px;">1757022</td><td class="xl68" style="border-width: 1px; border-top-style: none; border-left: 1px rgb(0, 0, 0); border-color: rgb(0, 0, 0); height: 29.7167px; width: 273.2px;">MSTB2,5/3-ST-5,08<span style="mso-spacerun: yes;"> </span>terminal block</td><td class="xl68" style="border-width: 1px; border-top-style: none; border-left: 1px rgb(0, 0, 0); border-color: rgb(0, 0, 0); height: 29.7167px; width: 62.2px;">1</td><td class="xl75" style="border-width: 1px; border-top-style: none; border-left: 1px rgb(0, 0, 0); width: 192.2px; border-color: rgb(0, 0, 0); height: 29.7167px;">virtaliitin</td></tr><tr style="height: 29.7167px;"><td class="xl69" height="20" style="height: 29.7167px; border-width: 1px; border-top: 1px rgb(0, 0, 0); border-color: rgb(0, 0, 0); width: 122.533px;">TARRA</td><td class="xl75" style="border-width: 1px; border-top-style: none; border-left: 1px rgb(0, 0, 0); width: 126.2px; border-color: rgb(0, 0, 0); height: 29.7167px;"> </td><td class="xl75" style="border-width: 1px; border-top-style: none; border-left: 1px rgb(0, 0, 0); width: 273.2px; border-color: rgb(0, 0, 0); height: 29.7167px;"><span lang="EN-US">Moduulitarra \[M1...M6\]</span></td><td class="xl75" style="border-width: 1px; border-top-style: none; border-left: 1px rgb(0, 0, 0); width: 62.2px; border-color: rgb(0, 0, 0); height: 29.7167px;">2</td><td class="xl76" style="border-width: 1px; border-top-style: none; border-left: 1px rgb(0, 0, 0); width: 192.2px; border-color: rgb(0, 0, 0); height: 29.7167px;">  
</td></tr></tbody></table>

[![PIENkeräily_yhteiset_osat3.jpg](https://wiki.bithouse.fi/uploads/images/gallery/2026-07/scaled-1680-/pienkeraily-yhteiset-osat3.jpg)](https://wiki.bithouse.fi/uploads/images/gallery/2026-07/pienkeraily-yhteiset-osat3.jpg)

<p class="callout info">Jos moduulikehykset ovat loppu, moduulit kiinnitetään ruuveilla ja kiertetyillä väliholkeilla.</p>

<table border="1" cellpadding="0" cellspacing="0" id="bkmrk-ruuvi-2099314-ruuvi%3B" style="border-collapse: collapse; width: 711px; border-width: 1px; border-spacing: 0px; border-color: rgb(0, 0, 0); height: 360px;" width="885"><thead></thead><tbody><tr style="height: 29.7167px;"><td class="xl69" height="20" style="height: 29.7167px; border-width: 1px; border-top: 1px rgb(0, 0, 0); border-color: rgb(0, 0, 0); width: 94.5333px;">RUUVI</td><td class="xl68" style="border-width: 1px; border-top-style: none; border-left: 1px rgb(0, 0, 0); border-color: rgb(0, 0, 0); height: 29.7167px; width: 111.2px;">2099314</td><td class="xl68" style="border-width: 1px; border-top-style: none; border-left: 1px rgb(0, 0, 0); border-color: rgb(0, 0, 0); height: 29.7167px; width: 316.2px;">Ruuvi; M3x6; 0,5; Pää: kartio; Pozidriv; PZ1; teräs; sinkki; DIN 966A</td><td class="xl68" style="border-width: 1px; border-top-style: none; border-left: 1px rgb(0, 0, 0); border-color: rgb(0, 0, 0); height: 29.7167px; width: 71.2px;">12</td><td class="xl76" style="border-width: 1px; border-top-style: none; border-left: 1px rgb(0, 0, 0); width: 183.2px; border-color: rgb(0, 0, 0); height: 29.7167px;">moduulien kiinnitykseen</td></tr><tr style="height: 29.7167px;"><td class="xl69" height="20" style="height: 29.7167px; border-width: 1px; border-top: 1px rgb(0, 0, 0); border-color: rgb(0, 0, 0); width: 94.5333px;">HOLKKI LYHYT</td><td class="xl68" style="border-width: 1px; border-top-style: none; border-left: 1px rgb(0, 0, 0); border-color: rgb(0, 0, 0); height: 29.7167px; width: 111.2px;">TP-8</td><td class="xl68" style="border-width: 1px; border-top-style: none; border-left: 1px rgb(0, 0, 0); border-color: rgb(0, 0, 0); height: 29.7167px; width: 316.2px;">Kierteitetty väliholkki; kuusikulmainen; polyamidi; M3; M3; 8mm</td><td class="xl68" style="border-width: 1px; border-top-style: none; border-left: 1px rgb(0, 0, 0); border-color: rgb(0, 0, 0); height: 29.7167px; width: 71.2px;">12</td><td class="xl75" style="border-width: 1px; border-top-style: none; border-left: 1px rgb(0, 0, 0); width: 183.2px; border-color: rgb(0, 0, 0); height: 29.7167px;">moduulien kiinnitykseen</td></tr><tr style="height: 29.7167px;"><td class="xl69" height="20" style="height: 29.7167px; border-width: 1px; border-top: 1px rgb(0, 0, 0); border-color: rgb(0, 0, 0); width: 94.5333px;">HOLKKI PITKÄ</td><td class="xl68" style="border-width: 1px; border-top-style: none; border-left: 1px rgb(0, 0, 0); border-color: rgb(0, 0, 0); height: 29.7167px; width: 111.2px;">TP-19</td><td class="xl68" style="border-width: 1px; border-top-style: none; border-left: 1px rgb(0, 0, 0); border-color: rgb(0, 0, 0); height: 29.7167px; width: 316.2px;">Kierteitetty väliholkki; kuusikulmainen; polyamidi; M3; M3; 19mm</td><td class="xl68" style="border-width: 1px; border-top-style: none; border-left: 1px rgb(0, 0, 0); border-color: rgb(0, 0, 0); height: 29.7167px; width: 71.2px;">12</td><td class="xl75" style="border-width: 1px; border-top-style: none; border-left: 1px rgb(0, 0, 0); width: 183.2px; border-color: rgb(0, 0, 0); height: 29.7167px;">moduulien kiinnitykseen</td></tr></tbody></table>

#### <span style="background-color: rgb(251, 238, 184);">2.</span> (D6)<span style="background-color: rgb(251, 238, 184);">??</span>... = <span style="background-color: rgb(251, 238, 184);">CPU-SoM</span>

<p class="callout info">SoMit ovat etukäteen ohjelmoituja, ja niiden pakkauksessa pitäisi lukea sekä ohjelmointipäivämäärä että ohjelmaversio. Jos näitä tietoja ei ole merkitty, SoMit tulisi ohjelmoida [**ohjeen**](https://wiki.bithouse.fi/books/integral-universaali-alakeskusprosessori/page/prosessorimoduulin-cpu-som-ohjelmointi) mukaisesti.</p>


<table border="1" cellpadding="0" cellspacing="0" id="bkmrk-integral-tuotekoodi--1" style="border-collapse: collapse; width: 702px; border-width: 1px; border-spacing: 0px; border-color: rgb(0, 0, 0); height: 185px;" width="846"><thead><tr style="height: 0.5px;"><td class="xl66 align-left" height="40" style="height: 47.6px; width: 102.867px; border-width: 1px; border-color: rgb(0, 0, 0);" width="118">**INTEGRAL Tuotekoodi**</td><td class="xl67 align-left" style="width: 72.2px; border-width: 1px; border-color: rgb(0, 0, 0); height: 47.6px;" width="88">**Koodi**</td><td class="xl66 align-left" style="width: 219.2px; border-width: 1px; border-color: rgb(0, 0, 0); height: 47.6px;" width="512">**Nimi**</td><td class="xl66 align-left" style="width: 71.2px; border-width: 1px; border-color: rgb(0, 0, 0); height: 47.6px;" width="64">**Määrä**</td><td class="xl66 align-left" style="width: 302.2px; border-width: 1px; border-color: rgb(0, 0, 0); height: 47.6px;" width="64">**Huom!**</td></tr></thead><tbody><tr style="height: 29.8px;"><td class="xl70 align-left" height="20" style="height: 29.8px; border-width: 1px; border-top: 1px rgb(0, 0, 0); width: 102.867px; border-color: rgb(0, 0, 0);" width="118"><span style="background-color: rgb(251, 238, 184);">D6**<span class="font5">30</span>**</span></td><td class="xl70 align-left" style="border-width: 1px; border-top-style: none; border-left: 1px rgb(0, 0, 0); width: 72.2px; border-color: rgb(0, 0, 0); height: 29.8px;" width="88"> </td><td class="xl71 align-left" style="border-width: 1px; border-top-style: none; border-left: 1px rgb(0, 0, 0); width: 219.2px; border-color: rgb(0, 0, 0); height: 29.8px;" width="512"><span lang="EN-US">Verdin AM62 Dual 1GB ET</span></td><td class="xl72 align-left" style="border-width: 1px; border-top-style: none; border-left: 1px rgb(0, 0, 0); width: 71.2px; border-color: rgb(0, 0, 0); height: 29.8px;" width="64">1</td><td class="xl70 align-left" style="border-width: 1px; border-top-style: none; border-left: 1px rgb(0, 0, 0); width: 302.2px; border-color: rgb(0, 0, 0); height: 29.8px;" width="64"> </td></tr><tr style="height: 29.8px;"><td class="xl70 align-left" height="20" style="height: 29.8px; border-width: 1px; border-top: 1px rgb(0, 0, 0); width: 102.867px; border-color: rgb(0, 0, 0);" width="118"><span style="background-color: rgb(251, 238, 184);">D6**<span class="font5">50</span>**</span></td><td class="xl70 align-left" style="border-width: 1px; border-top-style: none; border-left: 1px rgb(0, 0, 0); width: 72.2px; border-color: rgb(0, 0, 0); height: 29.8px;" width="88">  
</td><td class="xl71 align-left" style="border-width: 1px; border-top-style: none; border-left: 1px rgb(0, 0, 0); width: 219.2px; border-color: rgb(0, 0, 0); height: 29.8px;" width="512"><span lang="EN-US">Verdin AM62 Quad 2GB WB IT</span></td><td class="xl72 align-left" style="border-width: 1px; border-top-style: none; border-left: 1px rgb(0, 0, 0); width: 71.2px; border-color: rgb(0, 0, 0); height: 29.8px;" width="64">1</td><td class="xl70 align-left" style="border-width: 1px; border-top-style: none; border-left: 1px rgb(0, 0, 0); width: 302.2px; border-color: rgb(0, 0, 0); height: 29.8px;" width="64">tuotekoodi seuraa ominaisuuksia, ei tiettyä laitetta; sama määrä datapisteitä, sama tuotekoodi.</td></tr><tr style="height: 29.8px;"><td style="border-width: 1px; border-top: 1px rgb(0, 0, 0); width: 102.867px; border-color: rgb(0, 0, 0); height: 29.8px;"><span style="background-color: rgb(251, 238, 184);">D6**5<span class="font5">0</span>**</span></td><td style="border-width: 1px; border-top-style: none; border-left: 1px rgb(0, 0, 0); width: 72.2px; border-color: rgb(0, 0, 0); height: 29.8px;">  
</td><td style="border-width: 1px; border-top-style: none; border-left: 1px rgb(0, 0, 0); width: 219.2px; border-color: rgb(0, 0, 0); height: 29.8px;"><span lang="EN-US">Verdin iMX8MM Q 2GB IT</span></td><td style="border-width: 1px; border-top-style: none; border-left: 1px rgb(0, 0, 0); width: 71.2px; border-color: rgb(0, 0, 0); height: 29.8px;">1</td><td style="border-width: 1px; border-top-style: none; border-left: 1px rgb(0, 0, 0); width: 302.2px; border-color: rgb(0, 0, 0); height: 29.8px;">Vain näitä hyllyssä tällä hetkellä</td></tr><tr style="height: 29.8px;"><td class="xl70 align-left" height="20" style="height: 29.8px; border-width: 1px; border-top: 1px rgb(0, 0, 0); width: 102.867px; border-color: rgb(0, 0, 0);" width="118"><span style="background-color: rgb(251, 238, 184);">D6**<span class="font5">70</span>**</span></td><td class="xl70 align-left" style="border-width: 1px; border-top-style: none; border-left: 1px rgb(0, 0, 0); width: 72.2px; border-color: rgb(0, 0, 0); height: 29.8px;" width="88"> </td><td class="xl71 align-left" style="border-width: 1px; border-top-style: none; border-left: 1px rgb(0, 0, 0); width: 219.2px; border-color: rgb(0, 0, 0); height: 29.8px;" width="512"><span lang="EN-US">Verdin iMX8M Plus Quad 8GB WB IT</span></td><td class="xl72 align-left" style="border-width: 1px; border-top-style: none; border-left: 1px rgb(0, 0, 0); width: 71.2px; border-color: rgb(0, 0, 0); height: 29.8px;" width="64">1</td><td class="xl70 align-left" style="border-width: 1px; border-top-style: none; border-left: 1px rgb(0, 0, 0); width: 302.2px; border-color: rgb(0, 0, 0); height: 29.8px;" width="64">  
</td></tr></tbody></table>

#### <span style="background-color: rgb(236, 202, 250);">3.</span> (D6??) <span style="background-color: rgb(236, 202, 250);">D</span> = <span style="background-color: rgb(236, 202, 250);">näyttö</span>


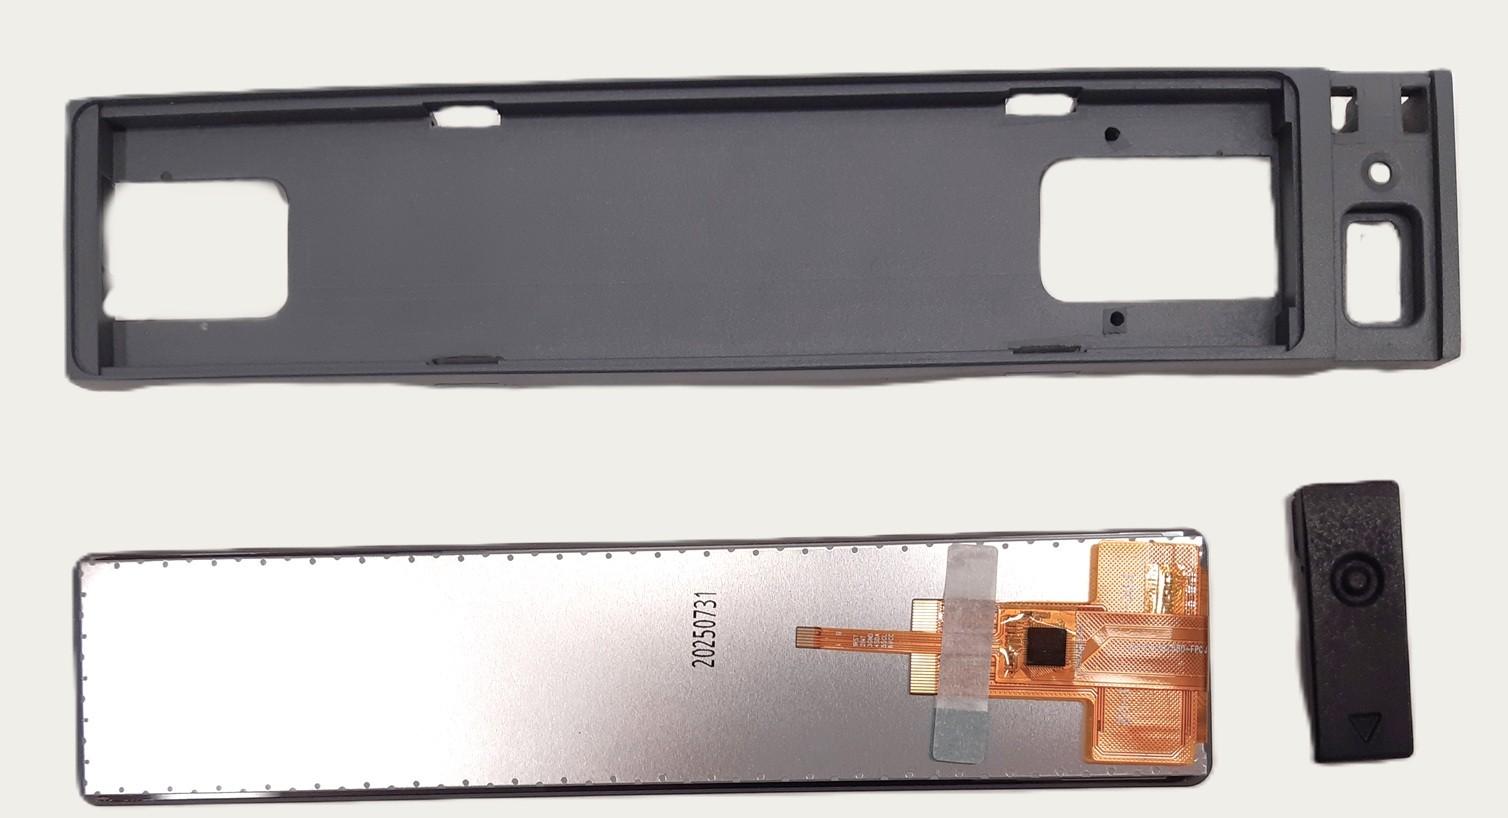
<table border="1" cellpadding="0" cellspacing="0" id="bkmrk-integral-tuotekoodi--3" style="border-collapse: collapse; width: 789px; border-width: 1px; border-spacing: 0px; border-color: rgb(0, 0, 0); height: 321px;" width="846"><tbody><tr style="height: 10px;"><td class="xl67" height="40" style="height: 56.5167px; width: 105.867px; border-width: 1px; border-color: rgb(0, 0, 0);" width="87">**INTEGRAL tuotekoodi**</td><td class="xl68" style="width: 134.2px; border-width: 1px; border-color: rgb(0, 0, 0); height: 56.5167px;" width="112">**Koodi**</td><td class="xl69" style="width: 288.867px; border-width: 1px; border-color: rgb(0, 0, 0); height: 56.5167px;" width="527">**Nimi**</td><td class="xl69" style="width: 65.2px; border-width: 1px; border-color: rgb(0, 0, 0); height: 56.5167px;" width="56">**Määrä**</td><td class="xl69" style="width: 194.2px; border-width: 1px; border-color: rgb(0, 0, 0); height: 56.5167px;" width="64">**Huom!**</td></tr><tr style="height: 49.3167px;"><td class="xl71" height="20" style="height: 49.3167px; border-width: 1px; border-top: 1px rgb(0, 0, 0); border-color: rgb(0, 0, 0); width: 105.867px;"><span style="background-color: rgb(236, 202, 250);">**D**</span></td><td class="xl70" style="border-width: 1px; border-top-style: none; border-left: 1px rgb(0, 0, 0); border-color: rgb(0, 0, 0); height: 49.3167px; width: 134.2px;">TTH071TVT-01C3</td><td class="xl72" style="border-width: 1px; border-color: rgb(0, 0, 0); height: 49.3167px; width: 288.867px;"><div style="box-sizing: border-box; display: flex; align-items: center; gap: 4px;">  
</div><div style="box-sizing: border-box;"><div dir="ltr" style="box-sizing: border-box; flex: 0 0 auto;"><div style="box-sizing: border-box; flex: 0 0 auto; inset: -9px -8px -8px -9px;"><div style="box-sizing: border-box; flex: 0 0 auto;"><div style="box-sizing: border-box; left: 0px; position: absolute; top: 0px;">  
</div></div><div style="box-sizing: border-box; flex: 0 0 auto;"><div style="box-sizing: border-box; position: absolute;">  
</div></div></div></div></div><div role="listitem" style="box-sizing: border-box; font-variant-ligatures: normal; font-variant-caps: normal; orphans: 2; text-align: start; widows: 2; -webkit-text-stroke-width: 0px; text-decoration-thickness: initial; text-decoration-style: initial; text-decoration-color: initial;"><div style="box-sizing: border-box;"><div aria-label="At 1:26 PM Monday, September 1, maisa wrote, 7.1-inch Touch Display, 280x1424, MIPI,
with custom cover glass by optical bonding" data-testid="postView" style="box-sizing: border-box; max-width: 100%; transition: height 200ms, background-color 200ms; overflow-wrap: break-word;" tabindex="0"><div data-testid="postContent" role="application" style="box-sizing: border-box; display: table;"><div style="box-sizing: border-box; display: table-cell;"><div style="box-sizing: border-box; display: flex; align-items: center;"><div data-testid="post-menu-749bqfxze3bkxc6ny7c9sxjauh" style="box-sizing: border-box; max-width: 100%; flex-basis: 0px; flex-grow: 1; display: flex; justify-content: flex-end; border: rgba(0, 0, 0, 0); border-radius: 4px;">  
</div></div><div style="box-sizing: border-box; overflow-wrap: break-word; padding-bottom: .2em; padding-top: 0px;"><div style="box-sizing: border-box; transition-property: height; transition-duration: 250ms; transition-timing-function: ease;"><div style="box-sizing: border-box; display: block;"><div style="box-sizing: border-box; overflow: clip; position: relative;"><div style="box-sizing: border-box; max-height: 600px;"><div dir="auto" style="box-sizing: border-box; outline: none;" tabindex="0">7.1-inch Touch Display, 280x1424, MIPI, with custom cover glass by optical bonding</div></div></div></div></div></div></div></div></div></div></div></td><td class="xl71" style="border-width: 1px; border-top: 1px rgb(0, 0, 0); border-color: rgb(0, 0, 0); height: 49.3167px; width: 65.2px;">1</td><td class="xl71" style="border-width: 1px; border-top-style: none; border-left: 1px rgb(0, 0, 0); border-color: rgb(0, 0, 0); height: 49.3167px; width: 194.2px;"> </td></tr><tr style="height: 29.7167px;"><td style="border-width: 1px; border-top: 1px rgb(0, 0, 0); border-color: rgb(0, 0, 0); height: 29.7167px; width: 105.867px;">**<span style="background-color: rgb(191, 237, 210);">  
</span>**</td><td style="border-width: 1px; border-top-style: none; border-left: 1px rgb(0, 0, 0); border-color: rgb(0, 0, 0); height: 29.7167px; width: 134.2px;"><span style="background-color: rgb(206, 212, 217);">&lt;tulossa&gt;</span></td><td style="border-width: 1px; border-color: rgb(0, 0, 0); height: 29.7167px; width: 288.867px;"><div style="box-sizing: border-box; display: flex; align-items: center; gap: 4px;">Näytön kehys</div></td><td style="border-width: 1px; border-top: 1px rgb(0, 0, 0); border-color: rgb(0, 0, 0); height: 29.7167px; width: 65.2px;">1</td><td style="border-width: 1px; border-top-style: none; border-left: 1px rgb(0, 0, 0); border-color: rgb(0, 0, 0); height: 29.7167px; width: 194.2px;">  
</td></tr><tr style="height: 29.7167px;"><td style="border-width: 1px; border-top: 1px rgb(0, 0, 0); border-color: rgb(0, 0, 0); height: 29.7167px; width: 105.867px;">**<span style="background-color: rgb(191, 237, 210);">  
</span>**</td><td style="border-width: 1px; border-top-style: none; border-left: 1px rgb(0, 0, 0); border-color: rgb(0, 0, 0); height: 29.7167px; width: 134.2px;">  
</td><td style="border-width: 1px; border-color: rgb(0, 0, 0); height: 29.7167px; width: 288.867px;"><div style="box-sizing: border-box; display: flex; align-items: center; gap: 4px;">USB-liittimen suojalätkä</div></td><td style="border-width: 1px; border-top: 1px rgb(0, 0, 0); border-color: rgb(0, 0, 0); height: 29.7167px; width: 65.2px;">1</td><td style="border-width: 1px; border-top-style: none; border-left: 1px rgb(0, 0, 0); border-color: rgb(0, 0, 0); height: 29.7167px; width: 194.2px;">  
</td></tr><tr style="height: 29.7167px;"><td style="border-width: 1px; border-top: 1px rgb(0, 0, 0); border-color: rgb(0, 0, 0); height: 29.7167px; width: 105.867px;">**<span style="background-color: rgb(191, 237, 210);">  
</span>**</td><td style="border-width: 1px; border-top-style: none; border-left: 1px rgb(0, 0, 0); border-color: rgb(0, 0, 0); height: 29.7167px; width: 134.2px;">IP-DPL-AD</td><td style="border-width: 1px; border-color: rgb(0, 0, 0); height: 29.7167px; width: 288.867px;"><div style="box-sizing: border-box; display: flex; align-items: center; gap: 4px;">Näytön lisäkortti ( DSI Adapter)</div></td><td style="border-width: 1px; border-top: 1px rgb(0, 0, 0); border-color: rgb(0, 0, 0); height: 29.7167px; width: 65.2px;">1</td><td style="border-width: 1px; border-top-style: none; border-left: 1px rgb(0, 0, 0); border-color: rgb(0, 0, 0); height: 29.7167px; width: 194.2px;">  
</td></tr><tr style="height: 29.7167px;"><td style="border-width: 1px; border-top: 1px rgb(0, 0, 0); border-color: rgb(0, 0, 0); height: 29.7167px; width: 105.867px;">**<span style="background-color: rgb(191, 237, 210);">  
</span>**</td><td style="border-width: 1px; border-top-style: none; border-left: 1px rgb(0, 0, 0); border-color: rgb(0, 0, 0); height: 29.7167px; width: 134.2px;">IP-DPL-FPC</td><td style="border-width: 1px; border-color: rgb(0, 0, 0); height: 29.7167px; width: 288.867px;"><div style="box-sizing: border-box; display: flex; align-items: center; gap: 4px;">0150260440(CABLE PREMO-1T 102MM ) </div></td><td style="border-width: 1px; border-top: 1px rgb(0, 0, 0); border-color: rgb(0, 0, 0); height: 29.7167px; width: 65.2px;">1</td><td style="border-width: 1px; border-top-style: none; border-left: 1px rgb(0, 0, 0); border-color: rgb(0, 0, 0); height: 29.7167px; width: 194.2px;">Lattakaapeli (näytön lisäkortin ja pääkortin välille)</td></tr><tr style="height: 29.7167px;"><td style="border-width: 1px; border-top: 1px rgb(0, 0, 0); border-color: rgb(0, 0, 0); height: 29.7167px; width: 105.867px;">**<span style="background-color: rgb(191, 237, 210);">  
</span>**</td><td style="border-width: 1px; border-top-style: none; border-left: 1px rgb(0, 0, 0); border-color: rgb(0, 0, 0); height: 29.7167px; width: 134.2px;">  
</td><td style="border-width: 1px; border-color: rgb(0, 0, 0); height: 29.7167px; width: 288.867px;"><div style="box-sizing: border-box; display: flex; align-items: center; gap: 4px;">Ruuvit lisäkortin kiinnittämiseksi kehykseen</div></td><td style="border-width: 1px; border-top: 1px rgb(0, 0, 0); border-color: rgb(0, 0, 0); height: 29.7167px; width: 65.2px;">4</td><td style="border-width: 1px; border-top-style: none; border-left: 1px rgb(0, 0, 0); border-color: rgb(0, 0, 0); height: 29.7167px; width: 194.2px;">  
</td></tr><tr style="height: 29.7167px;"><td class="xl73" height="20" style="height: 29.7167px; border-width: 1px; border-top: 1px rgb(0, 0, 0); width: 105.867px; border-color: rgb(0, 0, 0);" width="87">  
</td><td class="xl74" style="border-width: 1px; border-top-style: none; border-left: 1px rgb(0, 0, 0); width: 134.2px; border-color: rgb(0, 0, 0); height: 29.7167px;" width="112"> </td><td class="xl73" style="border-width: 1px; border-left: 1px rgb(0, 0, 0); width: 288.867px; border-color: rgb(0, 0, 0); height: 29.7167px;" width="527">Tarra \[ETH2 ETH1 ...FE\]</td><td class="xl73" style="border-width: 1px; border-top-style: none; border-left: 1px rgb(0, 0, 0); width: 65.2px; border-color: rgb(0, 0, 0); height: 29.7167px;" width="56">1</td><td class="xl73" style="border-width: 1px; border-top-style: none; border-left: 1px rgb(0, 0, 0); width: 194.2px; border-color: rgb(0, 0, 0); height: 29.7167px;" width="64">osoittaa Ethernet-porttien ja virtaliittimen kytkentäpisteet kansitarran sijaan</td></tr></tbody></table>

#### <span style="background-color: rgb(236, 202, 250);">3.</span> (D6??) <span style="background-color: rgb(236, 202, 250);">tyhjä</span> = ei näyttöä, vain kansi


<table border="1" cellpadding="0" cellspacing="0" id="bkmrk-integral-tuotekoodi--5" style="border-collapse: collapse; width: 793px; border-width: 1px; border-spacing: 0px; border-color: rgb(0, 0, 0);" width="834"><thead><tr style="height: 15.0pt;"><td class="xl68" height="40" style="height: 30pt; width: 103.883px; border-width: 1px; border-color: rgb(0, 0, 0);" width="87">**INTEGRAL tuotekoodi**</td><td class="xl69" style="width: 61.2833px; border-width: 1px; border-color: rgb(0, 0, 0);" width="96">**Koodi**</td><td class="xl70" style="width: 94.9833px; border-width: 1px; border-color: rgb(0, 0, 0);" width="523">**Nimi**</td><td class="xl70" style="width: 59.05px; border-width: 1px; border-color: rgb(0, 0, 0);" width="64">**Määrä**</td><td class="xl70" style="width: 473.083px; border-width: 1px; border-color: rgb(0, 0, 0);" width="64">**Huom!**</td></tr></thead><tbody><tr style="height: 15.0pt;"><td class="xl71" height="20" style="height: 15pt; border-width: 1px; border-top: 1px rgb(0, 0, 0); border-color: rgb(0, 0, 0); width: 103.883px;"> </td><td class="xl66" style="border-width: 1px; border-top-style: none; border-left: 1px rgb(0, 0, 0); border-color: rgb(0, 0, 0); width: 61.2833px;"> </td><td class="xl66" style="border-width: 1px; border-top-style: none; border-left: 1px rgb(0, 0, 0); border-color: rgb(0, 0, 0); width: 94.9833px;">Kansi</td><td class="xl67" style="border-width: 1px; border-top-style: none; border-left: 1px rgb(0, 0, 0); border-color: rgb(0, 0, 0); width: 59.05px;">1</td><td class="xl67" style="border-width: 1px; border-top-style: none; border-left: 1px rgb(0, 0, 0); border-color: rgb(0, 0, 0); width: 473.083px;">  
</td></tr><tr><td style="border-width: 1px; border-top: 1px rgb(0, 0, 0); border-color: rgb(0, 0, 0); width: 103.883px;"><span style="background-color: rgb(191, 237, 210);">  
</span></td><td style="border-width: 1px; border-top-style: none; border-left: 1px rgb(0, 0, 0); border-color: rgb(0, 0, 0); width: 61.2833px;"> </td><td style="border-width: 1px; border-top-style: none; border-left: 1px rgb(0, 0, 0); border-color: rgb(0, 0, 0); width: 94.9833px;">Kansitarra</td><td style="border-width: 1px; border-top-style: none; border-left: 1px rgb(0, 0, 0); border-color: rgb(0, 0, 0); width: 59.05px;">1</td><td style="border-width: 1px; border-top-style: none; border-left: 1px rgb(0, 0, 0); border-color: rgb(0, 0, 0); width: 473.083px;">Toistaiseksi!  
**Tulevaisuudessa saamme kannet, joissa tarra on valmiiksi painettuna.**  
</td></tr></tbody></table>


#### <span style="background-color: rgb(191, 237, 210);">4.</span> <span style="background-color: rgb(191, 237, 210);">M</span> = <span style="background-color: rgb(191, 237, 210);">Modeemi</span>


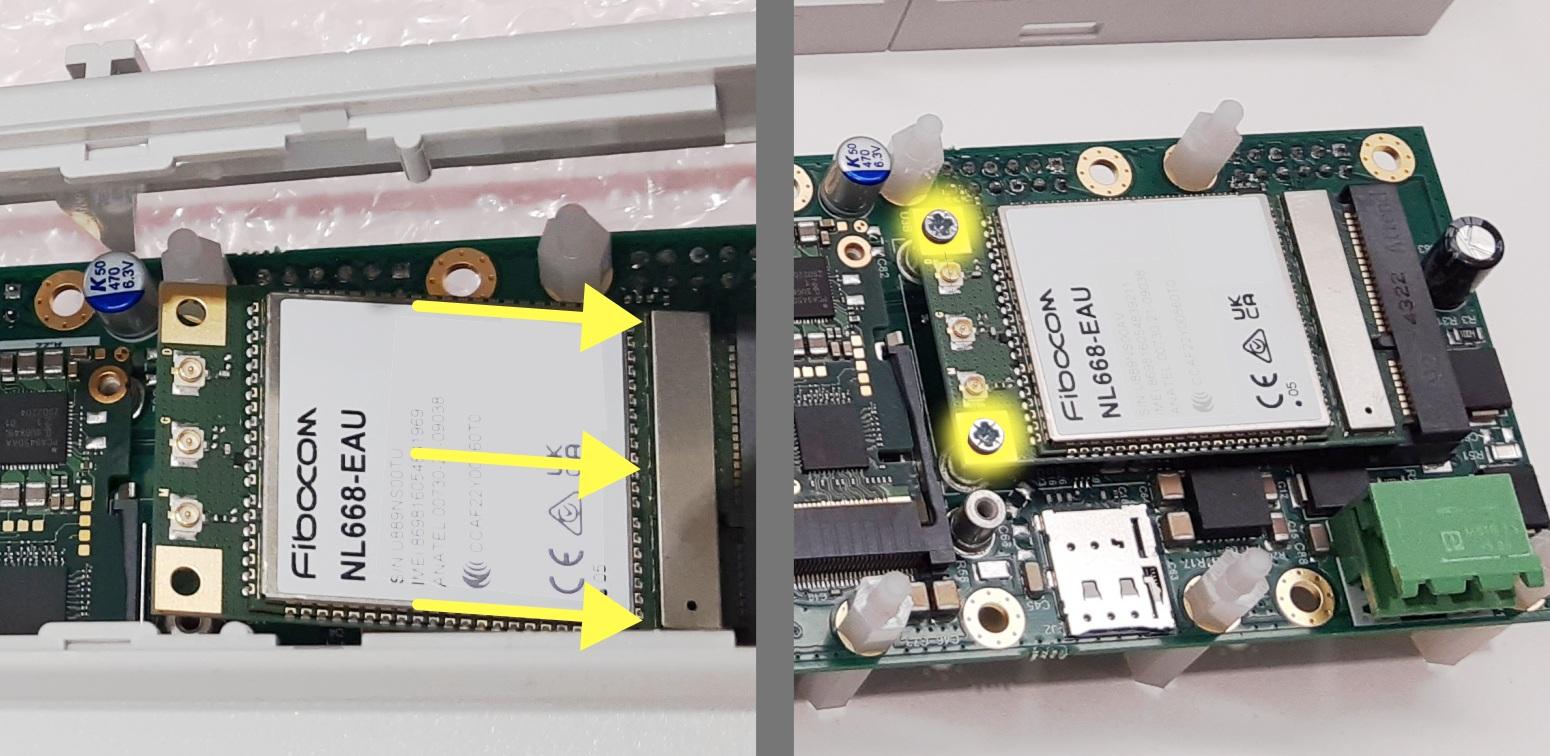
<table border="1" cellpadding="0" cellspacing="0" id="bkmrk-integral-tuotekoodi--7" style="border-collapse: collapse; width: 738px; border-width: 1px; border-spacing: 0px; border-color: rgb(0, 0, 0); height: 137px;" width="834"><thead><tr style="height: 15.0pt;"><td class="xl68" height="40" style="height: 30pt; width: 102.083px; border-width: 1px; border-color: rgb(0, 0, 0);">**INTEGRAL tuotekoodi**</td><td class="xl69" style="width: 129.483px; border-width: 1px; border-color: rgb(0, 0, 0);">**Koodi**</td><td class="xl70" style="width: 378.167px; border-width: 1px; border-color: rgb(0, 0, 0);">**Nimi**</td><td class="xl70" style="width: 62.25px; border-width: 1px; border-color: rgb(0, 0, 0);">**Määrä**</td><td class="xl70" style="width: 116.25px; border-width: 1px; border-color: rgb(0, 0, 0);">**Huom!**</td></tr></thead><tbody><tr style="height: 15.0pt;"><td class="xl71" height="20" style="height: 15pt; border-width: 1px; border-top: 1px rgb(0, 0, 0); border-color: rgb(0, 0, 0); width: 102.083px;"><span style="background-color: rgb(191, 237, 210);">**M**</span></td><td class="xl66" style="border-width: 1px; border-top-style: none; border-left: 1px rgb(0, 0, 0); border-color: rgb(0, 0, 0); width: 129.483px;">11461 tai 11462 </td><td class="xl66" style="border-width: 1px; border-top-style: none; border-left: 1px rgb(0, 0, 0); border-color: rgb(0, 0, 0); width: 378.167px;"><span lang="EN-US">Fibocom NL668-EU-05 LTE Cat-4 mPCIe</span></td><td class="xl67" style="border-width: 1px; border-top-style: none; border-left: 1px rgb(0, 0, 0); border-color: rgb(0, 0, 0); width: 62.25px;">1</td><td class="xl67" style="border-width: 1px; border-top-style: none; border-left: 1px rgb(0, 0, 0); border-color: rgb(0, 0, 0); width: 116.25px;">  
</td></tr><tr><td style="border-width: 1px; border-top: 1px rgb(0, 0, 0); border-color: rgb(0, 0, 0); width: 102.083px;"><span style="background-color: rgb(191, 237, 210);">  
</span></td><td style="border-width: 1px; border-top-style: none; border-left: 1px rgb(0, 0, 0); border-color: rgb(0, 0, 0); width: 129.483px;">170216-01</td><td style="border-width: 1px; border-top-style: none; border-left: 1px rgb(0, 0, 0); border-color: rgb(0, 0, 0); width: 378.167px;"><span lang="EN-US">RF Interface Cable SMA/IPEX MHF, 8 cm (antennipiuha)</span></td><td style="border-width: 1px; border-top-style: none; border-left: 1px rgb(0, 0, 0); border-color: rgb(0, 0, 0); width: 62.25px;">1</td><td style="border-width: 1px; border-top-style: none; border-left: 1px rgb(0, 0, 0); border-color: rgb(0, 0, 0); width: 116.25px;">rikka+mutteri</td></tr><tr><td style="border-width: 1px; border-top: 1px rgb(0, 0, 0); border-color: rgb(0, 0, 0); width: 102.083px;"><span style="background-color: rgb(191, 237, 210);">  
</span></td><td style="border-width: 1px; border-top-style: none; border-left: 1px rgb(0, 0, 0); border-color: rgb(0, 0, 0); width: 129.483px;">  
</td><td style="border-width: 1px; border-top-style: none; border-left: 1px rgb(0, 0, 0); border-color: rgb(0, 0, 0); width: 378.167px;"><span lang="EN-US">Ruuvit M2</span></td><td style="border-width: 1px; border-top-style: none; border-left: 1px rgb(0, 0, 0); border-color: rgb(0, 0, 0); width: 62.25px;">2</td><td style="border-width: 1px; border-top-style: none; border-left: 1px rgb(0, 0, 0); border-color: rgb(0, 0, 0); width: 116.25px;">  
</td></tr></tbody></table>


#### <span style="background-color: rgb(194, 224, 244);">5. </span><span style="background-color: rgb(255, 255, 255);"><span style="background-color: rgb(194, 224, 244);">X-X-X-X-X-X = moduulipaikat järjestyksessä M1-M6</span></span>


<table border="1" cellpadding="0" cellspacing="0" id="bkmrk-integral-tuotekoodi--8" style="border-collapse: collapse; width: 785px; border-width: 1px; border-spacing: 0px; border-color: rgb(0, 0, 0); height: 182.6px;" width="846"><colgroup><col style="width: 106px;" width="87"></col><col style="width: 103px;" width="112"></col><col style="width: 351px;" width="527"></col><col style="width: 78px;" width="56"></col><col style="width: 153px;" width="64"></col></colgroup><thead><tr style="height: 46.6px;"><td class="xl71" height="40" style="height: 46.6px; width: 65pt; border-width: 1px; border-color: rgb(0, 0, 0);" width="87">**INTEGRAL tuotekoodi**</td><td class="xl72" style="width: 84pt; border-width: 1px; border-color: rgb(0, 0, 0); height: 46.6px;" width="112">**Koodi**</td><td class="xl73" style="width: 395pt; border-width: 1px; border-color: rgb(0, 0, 0); height: 46.6px;" width="527">**Nimi**</td><td class="xl73" style="width: 42pt; border-width: 1px; border-color: rgb(0, 0, 0); height: 46.6px;" width="56">**Määrä**</td><td class="xl73" style="width: 48pt; border-width: 1px; border-color: rgb(0, 0, 0); height: 46.6px;" width="64">**Huom!**</td></tr></thead><tbody><tr style="height: 29.8px;"><td class="xl69" height="40" rowspan="4" style="border-width: 1px; border-bottom-style: solid; height: 136px; border-top: 1px rgb(0, 0, 0); border-color: rgb(0, 0, 0);" width="87"><span style="background-color: rgb(194, 224, 244);">IO</span><span style="background-color: rgb(194, 224, 244);">  
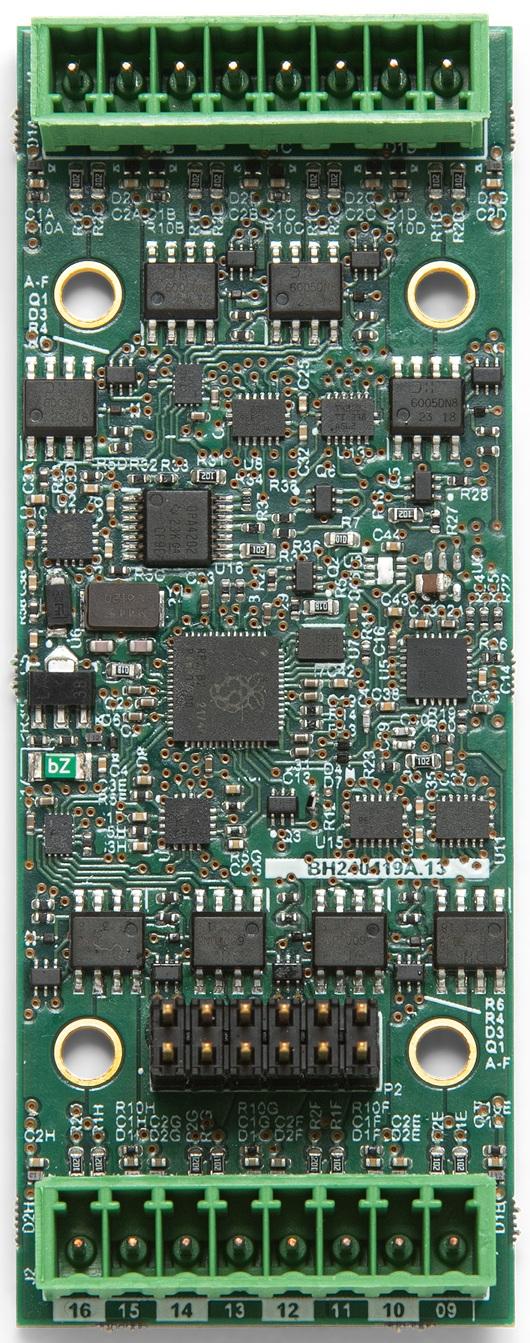
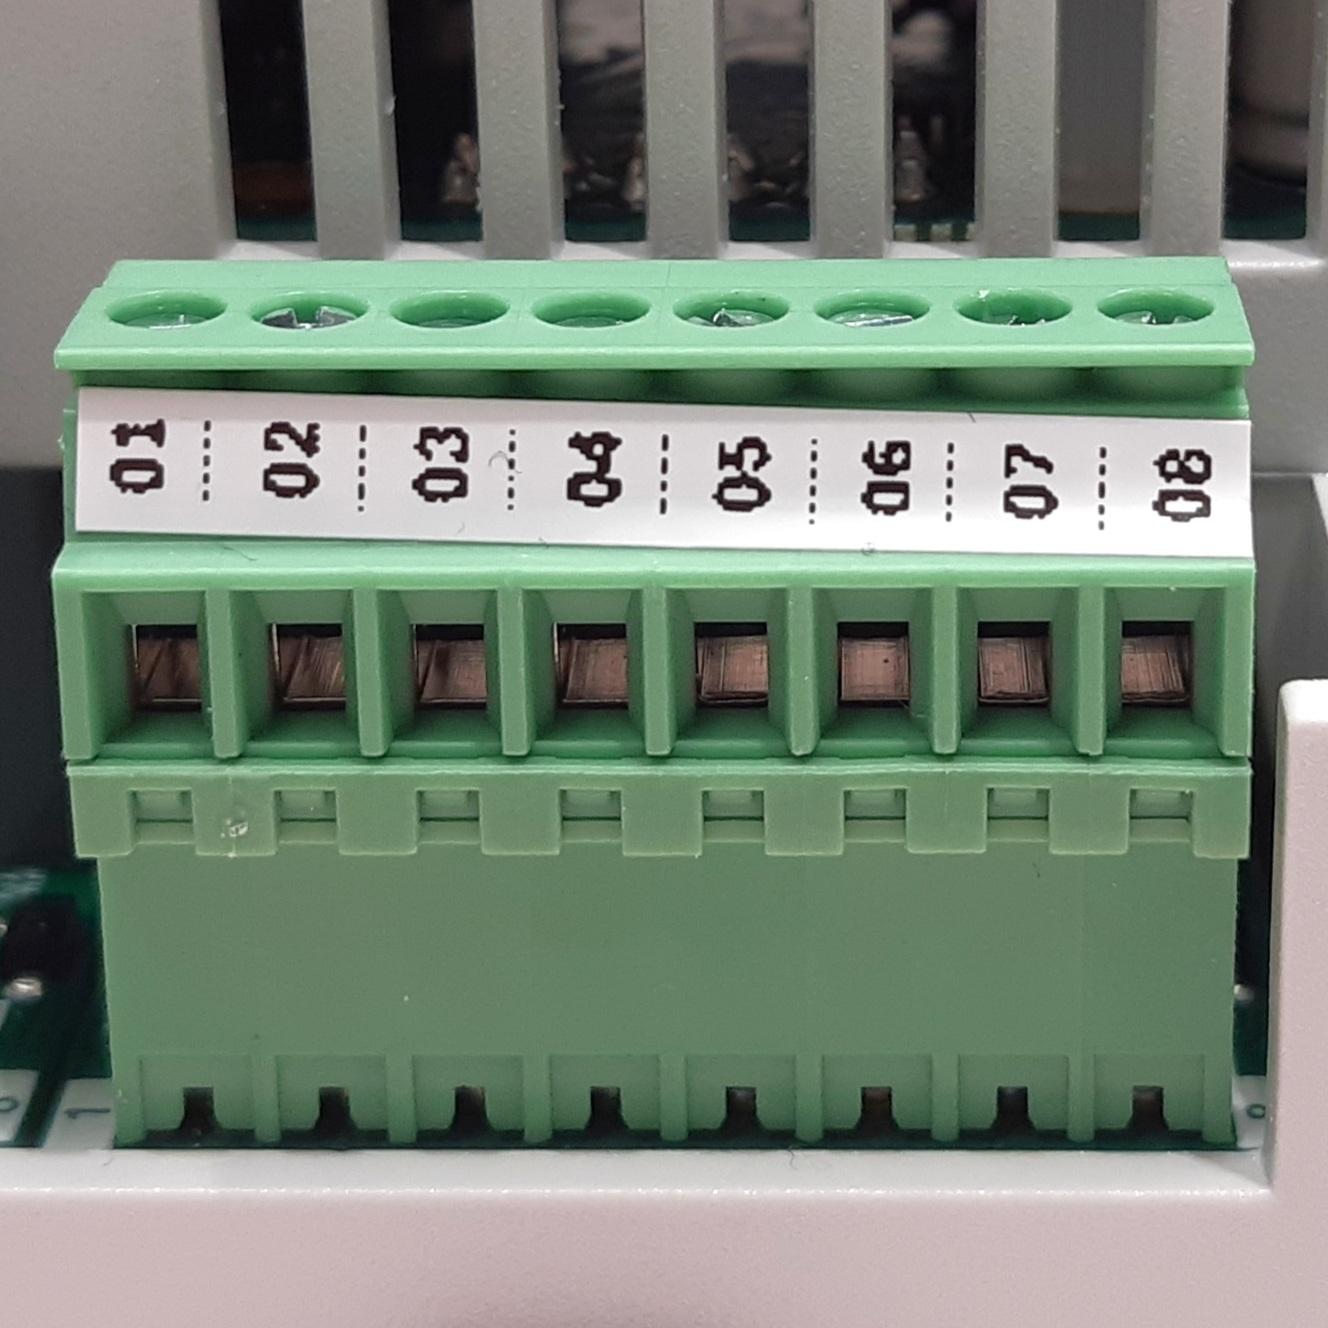
</span><span style="background-color: rgb(194, 224, 244);">![IM-IO816.jpg](https://wiki.bithouse.fi/uploads/images/gallery/2026-03/scaled-1680-/im-io816.jpg)</span></td><td class="xl67" style="border-width: 1px; border-top-style: none; border-left: 1px rgb(0, 0, 0); border-color: rgb(0, 0, 0); height: 29.8px;">IM-IO816</td><td class="xl66" style="border-width: 1px; border-top-style: none; border-left: 1px rgb(0, 0, 0); border-color: rgb(0, 0, 0); height: 29.8px;">Integral säätimen I/O-moduuli</td><td class="xl66" style="border-width: 1px; border-top-style: none; border-left: 1px rgb(0, 0, 0); border-color: rgb(0, 0, 0); height: 29.8px;">1</td><td class="xl66" style="border-width: 1px; border-top-style: none; border-left: 1px rgb(0, 0, 0); border-color: rgb(0, 0, 0); height: 29.8px;">  
</td></tr><tr style="height: 46.6px;"><td class="xl67" height="20" style="height: 46.6px; border-width: 1px; border-top-style: none; border-left: 1px rgb(0, 0, 0); border-color: rgb(0, 0, 0);">1862917</td><td class="xl68" style="border-width: 1px; border-top-style: none; border-left: 1px rgb(0, 0, 0); border-color: rgb(0, 0, 0); height: 46.6px;">Pluggable Terminal Block, 3.5 mm, 8 Ways, 28AWG to 16AWG, 1.5 mm², Screw, 8 A</td><td class="xl66" style="border-width: 1px; border-top-style: none; border-left: 1px rgb(0, 0, 0); border-color: rgb(0, 0, 0); height: 46.6px;">2</td><td class="xl66" style="border-width: 1px; border-top-style: none; border-left: 1px rgb(0, 0, 0); border-color: rgb(0, 0, 0); height: 46.6px;">  
</td></tr><tr style="height: 29.8px;"><td style="border-width: 1px; border-top-style: none; border-left: 1px rgb(0, 0, 0); border-color: rgb(0, 0, 0); height: 29.8px;">  
</td><td style="border-width: 1px; border-top-style: none; border-left: 1px rgb(0, 0, 0); border-color: rgb(0, 0, 0); height: 29.8px;">Tarra \[1...8\]</td><td style="border-width: 1px; border-top-style: none; border-left: 1px rgb(0, 0, 0); border-color: rgb(0, 0, 0); height: 29.8px;">1</td><td style="border-width: 1px; border-top-style: none; border-left: 1px rgb(0, 0, 0); border-color: rgb(0, 0, 0); height: 29.8px;">Toistaiseksi: **Liittimet, joissa on merkinnät: tulossa 8.2026**</td></tr><tr style="height: 29.8px;"><td style="border-width: 1px; border-top-style: none; border-left: 1px rgb(0, 0, 0); border-color: rgb(0, 0, 0); height: 29.8px;">  
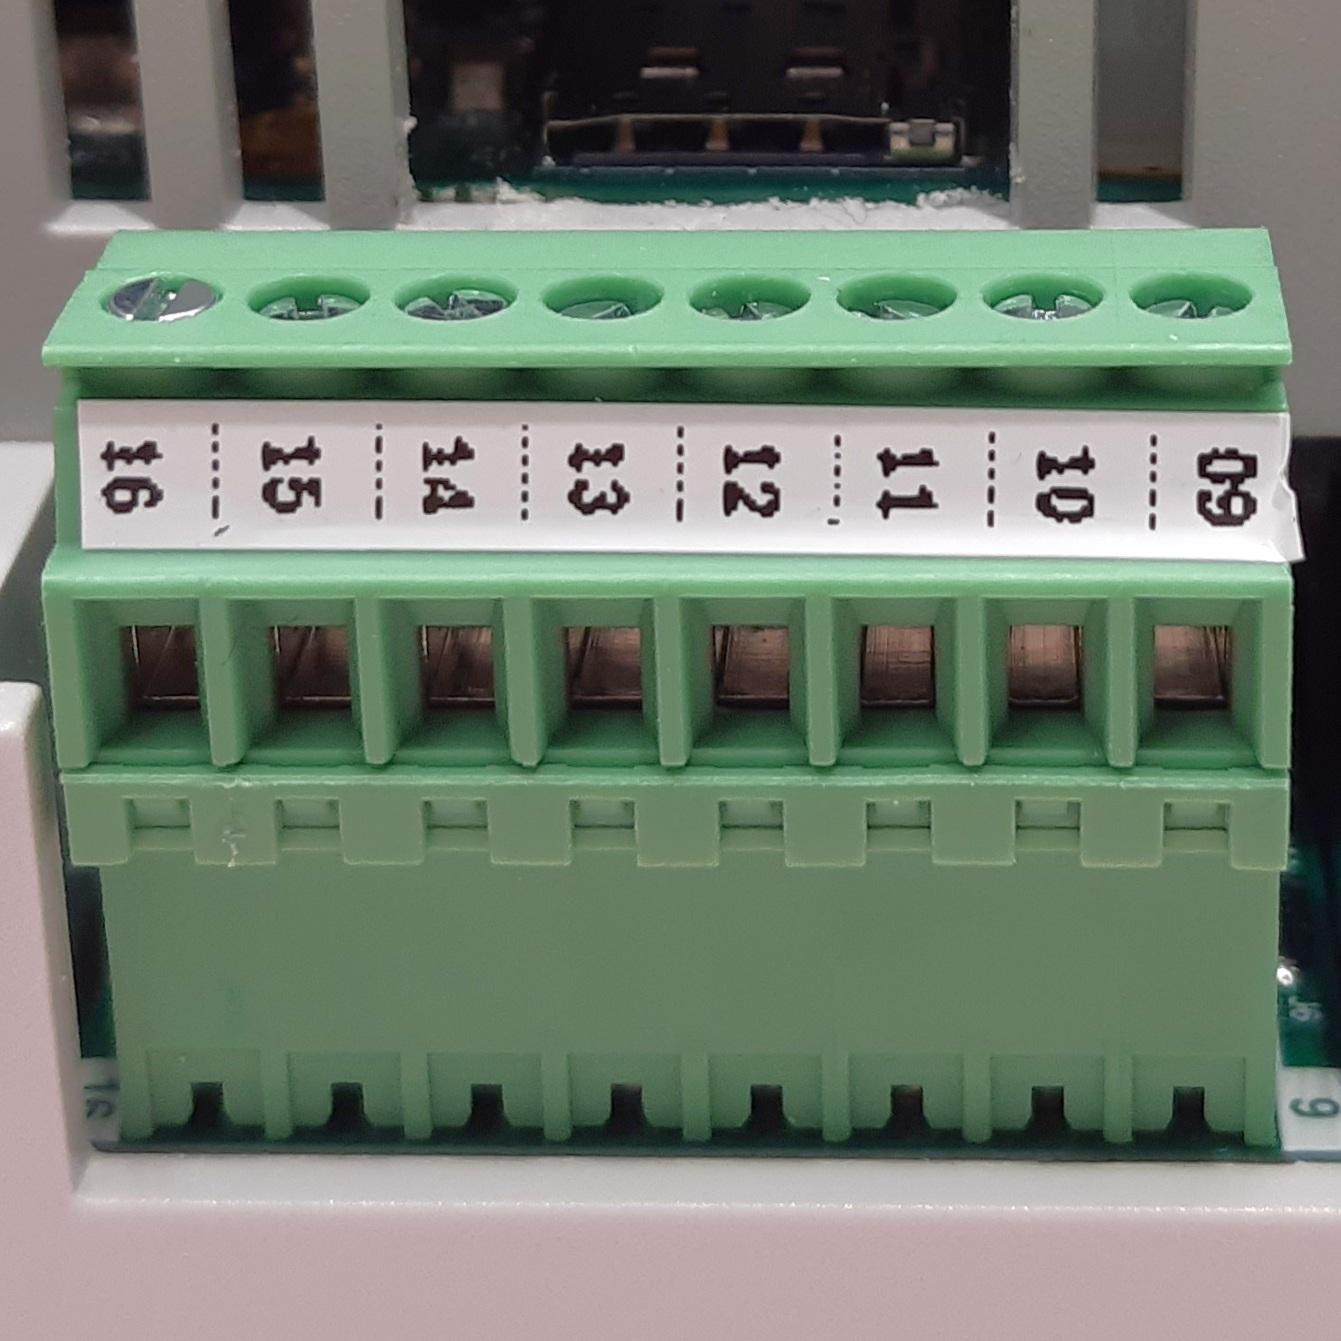
</td><td style="border-width: 1px; border-top-style: none; border-left: 1px rgb(0, 0, 0); border-color: rgb(0, 0, 0); height: 29.8px;">Tarra \[9...16\]</td><td style="border-width: 1px; border-top-style: none; border-left: 1px rgb(0, 0, 0); border-color: rgb(0, 0, 0); height: 29.8px;">1</td><td style="border-width: 1px; border-top-style: none; border-left: 1px rgb(0, 0, 0); border-color: rgb(0, 0, 0); height: 29.8px;">Toistaiseksi: **Liittimet, joissa on merkinnät: tulossa 8.2026**</td></tr></tbody></table>

<table border="1" cellpadding="0" cellspacing="0" id="bkmrk-integral-tuotekoodi--9" style="border-collapse: collapse; width: 784px; border-width: 1px; border-spacing: 0px; border-color: rgb(0, 0, 0); height: 182.6px;" width="846"><colgroup><col style="width: 107px;" width="87"></col><col style="width: 102px;" width="112"></col><col style="width: 353px;" width="527"></col><col style="width: 75px;" width="56"></col><col style="width: 154px;" width="64"></col></colgroup><thead><tr style="height: 46.6px;"><td class="xl71" height="40" style="height: 46.6px; width: 65pt; border-width: 1px; border-color: rgb(0, 0, 0);" width="87">**INTEGRAL tuotekoodi**</td><td class="xl72" style="width: 84pt; border-width: 1px; border-color: rgb(0, 0, 0); height: 46.6px;" width="112">**Koodi**</td><td class="xl73" style="width: 395pt; border-width: 1px; border-color: rgb(0, 0, 0); height: 46.6px;" width="527">**Nimi**</td><td class="xl73" style="width: 42pt; border-width: 1px; border-color: rgb(0, 0, 0); height: 46.6px;" width="56">**Määrä**</td><td class="xl73" style="width: 48pt; border-width: 1px; border-color: rgb(0, 0, 0); height: 46.6px;" width="64">**Huom!**</td></tr></thead><tbody><tr style="height: 29.8px;"><td class="xl68" height="60" rowspan="4" style="border-width: 1px; border-bottom-style: solid; height: 136px; border-top: 1px rgb(0, 0, 0); border-color: rgb(0, 0, 0);"><span style="background-color: rgb(194, 224, 244);">RS2</span>  
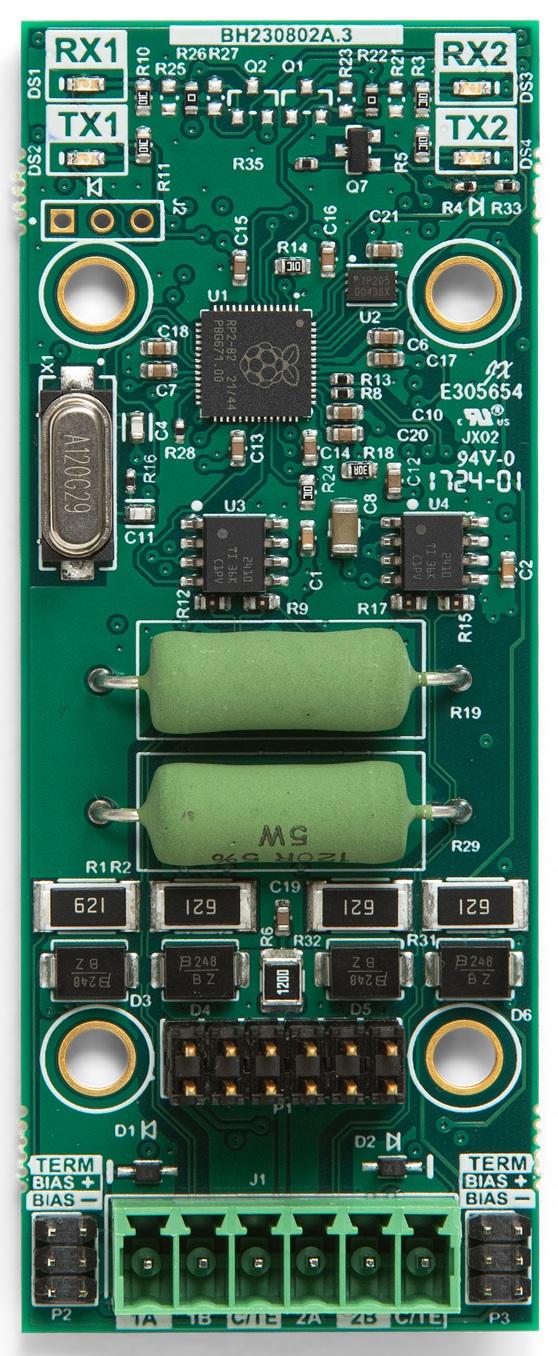
<span style="background-color: rgb(194, 224, 244);">![IM-RS485-2.jpg](https://wiki.bithouse.fi/uploads/images/gallery/2026-03/scaled-1680-/im-rs485-2.jpg)</span></td><td class="xl67" style="border-width: 1px; border-top-style: none; border-left: 1px rgb(0, 0, 0); border-color: rgb(0, 0, 0); height: 29.8px;">IM-RS485-2P</td><td class="xl66" style="border-width: 1px; border-top-style: none; border-left: 1px rgb(0, 0, 0); border-color: rgb(0, 0, 0); height: 29.8px;">Integral säätimen RS485-väyläsovitin, 2 väylää</td><td class="xl66" style="border-width: 1px; border-top-style: none; border-left: 1px rgb(0, 0, 0); border-color: rgb(0, 0, 0); height: 29.8px;">1</td><td class="xl66" style="border-width: 1px; border-top-style: none; border-left: 1px rgb(0, 0, 0); border-color: rgb(0, 0, 0); height: 29.8px;"> </td></tr><tr style="height: 46.6px;"><td class="xl74" height="20" style="height: 46.6px; border-width: 1px; border-top-style: none; border-left: 1px rgb(0, 0, 0); border-color: rgb(0, 0, 0);">1862894</td><td class="xl74" style="border-width: 1px; border-top-style: none; border-left: 1px rgb(0, 0, 0); border-color: rgb(0, 0, 0); height: 46.6px;">Pluggable Terminal Block, 3.5 mm, 6 Ways, 28AWG to 16AWG, 1.5 mm², Screw, 8 A</td><td class="xl74" style="border-width: 1px; border-top-style: none; border-left: 1px rgb(0, 0, 0); border-color: rgb(0, 0, 0); height: 46.6px;">1</td><td class="xl66" style="border-width: 1px; border-top-style: none; border-left: 1px rgb(0, 0, 0); border-color: rgb(0, 0, 0); height: 46.6px;"> </td></tr><tr style="height: 29.8px;"><td class="xl75" height="20" style="height: 29.8px; border-width: 1px; border-top-style: none; border-left: 1px rgb(0, 0, 0); border-color: rgb(0, 0, 0);">JUMPER-H/B</td><td class="xl75" style="border-width: 1px; border-top-style: none; border-left: 1px rgb(0, 0, 0); border-color: rgb(0, 0, 0); height: 29.8px;">Jumpperi; pin; naaras; varren kanssa; 2,54 mm; 1x2; musta</td><td class="xl74" style="border-width: 1px; border-top-style: none; border-left: 1px rgb(0, 0, 0); border-color: rgb(0, 0, 0); height: 29.8px;">6</td><td class="xl66" style="border-width: 1px; border-top-style: none; border-left: 1px rgb(0, 0, 0); border-color: rgb(0, 0, 0); height: 29.8px;">  
</td></tr><tr style="height: 29.8px;"><td style="border-width: 1px; border-top-style: none; border-left: 1px rgb(0, 0, 0); border-color: rgb(0, 0, 0); height: 29.8px;">  
</td><td style="border-width: 1px; border-top-style: none; border-left: 1px rgb(0, 0, 0); border-color: rgb(0, 0, 0); height: 29.8px;">Tarra \[1A...2C\]</td><td style="border-width: 1px; border-top-style: none; border-left: 1px rgb(0, 0, 0); border-color: rgb(0, 0, 0); height: 29.8px;">1</td><td style="border-width: 1px; border-top-style: none; border-left: 1px rgb(0, 0, 0); border-color: rgb(0, 0, 0); height: 29.8px;">Toistaiseksi</td></tr></tbody></table>

<table border="1" cellpadding="0" cellspacing="0" id="bkmrk-integral-tuotekoodi--10" style="border-collapse: collapse; width: 784px; border-width: 1px; border-spacing: 0px; border-color: rgb(0, 0, 0);" width="846"><colgroup><col style="width: 107px;" width="87"></col><col style="width: 106px;" width="112"></col><col style="width: 348px;" width="527"></col><col style="width: 75px;" width="56"></col><col style="width: 155px;" width="64"></col></colgroup><thead><tr style="height: 15.0pt;"><td class="xl71" height="40" style="height: 30pt; width: 65pt; border-width: 1px; border-color: rgb(0, 0, 0);" width="87">**INTEGRAL tuotekoodi**</td><td class="xl72" style="width: 84pt; border-width: 1px; border-color: rgb(0, 0, 0);" width="112">**Koodi**</td><td class="xl73" style="width: 395pt; border-width: 1px; border-color: rgb(0, 0, 0);" width="527">**Nimi**</td><td class="xl73" style="width: 42pt; border-width: 1px; border-color: rgb(0, 0, 0);" width="56">**Määrä**</td><td class="xl73" style="width: 48pt; border-width: 1px; border-color: rgb(0, 0, 0);" width="64">**Huom!**</td></tr></thead><tbody><tr style="height: 15.0pt;"><td class="xl69" height="40" rowspan="3" style="border-width: 1px; border-bottom: 1px solid rgb(0, 0, 0); height: 30pt; border-top: 1px rgb(0, 0, 0); border-color: rgb(0, 0, 0);"><span style="background-color: rgb(194, 224, 244);">MB10</span>  
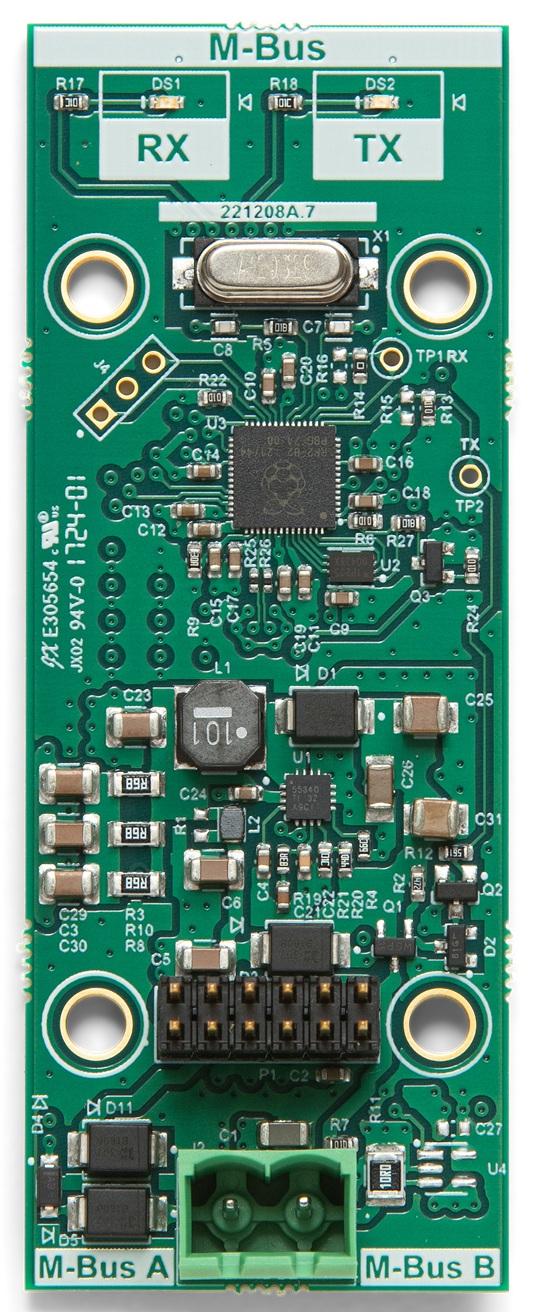
<span style="background-color: rgb(194, 224, 244);">![IM-MBUS20.jpg](https://wiki.bithouse.fi/uploads/images/gallery/2026-03/scaled-1680-/im-mbus20.jpg)</span></td><td class="xl67" style="border-width: 1px; border-top: 1px rgb(0, 0, 0); border-left: 1px rgb(0, 0, 0); border-color: rgb(0, 0, 0);">IM-MBUS-10</td><td class="xl66" style="border-width: 1px; border-top: 1px rgb(0, 0, 0); border-left: 1px rgb(0, 0, 0); border-color: rgb(0, 0, 0);">Integral säätimen M-Bus-tasomuunnin 10 mittarille</td><td class="xl66" style="border-width: 1px; border-top: 1px rgb(0, 0, 0); border-left: 1px rgb(0, 0, 0); border-color: rgb(0, 0, 0);">1</td><td class="xl66" style="border-width: 1px; border-top: 1px rgb(0, 0, 0); border-left: 1px rgb(0, 0, 0); border-color: rgb(0, 0, 0);"> </td></tr><tr style="height: 15.0pt;"><td class="xl66" height="20" style="height: 15pt; border-width: 1px; border-top: 1px rgb(0, 0, 0); border-left: 1px rgb(0, 0, 0); border-color: rgb(0, 0, 0);">1792016</td><td class="xl68" style="border-width: 1px; border-top: 1px rgb(0, 0, 0); border-left: 1px rgb(0, 0, 0); border-color: rgb(0, 0, 0);">Pluggable Terminal Block, 5 mm, 2 Ways, 30AWG to 12AWG, 2.5 mm², Screw, 12 A</td><td class="xl66" style="border-width: 1px; border-top: 1px rgb(0, 0, 0); border-left: 1px rgb(0, 0, 0); border-color: rgb(0, 0, 0);">1</td><td class="xl66" style="border-width: 1px; border-top: 1px rgb(0, 0, 0); border-left: 1px rgb(0, 0, 0); border-color: rgb(0, 0, 0);">  
</td></tr><tr><td style="border-width: 1px; border-top-style: none; border-left: 1px rgb(0, 0, 0); border-color: rgb(0, 0, 0);">  
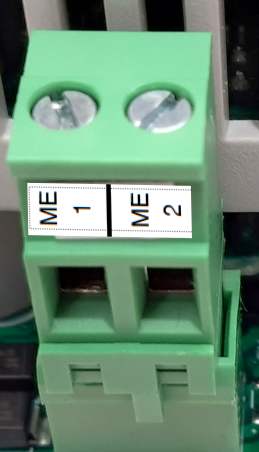
</td><td style="border-width: 1px; border-top-style: none; border-left: 1px rgb(0, 0, 0); border-color: rgb(0, 0, 0);">Tarra \[ME 1 | ME 2\]</td><td style="border-width: 1px; border-top-style: none; border-left: 1px rgb(0, 0, 0); border-color: rgb(0, 0, 0);">1</td><td style="border-width: 1px; border-top-style: none; border-left: 1px rgb(0, 0, 0); border-color: rgb(0, 0, 0);">Toistaiseksi</td></tr></tbody></table>

<table border="1" id="bkmrk-integral-tuotekoodi-" style="border-collapse: collapse; width: 94.2857%; border-width: 1px; border-color: rgb(0, 0, 0);"><colgroup><col style="width: 13.2693%;"></col><col style="width: 13.5221%;"></col><col style="width: 44.9912%;"></col><col style="width: 8.33881%;"></col><col style="width: 19.9671%;"></col></colgroup><thead><tr><td style="border-color: rgb(0, 0, 0);">**INTEGRAL tuotekoodi**</td><td class="xl72" style="width: 84pt; border-width: 1px; border-color: rgb(0, 0, 0);" width="112">**Koodi**</td><td class="xl73" style="width: 395pt; border-width: 1px; border-color: rgb(0, 0, 0);" width="527">**Nimi**</td><td class="xl73" style="width: 42pt; border-width: 1px; border-color: rgb(0, 0, 0);" width="56">**Määrä**</td><td class="xl73" style="width: 48pt; border-width: 1px; border-color: rgb(0, 0, 0);" width="64">**Huom!**</td></tr></thead><tbody><tr><td class="xl69" height="40" rowspan="3" style="border-width: 1px; border-bottom: 1px solid rgb(0, 0, 0); height: 30pt; border-top: 1px rgb(0, 0, 0); border-color: rgb(0, 0, 0);"><span style="background-color: rgb(194, 224, 244);">MB250</span>  
</td><td class="xl67" style="border-width: 1px; border-top: 1px rgb(0, 0, 0); border-left: 1px rgb(0, 0, 0); border-color: rgb(0, 0, 0);">IM-MBUS-250</td><td class="xl66" style="border-width: 1px; border-top: 1px rgb(0, 0, 0); border-left: 1px rgb(0, 0, 0); border-color: rgb(0, 0, 0);">Integral säätimen M-Bus-tasomuunnin 250 mittarille</td><td class="xl66" style="border-width: 1px; border-top: 1px rgb(0, 0, 0); border-left: 1px rgb(0, 0, 0); border-color: rgb(0, 0, 0);">1</td><td class="xl66" style="border-width: 1px; border-top: 1px rgb(0, 0, 0); border-left: 1px rgb(0, 0, 0); border-color: rgb(0, 0, 0);"> </td></tr><tr><td class="xl66" height="20" style="height: 15pt; border-width: 1px; border-top: 1px rgb(0, 0, 0); border-left: 1px rgb(0, 0, 0); border-color: rgb(0, 0, 0);">1792016</td><td class="xl68" style="border-width: 1px; border-top: 1px rgb(0, 0, 0); border-left: 1px rgb(0, 0, 0); border-color: rgb(0, 0, 0);">Pluggable Terminal Block, 5 mm, 2 Ways, 30AWG to 12AWG, 2.5 mm², Screw, 12 A</td><td class="xl66" style="border-width: 1px; border-top: 1px rgb(0, 0, 0); border-left: 1px rgb(0, 0, 0); border-color: rgb(0, 0, 0);">1</td><td class="xl66" style="border-width: 1px; border-top: 1px rgb(0, 0, 0); border-left: 1px rgb(0, 0, 0); border-color: rgb(0, 0, 0);">  
</td></tr><tr><td style="border-width: 1px; border-top-style: none; border-left: 1px rgb(0, 0, 0); border-color: rgb(0, 0, 0);">  
</td><td style="border-width: 1px; border-top-style: none; border-left: 1px rgb(0, 0, 0); border-color: rgb(0, 0, 0);">Tarra \[ME 1 | ME 2\]</td><td style="border-width: 1px; border-top-style: none; border-left: 1px rgb(0, 0, 0); border-color: rgb(0, 0, 0);">1</td><td style="border-width: 1px; border-top-style: none; border-left: 1px rgb(0, 0, 0); border-color: rgb(0, 0, 0);">Toistaiseksi</td></tr></tbody></table>

<table border="1" cellpadding="0" cellspacing="0" id="bkmrk-integral-tuotekoodi--12" style="border-collapse: collapse; width: 786px; border-spacing: 0px; border: 1px solid rgb(0, 0, 0); height: 246.75px;" width="846"><colgroup><col style="width: 107px;" width="87"></col><col style="width: 104px;" width="112"></col><col style="width: 356px;" width="527"></col><col style="width: 70px;" width="56"></col><col style="width: 154px;" width="64"></col></colgroup><thead><tr style="height: 46.6px;"><td class="xl71" height="40" style="height: 46.6px; width: 65pt; border-width: 1px; border-color: rgb(0, 0, 0);" width="87">**INTEGRAL tuotekoodi**</td><td class="xl72" style="width: 84pt; border-width: 1px; border-color: rgb(0, 0, 0); height: 46.6px;" width="112">**Koodi**</td><td class="xl73" style="width: 395pt; border-width: 1px; border-color: rgb(0, 0, 0); height: 46.6px;" width="527">**Nimi**</td><td class="xl73" style="width: 42pt; border-width: 1px; border-color: rgb(0, 0, 0); height: 46.6px;" width="56">**Määrä**</td><td class="xl73" style="width: 48pt; border-width: 1px; border-color: rgb(0, 0, 0); height: 46.6px;" width="64">**Huom!**</td></tr></thead><tbody><tr style="height: 200.15px;"><td class="xl69" height="40" style="border-width: 1px; border-bottom-style: solid; height: 200.15px; border-top: 1px rgb(0, 0, 0); border-color: rgb(0, 0, 0);"><span style="background-color: rgb(194, 224, 244);">USB4</span>

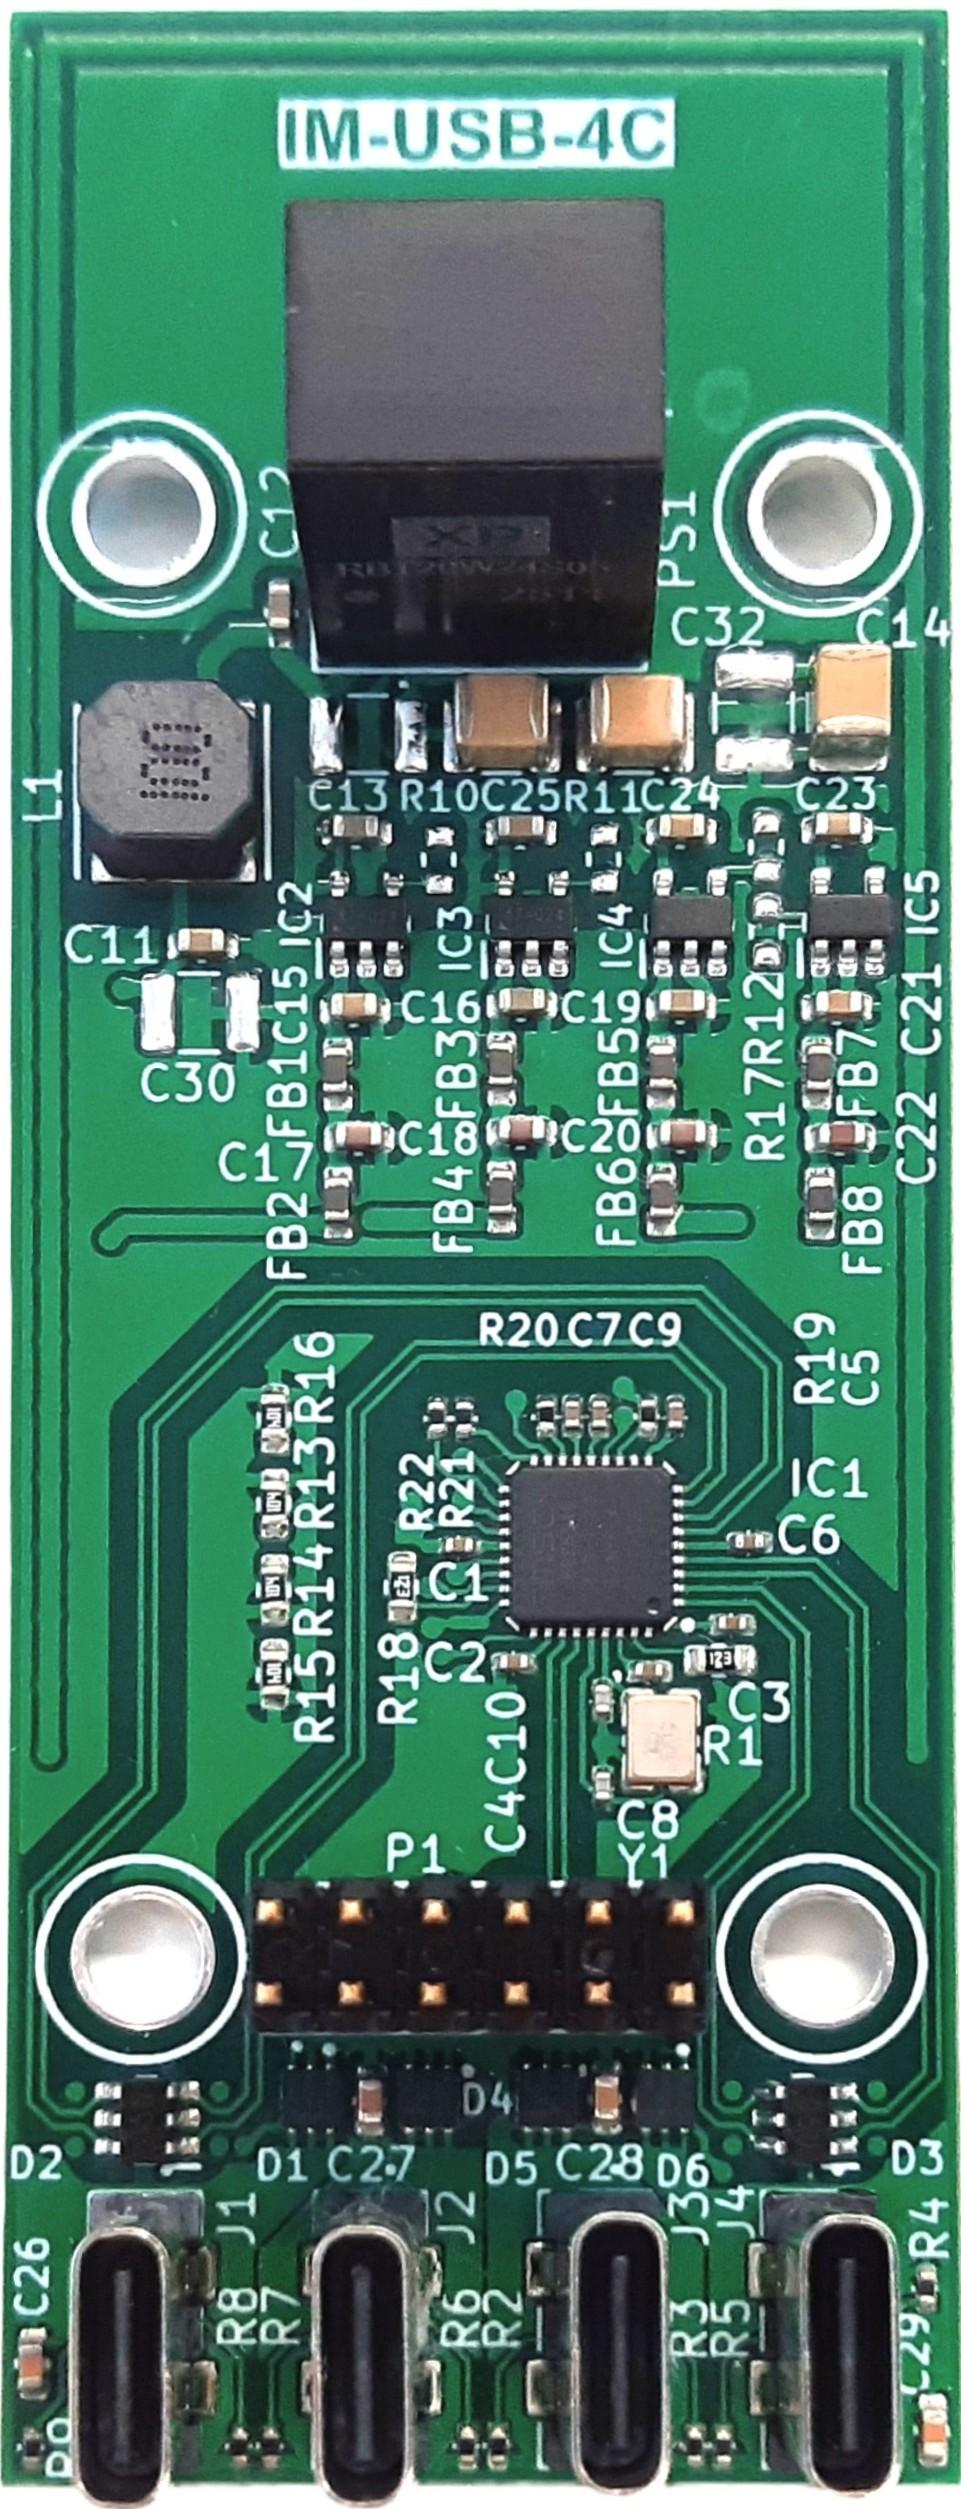
![IM-USB-4C.jpg](https://wiki.bithouse.fi/uploads/images/gallery/2026-03/scaled-1680-/im-usb-4c.jpg)

</td><td class="xl67" style="border-width: 1px; border-top-style: none; border-left: 1px rgb(0, 0, 0); border-color: rgb(0, 0, 0); height: 200.15px;">IM-USB-C-4P</td><td class="xl66" style="border-width: 1px; border-top-style: none; border-left: 1px rgb(0, 0, 0); border-color: rgb(0, 0, 0); height: 200.15px;">Intergal säätimen sovitin 4:lle USB C-liittimelle</td><td class="xl66" style="border-width: 1px; border-top-style: none; border-left: 1px rgb(0, 0, 0); border-color: rgb(0, 0, 0); height: 200.15px;">1</td><td class="xl66" style="border-width: 1px; border-top-style: none; border-left: 1px rgb(0, 0, 0); border-color: rgb(0, 0, 0); height: 200.15px;">  
</td></tr></tbody></table>

<table border="1" cellpadding="0" cellspacing="0" id="bkmrk-integral-tuotekoodi--11" style="border-collapse: collapse; width: 739px; border-width: 1px; border-spacing: 0px; border-color: rgb(0, 0, 0);" width="846"><colgroup><col style="width: 110px;" width="87"></col><col style="width: 106px;" width="112"></col><col style="width: 351px;" width="527"></col><col style="width: 70px;" width="56"></col><col style="width: 154px;" width="64"></col></colgroup><thead><tr style="height: 15.0pt;"><td class="xl71" height="40" style="height: 30pt; width: 65pt; border-width: 1px; border-color: rgb(0, 0, 0);" width="87">**INTEGRAL tuotekoodi**</td><td class="xl72" style="width: 84pt; border-width: 1px; border-color: rgb(0, 0, 0);" width="112">**Koodi**</td><td class="xl73" style="width: 395pt; border-width: 1px; border-color: rgb(0, 0, 0);" width="527">**Nimi**</td><td class="xl73" style="width: 42pt; border-width: 1px; border-color: rgb(0, 0, 0);" width="56">**Määrä**</td><td class="xl73" style="width: 48pt; border-width: 1px; border-color: rgb(0, 0, 0);" width="64">**Huom!**</td></tr></thead><tbody><tr style="height: 15.0pt;"><td class="xl69" height="40" rowspan="2" style="border-width: 1px; border-bottom: 1px solid rgb(0, 0, 0); height: 30pt; border-top: 1px rgb(0, 0, 0); border-color: rgb(0, 0, 0);"><span style="background-color: rgb(194, 224, 244);">24V</span></td><td class="xl67" style="border-width: 1px; border-top: 1px rgb(0, 0, 0); border-left: 1px rgb(0, 0, 0); border-color: rgb(0, 0, 0);">IM-24VDC</td><td class="xl66" style="border-width: 1px; border-top: 1px rgb(0, 0, 0); border-left: 1px rgb(0, 0, 0); border-color: rgb(0, 0, 0);">  
</td><td class="xl66" style="border-width: 1px; border-top: 1px rgb(0, 0, 0); border-left: 1px rgb(0, 0, 0); border-color: rgb(0, 0, 0);">1</td><td class="xl66" style="border-width: 1px; border-top: 1px rgb(0, 0, 0); border-left: 1px rgb(0, 0, 0); border-color: rgb(0, 0, 0);"> </td></tr><tr style="height: 15.0pt;"><td class="xl66" height="20" style="height: 15pt; border-width: 1px; border-top: 1px rgb(0, 0, 0); border-left: 1px rgb(0, 0, 0); border-color: rgb(0, 0, 0);"> </td><td class="xl68" style="border-width: 1px; border-top: 1px rgb(0, 0, 0); border-left: 1px rgb(0, 0, 0); border-color: rgb(0, 0, 0);"> </td><td class="xl66" style="border-width: 1px; border-top: 1px rgb(0, 0, 0); border-left: 1px rgb(0, 0, 0); border-color: rgb(0, 0, 0);"> </td><td class="xl66" style="border-width: 1px; border-top: 1px rgb(0, 0, 0); border-left: 1px rgb(0, 0, 0); border-color: rgb(0, 0, 0);">  
</td></tr></tbody></table>

Osat sijaitsevat työskentelypöydän viereisessä hyllyssä. Jos hyllystä puuttu osia, niitä löytyy eri paikoista, kts.[Osien varastopaikkoja jos puuttuu kokoamispisteen hyllystä](https://wiki.bithouse.fi/books/integral-universaali-alakeskusprosessori/page/osien-varastopaikkoja-jos-puuttuu-kokoamispisteen-hyllysta "Osien varastopaikkoja jos puuttuu kokoamispisteen hyllystä")

[![työpiste ja hylly.jpg](https://wiki.bithouse.fi/uploads/images/gallery/2026-08/scaled-1680-/tyopiste-ja-hylly.jpg)](https://wiki.bithouse.fi/uploads/images/gallery/2026-08/tyopiste-ja-hylly.jpg)

##### <span style="text-decoration: underline;">Vanhentuneet mallit</span>

<table border="1" cellpadding="0" cellspacing="0" id="bkmrk-integral-tuotekoodi--2" style="border-collapse: collapse; width: 784px; border-width: 1px; border-spacing: 0px; border-color: rgb(0, 0, 0);" width="846"><colgroup><col style="width: 107px;" width="87"></col><col style="width: 106px;" width="112"></col><col style="width: 348px;" width="527"></col><col style="width: 75px;" width="56"></col><col style="width: 155px;" width="64"></col></colgroup><thead><tr style="height: 15.0pt;"><td class="xl71" height="40" style="height: 30pt; width: 65pt; border-width: 1px; border-color: rgb(0, 0, 0);" width="87">**INTEGRAL tuotekoodi**</td><td class="xl72" style="width: 84pt; border-width: 1px; border-color: rgb(0, 0, 0);" width="112">**Koodi**</td><td class="xl73" style="width: 395pt; border-width: 1px; border-color: rgb(0, 0, 0);" width="527">**Nimi**</td><td class="xl73" style="width: 42pt; border-width: 1px; border-color: rgb(0, 0, 0);" width="56">**Määrä**</td><td class="xl73" style="width: 48pt; border-width: 1px; border-color: rgb(0, 0, 0);" width="64">**Huom!**</td></tr></thead><tbody><tr style="height: 15.0pt;"><td class="xl69" height="40" rowspan="3" style="border-width: 1px; border-bottom: 1px solid rgb(0, 0, 0); height: 30pt; border-top: 1px rgb(0, 0, 0); border-color: rgb(0, 0, 0);"><span style="background-color: rgb(194, 224, 244);">MB20</span>  
<span style="background-color: rgb(194, 224, 244);">![IM-MBUS20.jpg](https://wiki.bithouse.fi/uploads/images/gallery/2026-03/scaled-1680-/im-mbus20.jpg)</span></td><td class="xl67" style="border-width: 1px; border-top: 1px rgb(0, 0, 0); border-left: 1px rgb(0, 0, 0); border-color: rgb(0, 0, 0);">IM-MBUS-20</td><td class="xl66" style="border-width: 1px; border-top: 1px rgb(0, 0, 0); border-left: 1px rgb(0, 0, 0); border-color: rgb(0, 0, 0);">Integral säätimen M-Bus-tasomuunnin 20 mittarille</td><td class="xl66" style="border-width: 1px; border-top: 1px rgb(0, 0, 0); border-left: 1px rgb(0, 0, 0); border-color: rgb(0, 0, 0);">1</td><td class="xl66" style="border-width: 1px; border-top: 1px rgb(0, 0, 0); border-left: 1px rgb(0, 0, 0); border-color: rgb(0, 0, 0);"> </td></tr><tr style="height: 15.0pt;"><td class="xl66" height="20" style="height: 15pt; border-width: 1px; border-top: 1px rgb(0, 0, 0); border-left: 1px rgb(0, 0, 0); border-color: rgb(0, 0, 0);">1792016</td><td class="xl68" style="border-width: 1px; border-top: 1px rgb(0, 0, 0); border-left: 1px rgb(0, 0, 0); border-color: rgb(0, 0, 0);">Pluggable Terminal Block, 5 mm, 2 Ways, 30AWG to 12AWG, 2.5 mm², Screw, 12 A</td><td class="xl66" style="border-width: 1px; border-top: 1px rgb(0, 0, 0); border-left: 1px rgb(0, 0, 0); border-color: rgb(0, 0, 0);">1</td><td class="xl66" style="border-width: 1px; border-top: 1px rgb(0, 0, 0); border-left: 1px rgb(0, 0, 0); border-color: rgb(0, 0, 0);">  
</td></tr><tr><td style="border-width: 1px; border-top-style: none; border-left: 1px rgb(0, 0, 0); border-color: rgb(0, 0, 0);">  
</td><td style="border-width: 1px; border-top-style: none; border-left: 1px rgb(0, 0, 0); border-color: rgb(0, 0, 0);">Tarra \[ME 1 | ME 2\]</td><td style="border-width: 1px; border-top-style: none; border-left: 1px rgb(0, 0, 0); border-color: rgb(0, 0, 0);">1</td><td style="border-width: 1px; border-top-style: none; border-left: 1px rgb(0, 0, 0); border-color: rgb(0, 0, 0);">Toistaiseksi</td></tr></tbody></table>

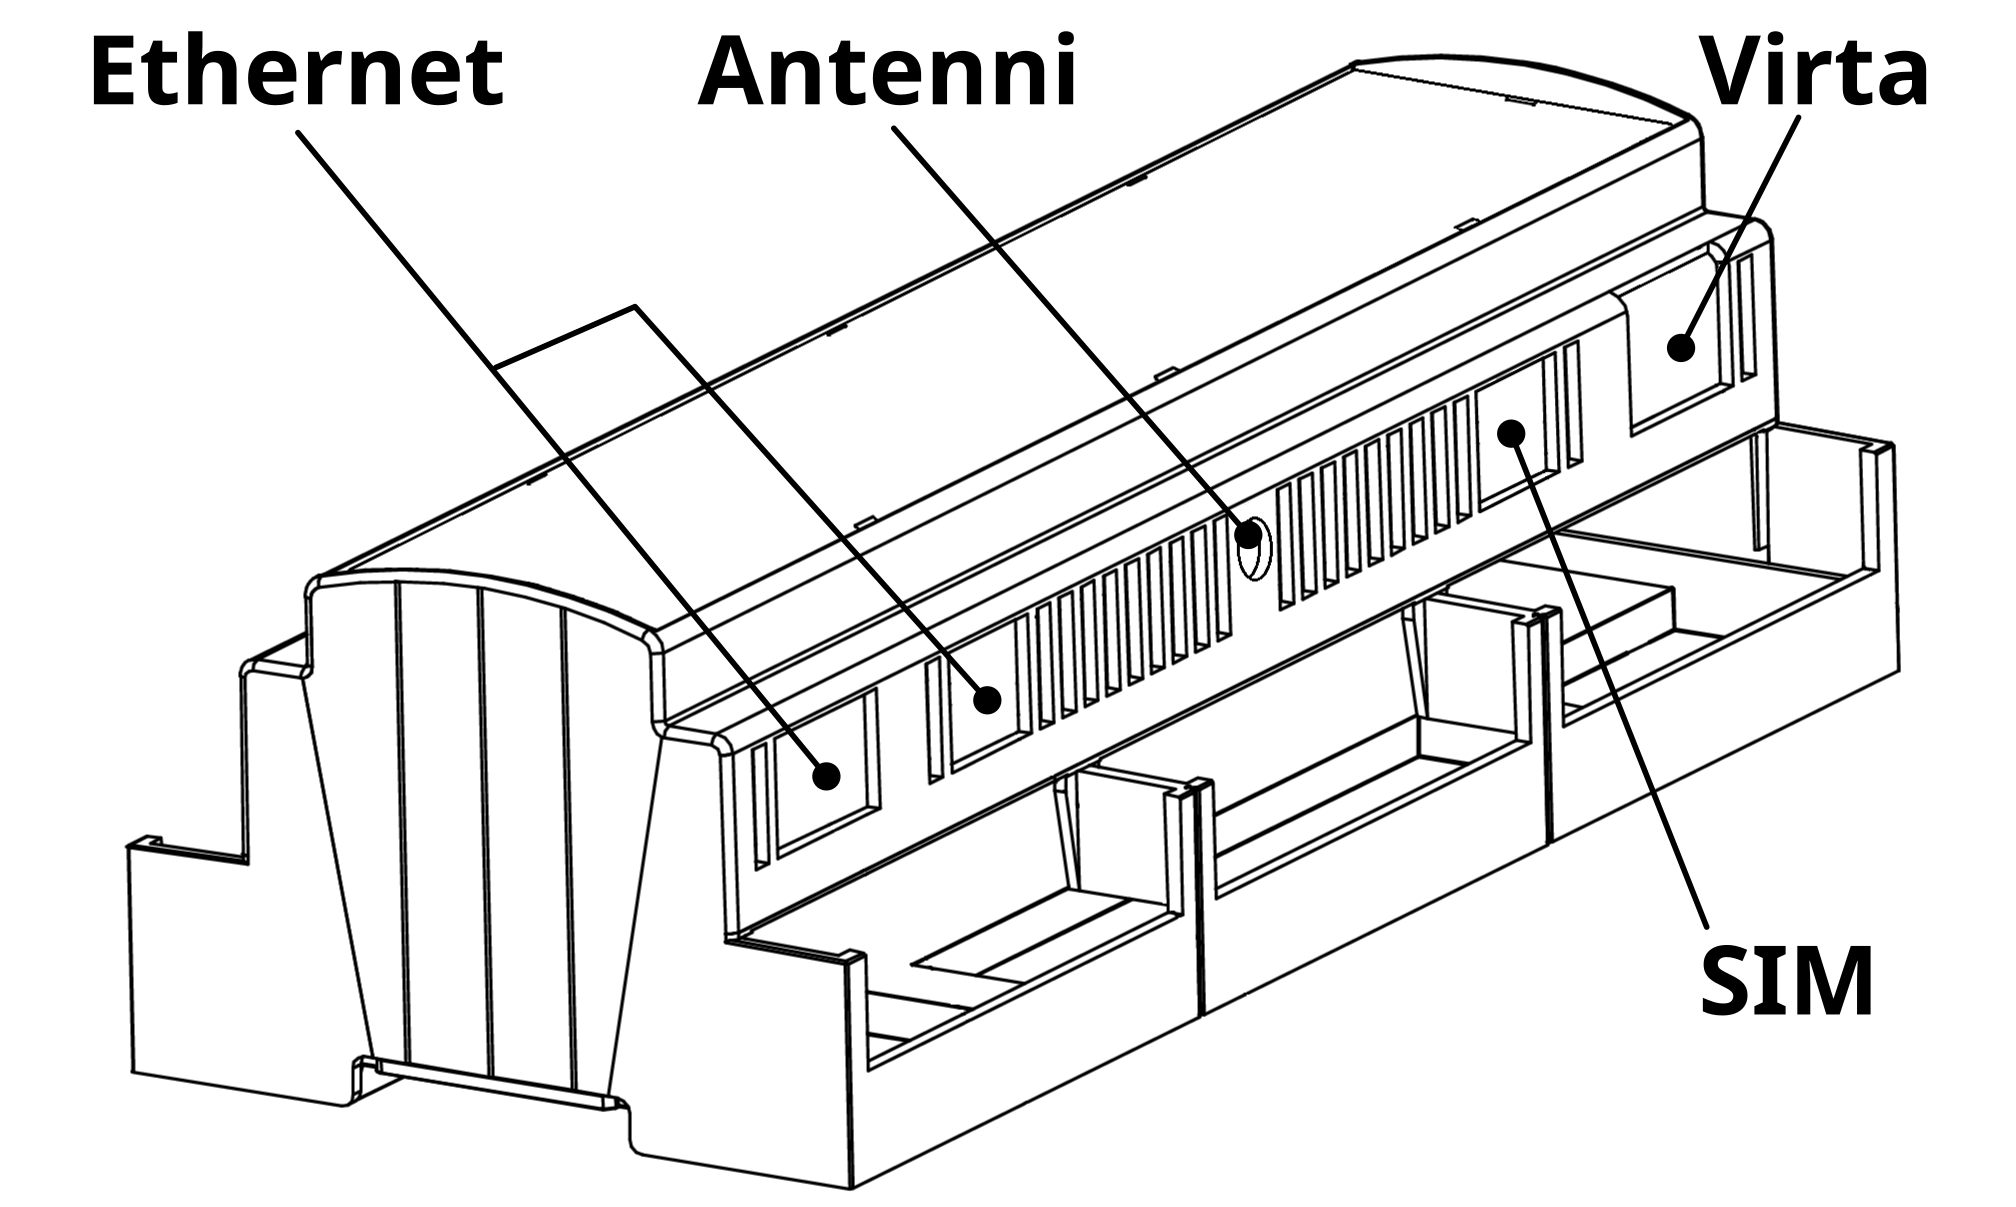
# Kotelon aukot

Kokoamispisteellä pitäisi olla koteloita, joissa on oikeat aukotukset. Tarkista kuitenkin tästä kuvasta.

- SIM-kortin aukotus ei ole koteloissa valmiina, joten se on lisätty pajalla käsin.

[![kotelo-ja-kansi-selitteet-SIM.png](https://wiki.bithouse.fi/uploads/images/gallery/2026-07/scaled-1680-/kotelo-ja-kansi-selitteet-sim.png)](https://wiki.bithouse.fi/uploads/images/gallery/2026-07/kotelo-ja-kansi-selitteet-sim.png)

# Näytön liimaus

<p class="callout warning">**HUOM! Liimaus tulee tehdä hyvin ilmastoidussa tilassa, hallin puolella.**</p>

**[![pohjapiirros_kokoamispisteet.png](https://wiki.bithouse.fi/uploads/images/gallery/2026-08/scaled-1680-/pohjapiirros-kokoamispisteet.png)](https://wiki.bithouse.fi/uploads/images/gallery/2026-08/pohjapiirros-kokoamispisteet.png)**

### OSAT:

- <span style="color: rgb(52, 73, 94);">näytön kehys</span>
- <span style="color: rgb(52, 73, 94);">näyttö</span>
- <span style="color: rgb(52, 73, 94);">USB-liittimen suojus</span>

[![PIENnäytön-valmistelu1.jpg](https://wiki.bithouse.fi/uploads/images/gallery/2026-07/scaled-1680-/piennayton-valmistelu1.jpg)](https://wiki.bithouse.fi/uploads/images/gallery/2026-07/piennayton-valmistelu1.jpg)


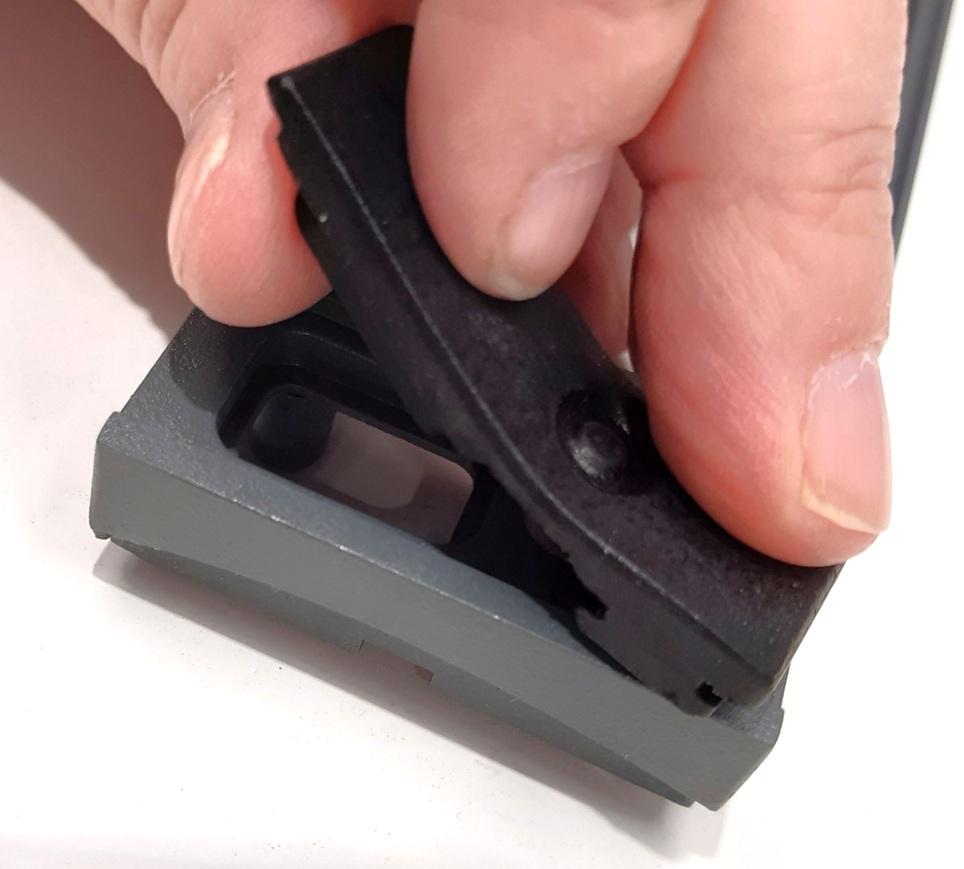
### <span style="background-color: rgb(236, 202, 250);">1. USB-suojalätkän kiinnittäminen kehykseen</span>

Kiinnitä USB-liittimen suoja näytön kehykseen napakasti painamalla.

[![lätkä-kiinni.jpg](https://wiki.bithouse.fi/uploads/images/gallery/2026-03/scaled-1680-/latka-kiinni.jpg)](https://wiki.bithouse.fi/uploads/images/gallery/2026-03/latka-kiinni.jpg)
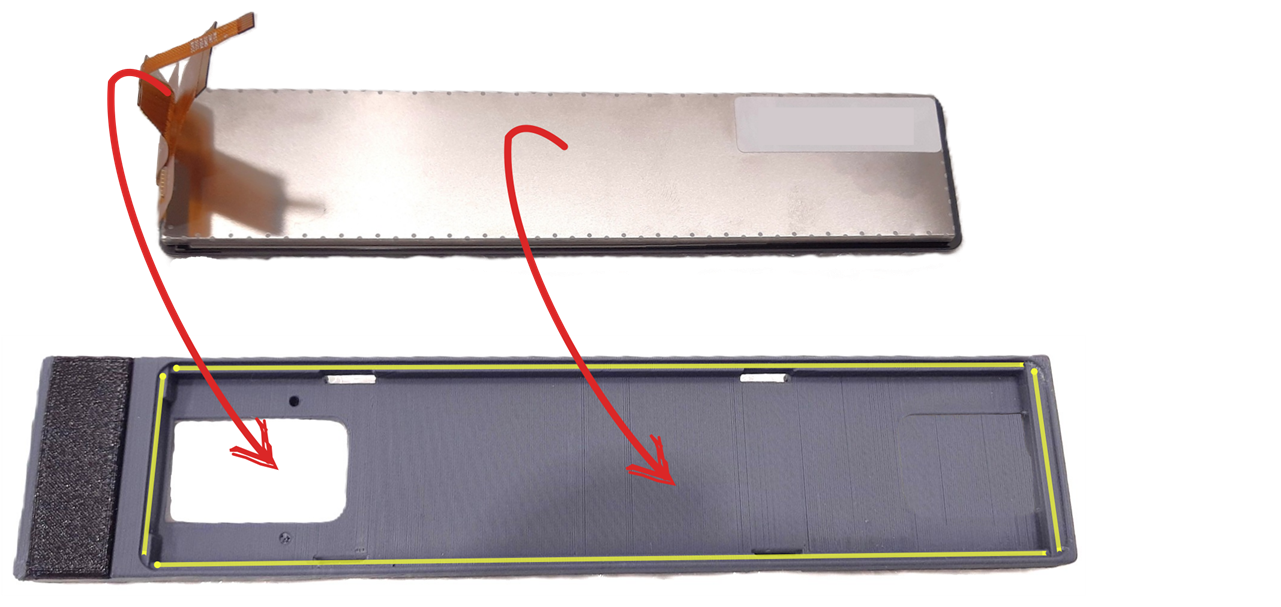
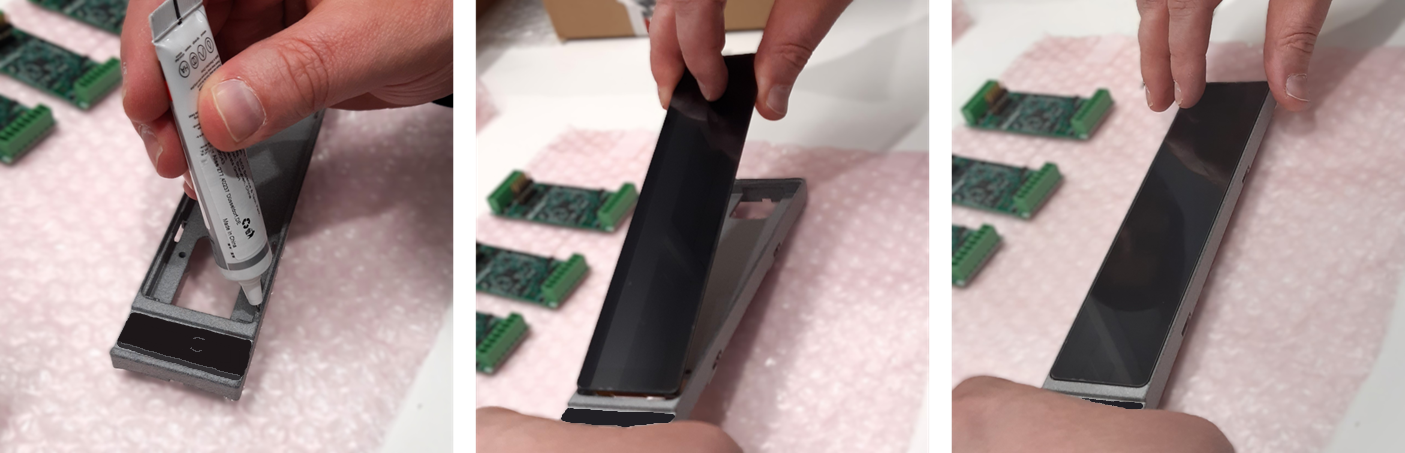
### <span style="background-color: rgb(236, 202, 250);">2. Näytön liimaus kehykseen</span>

- **PUHDISTA** ensin näytön kehyksestä ne kohdat, johon liima tulee.
- <span style="color: rgb(52, 73, 94);">Laita näyttöliimaa kehyksen reunoihin kuvan osoittamalla tavalla.</span>
- <span style="color: rgb(52, 73, 94);">Varmista, että piuhat menevät läpi aukosta.</span>
- <span style="color: rgb(52, 73, 94);">Paina kevyesti vähän aikaa (noin puoli minuuttia). </span>

<p class="callout success"><span style="color: rgb(52, 73, 94);">HUOM! Liimaa saa mieluummin olla liikaa kuin liian vähän. Parempi puhdistaa ylijäämä kuin että näyttö ei kiinnity kunnolla.</span></p>

[![näytön_liimaus-nuolet2.png](https://wiki.bithouse.fi/uploads/images/gallery/2025-12/scaled-1680-/GJvnayton-liimaus-nuolet2.png)](https://wiki.bithouse.fi/uploads/images/gallery/2025-12/GJvnayton-liimaus-nuolet2.png)

[![näytön_liimaus_uusi.png](https://wiki.bithouse.fi/uploads/images/gallery/2026-03/scaled-1680-/4X8nayton-liimaus-uusi.png)](https://wiki.bithouse.fi/uploads/images/gallery/2026-03/4X8nayton-liimaus-uusi.png)
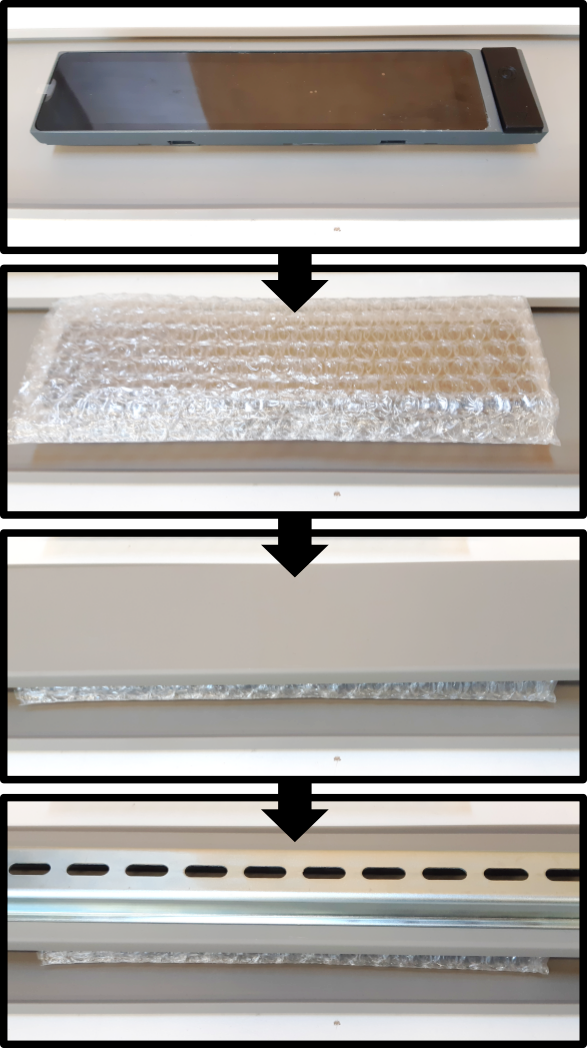
- <span style="color: rgb(52, 73, 94);">Jätä painon alle kuivumaan. Käytä tarvikkeita, joita on näytön liimauspisteellä.</span>

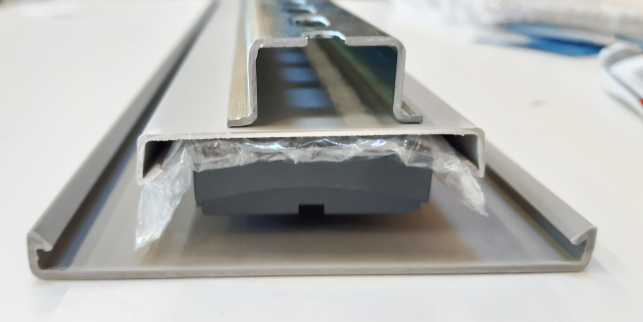
<span style="color: rgb(52, 73, 94);">Aseta näyttö johtokourusuojan päälle.</span>

- - <span style="color: rgb(52, 73, 94);">Aseta näytön oma pakkauskuplamuovi näytön päälle pehmustamaan/tiivistämään seuraavaa kerrosta</span>
    - <span style="color: rgb(52, 73, 94);">Aseta kapeampi johtokourunsuoja kuplamuovin päälle, johon se asettuu hyvin.</span>
    - <span style="color: rgb(52, 73, 94);">Lopuksi laita painoja pinon päälle. DIN-kiskot kelpaavat hyvin tähän muotonsa ja painonsa puolesta.</span>

<span style="color: rgb(52, 73, 94);">[![liimaus-kuivmaan_sarjis.png](https://wiki.bithouse.fi/uploads/images/gallery/2026-04/scaled-1680-/liimaus-kuivmaan-sarjis.png)](https://wiki.bithouse.fi/uploads/images/gallery/2026-04/liimaus-kuivmaan-sarjis.png)</span>

<span style="color: rgb(52, 73, 94);">[![liimaus-kuivmaan_rakennekuva.png](https://wiki.bithouse.fi/uploads/images/gallery/2026-04/scaled-1680-/liimaus-kuivmaan-rakennekuva.png)](https://wiki.bithouse.fi/uploads/images/gallery/2026-04/liimaus-kuivmaan-rakennekuva.png)</span>

<p class="callout info"><span style="color: rgb(52, 73, 94);">Muista sulkea liiman korkki.</span></p>

### <span style="background-color: rgb(236, 202, 250);"><span style="color: rgb(52, 73, 94);">3. </span><span style="color: rgb(52, 73, 94);">Lopuksi</span></span>


- Annetaan kuivua **24 tuntia**
- pakataan takaisin laatikkoon ja viedään Integralin osien hyllyyn.

# Tarkistuslista / assembly checklist (vapaaehtoinen, sisäiseen käyttöön)

Työpisteen hyllyn vieressä seinällä muovitaskussa on [kokoonpanon tarkastuslistoja](https://wiki.bithouse.fi/attachments/54). Printtaa linkin takaa lisää jos tasku on tyhjä.

- Lista on tarkoitettu avuksi erityisesti silloin, kun kokoaa useampaa laitetta kerrallaan. Listan avulla voi muistaa, missä kohtaa on minkäkin laitteen kanssa.
- Listasta voi myös tarkistaa jälkikäteen kokoonpanon kulun, jos laitteessa ilmenee ongelmia.

Listat kerätään kokoamispisteen hyllyssä olevaan laatikkoon. Laatikossa lukee **TÄYTETYT TARKASTUSLISTAT**

<p class="callout success">Listan käyttö on vapaaehtoista - käytä listaa jos se **helpottaa** omaa työskentelyäsi.</p>

# KOKOAMINEN

# Kokoamisohje: vakio-osat
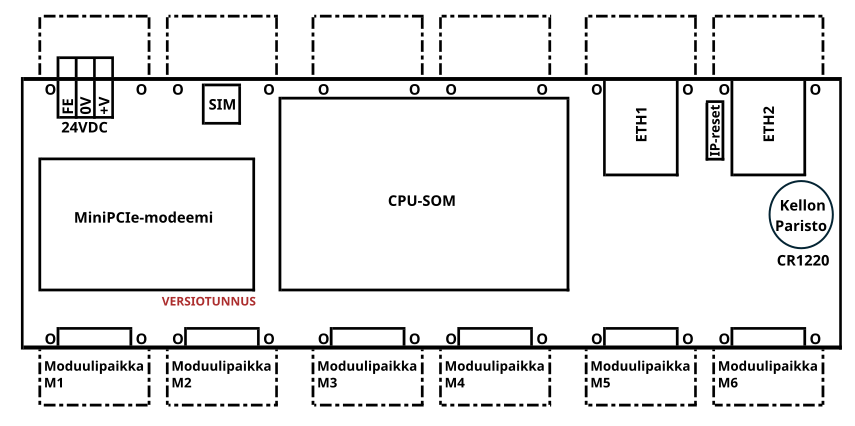
![Kytkentäkuva-IntegralFI.png](https://wiki.bithouse.fi/uploads/images/gallery/2026-02/scaled-1680-/kytkentakuva-integralfi.png)

### <span style="background-color: rgb(251, 238, 184);">1. CPU-SoM</span>


- Liu'uta prosessori kiinni liittimiin. Paina alas, jolloin se lukittuu paikoilleen.
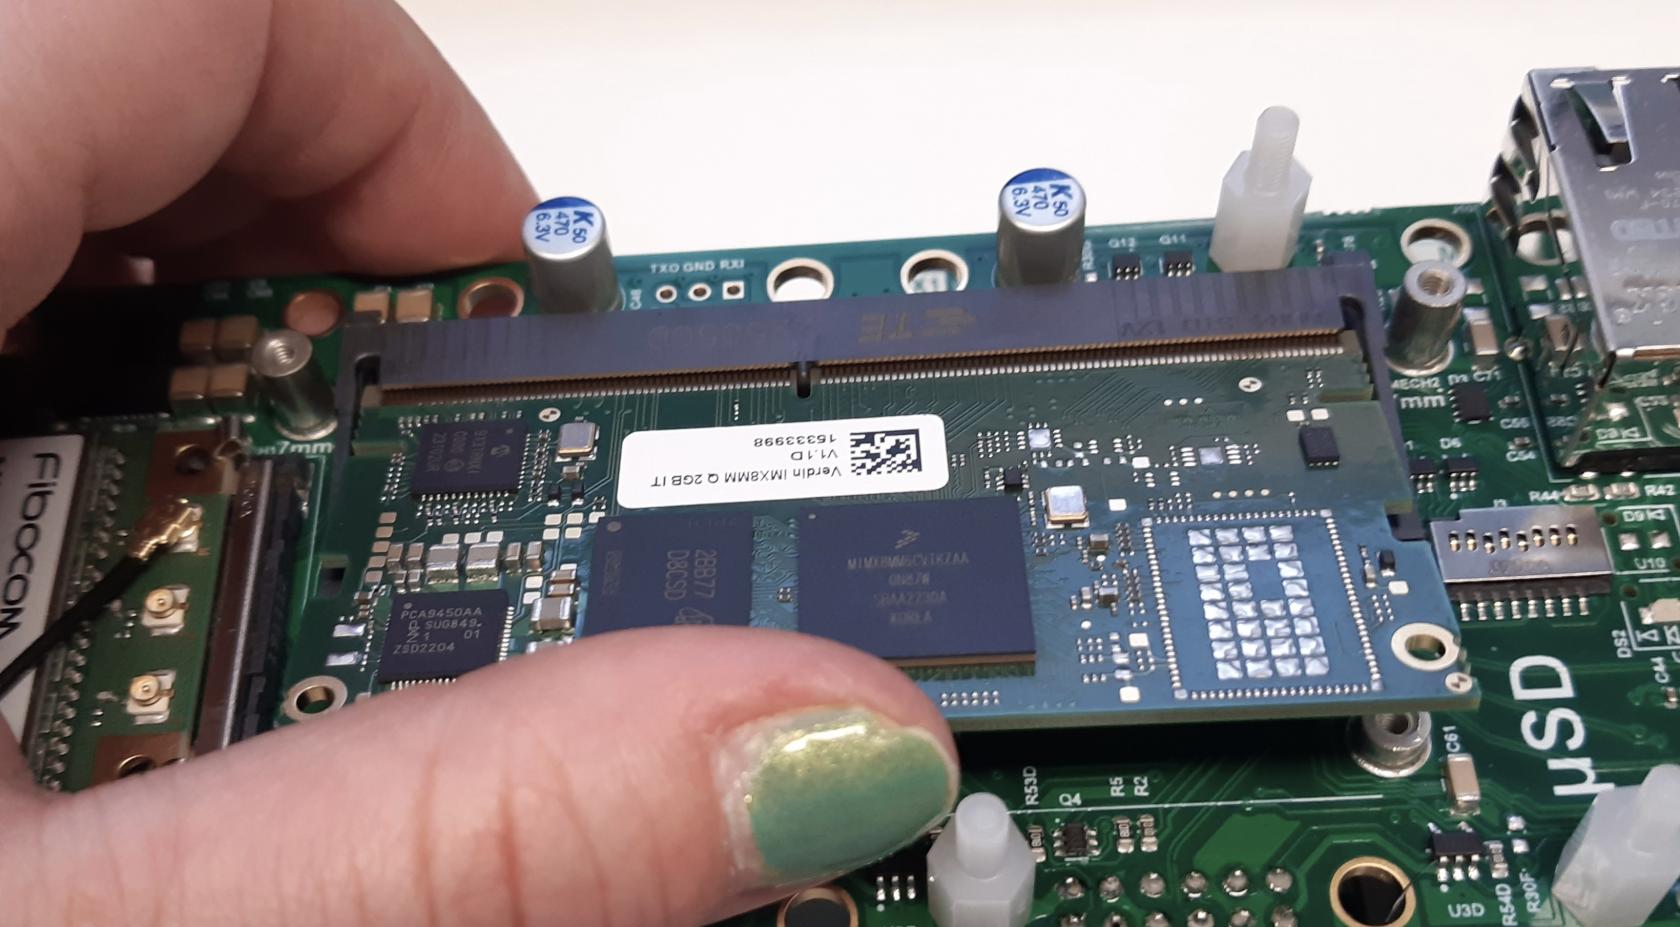
![CPU_paikoilleen.jpg](https://wiki.bithouse.fi/uploads/images/gallery/2025-04/scaled-1680-/cpu-paikoilleen.jpg)

- Mikäli prosessori ei lukitu kunnolla, nosta lyhyillä sivuilla olevia jousia varovasti esim. ruuvimeisselillä, jolloin jouset pääsevät loksahtamaan paikoilleen.
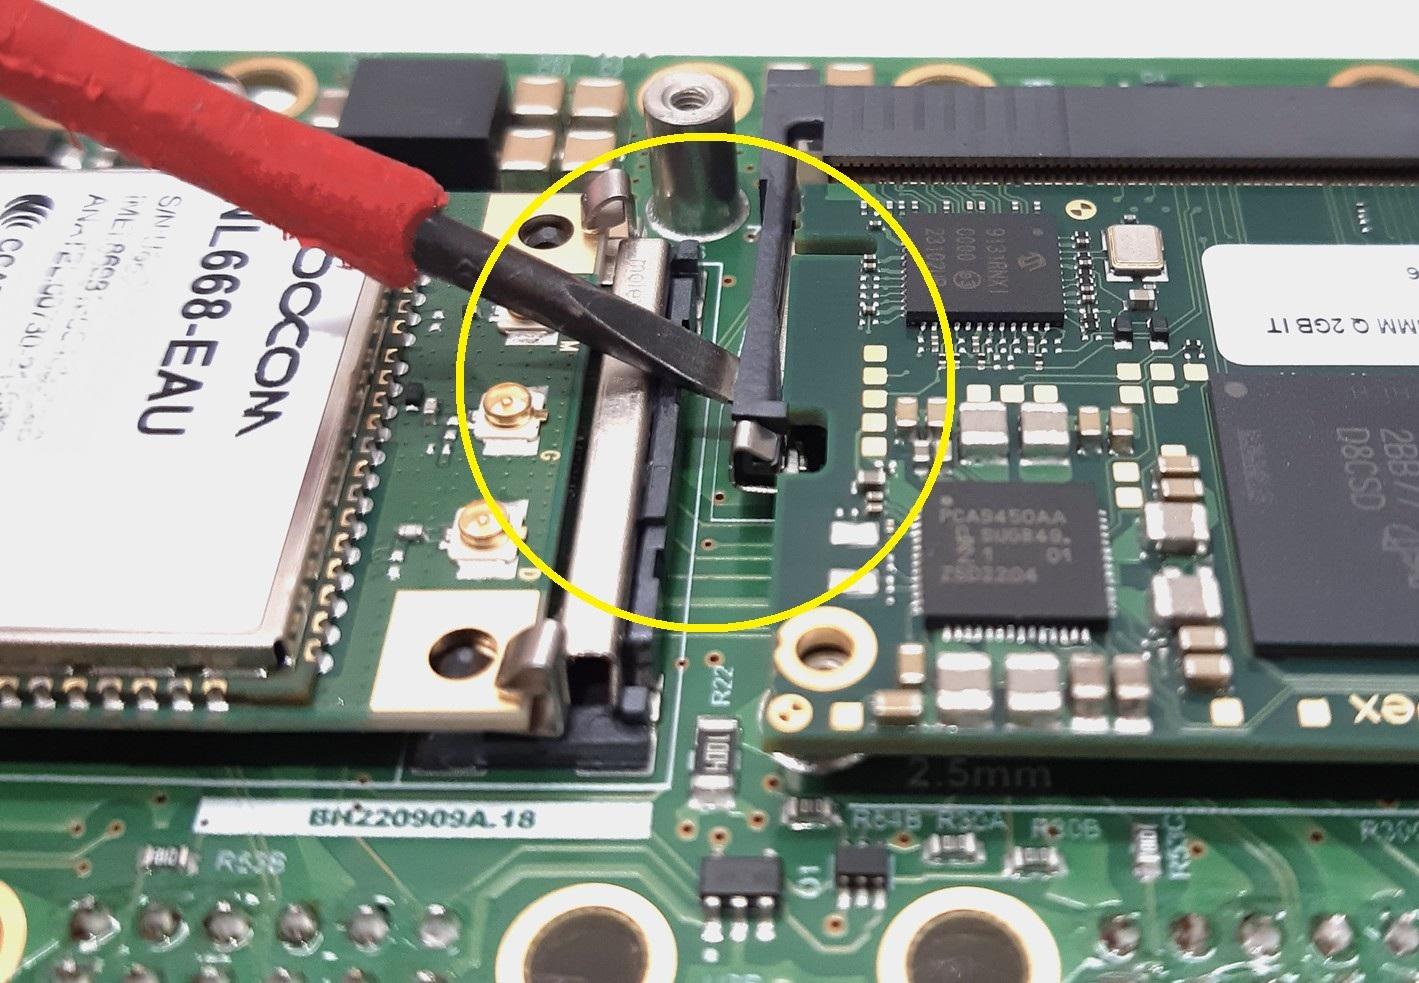
![CPU-SoM-kiinnitys10.jpg](https://wiki.bithouse.fi/uploads/images/gallery/2026-02/scaled-1680-/cpu-som-kiinnitys10.jpg)

- Tarvittaessa lukituksen voi vapauttaa lyhyillä sivuilla olevista jousista, vetämällä niitä ulospäin.

### 2. Paristo

- Aseta kellon **paristo** paikoilleen.
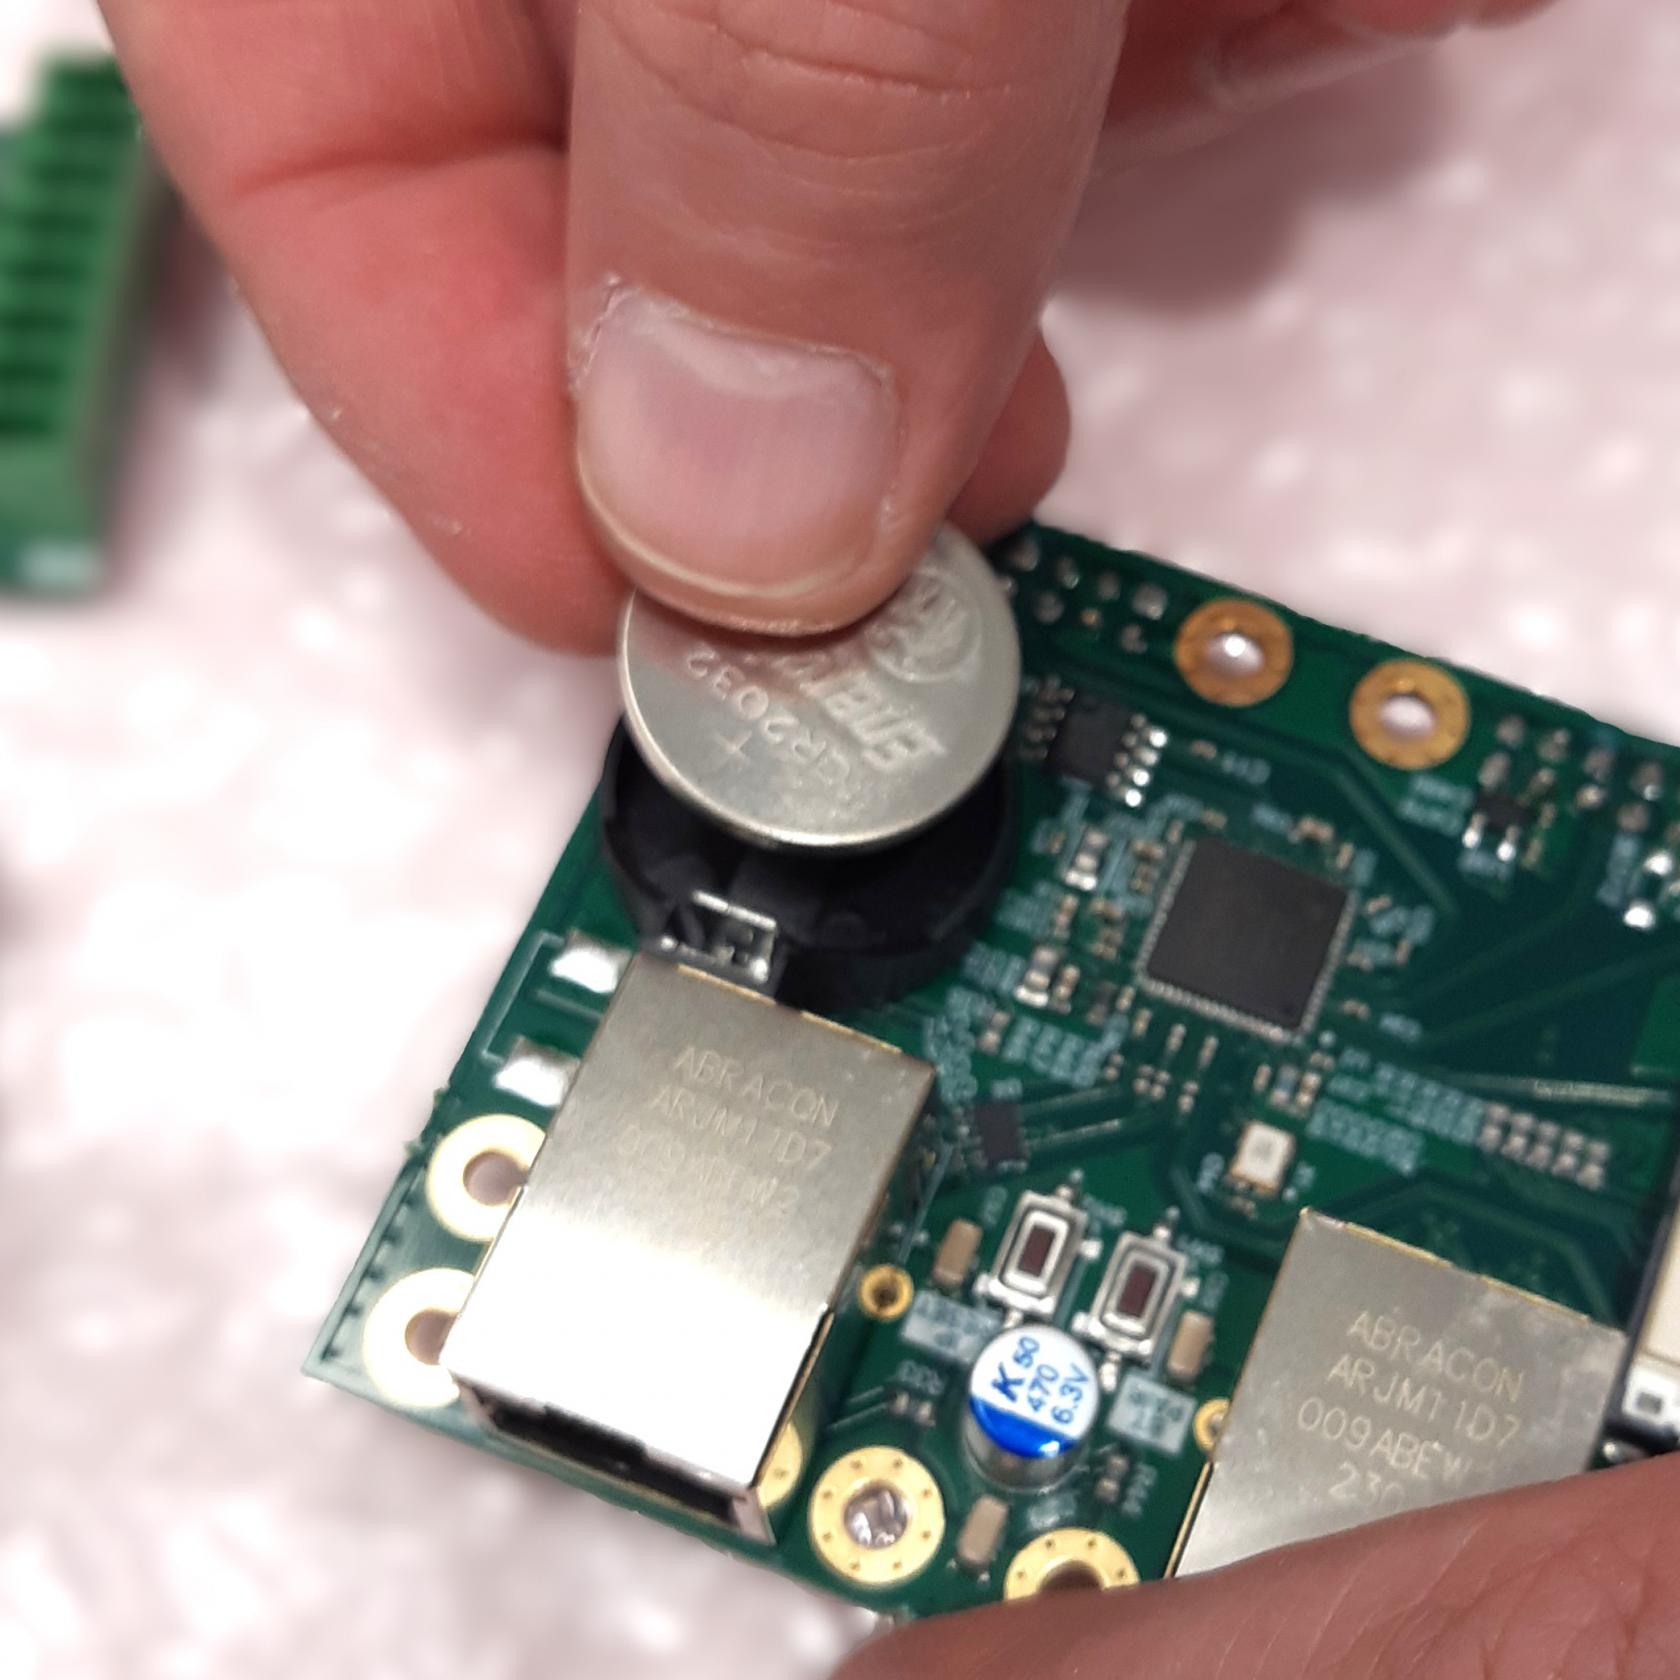
![paristo1.jpg](https://wiki.bithouse.fi/uploads/images/gallery/2025-12/scaled-1680-/paristo1.jpg)

### <span style="background-color: rgb(194, 224, 244);">3. Moduulit</span>


[![moduulipaikat-simple.png](https://wiki.bithouse.fi/uploads/images/gallery/2026-03/scaled-1680-/moduulipaikat-simple.png)](https://wiki.bithouse.fi/uploads/images/gallery/2026-03/moduulipaikat-simple.png)

- Tarkista tuotekoodista mitkä moduulit asennetaan:

<table border="1" id="bkmrk-moduulin-lyhenne-tuo" style="border-collapse: collapse; width: 34.2857%;"><colgroup><col style="width: 45.5769%;"></col><col style="width: 54.4232%;"></col></colgroup><thead><tr><td>**Moduulin lyhenne tuotekoodissa**</td><td>**Moduulin tuotekoodi**</td></tr></thead><tbody><tr><td>IO</td><td>IM-IO816</td></tr><tr><td>RS2</td><td>IM-RS485-2P</td></tr><tr><td>?</td><td>IM-MBUS-10</td></tr><tr><td>MB250</td><td>IM-MBUS-250</td></tr><tr><td>USB</td><td>IM-USB-C-4P</td></tr><tr><td>24V</td><td>IM-24VDC</td></tr></tbody></table>

- Tarkista tuotekoodista moduulien oikeat paikat pääkortissa: 
    - merkkisarja esimerkiksi <span style="background-color: rgb(194, 224, 244);">\[IO-IO-IO-IO-X-RS\]</span>

<table border="1" class="align-left" id="bkmrk-moduulipaikka-1-im-i" style="border-collapse: collapse; width: 129.422%; height: 177.6px;"><colgroup><col style="width: 45.8878%;"></col><col style="width: 54.1688%;"></col></colgroup><tbody><tr style="height: 29.6px;"><td style="height: 29.6px;">Moduulipaikka 1</td><td style="height: 29.6px;">IM-IO816</td></tr><tr style="height: 29.6px;"><td style="height: 29.6px;">Moduulipaikka 2</td><td style="height: 29.6px;">IM-IO816</td></tr><tr style="height: 29.6px;"><td style="height: 29.6px;">Moduulipaikka 3</td><td style="height: 29.6px;">IM-IO816</td></tr><tr style="height: 29.6px;"><td style="height: 29.6px;">Moduulipaikka 4</td><td style="height: 29.6px;">IM-IO816</td></tr><tr style="height: 29.6px;"><td style="height: 29.6px;">Moduulipaikka 5

</td><td style="height: 29.6px;">ei moduulia</td></tr><tr style="height: 29.6px;"><td style="height: 29.6px;">Moduulipaikka 6</td><td style="height: 29.6px;">IM-RS485-2</td></tr></tbody></table>

<p class="callout info">Jos päätyihin ei tule muuta, laitetaan päätypaikkoihin (moduulipaikat 1 ja 6) tyhjä kortti. Näille ei ole erillistä merkintää tilauskoodissa.</p>

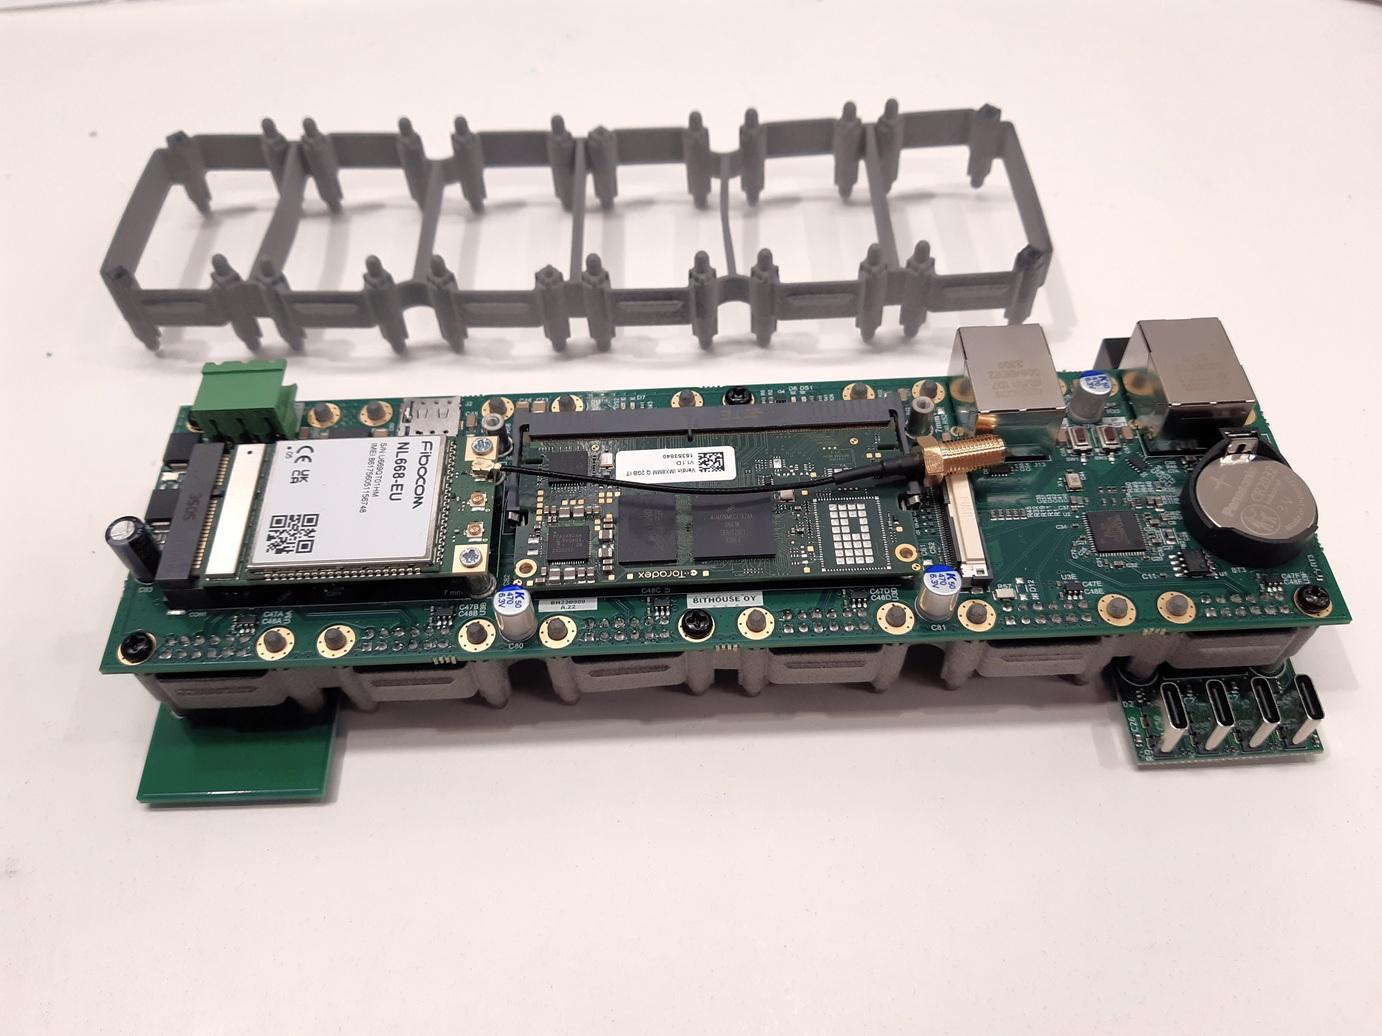
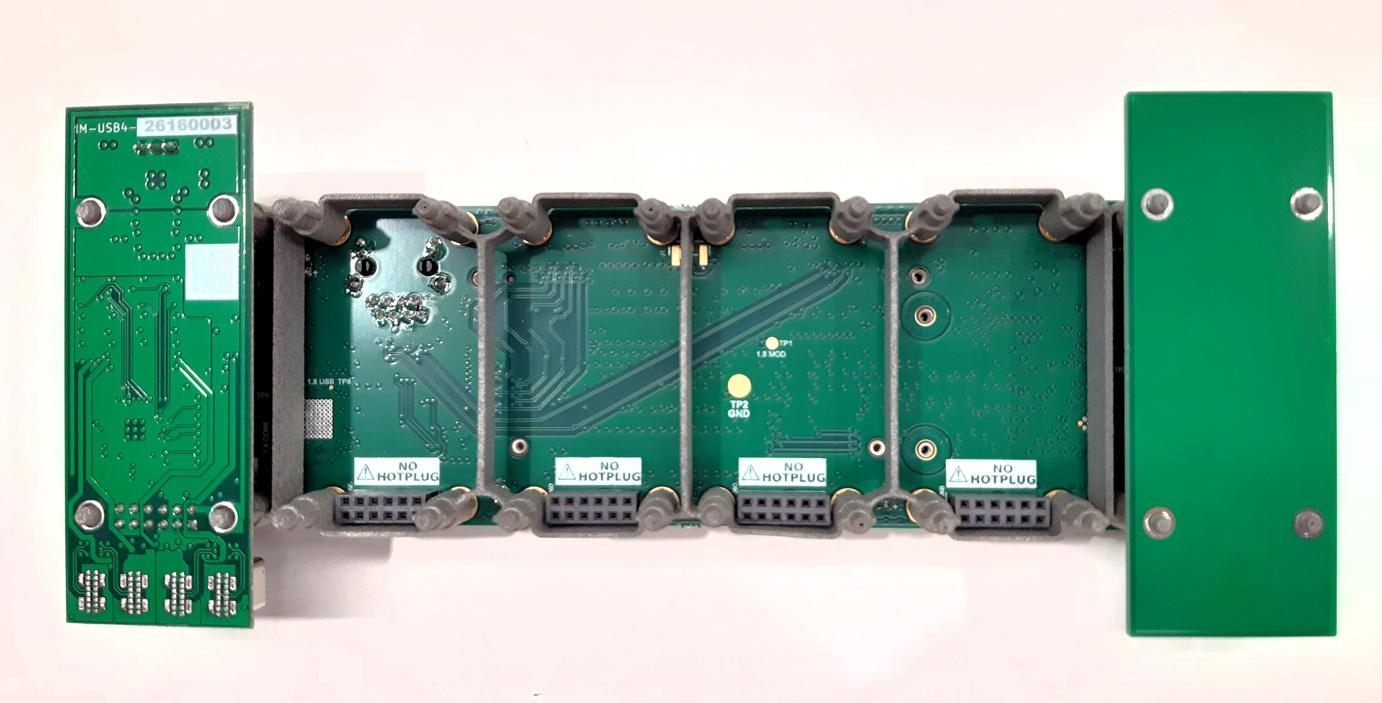
- Kiinnitä moduulikehys pääkorttiin. 
    - Moduulikehyksessä on alapuolella jokaisen moduulin kohdalla neljä tappia. Yläpuolella on tappeja ja ruuvinreikiä.
    - Aseta kehys niin, että ruuvinreiät tulevat pääkorttiin päin.
    - Ruuvaa kehys kiinni pääkorttiin (samat ruuvit kuin näytön lisäkortissa tai vastaavat)
- Kiinnitä moduulit kehykseen, ei ruuveja, vain napsautetaan paikoilleen. 
    - Varo etteivät moduulit irtoa, ne pysyvät kunnolla paikallaan vain kotelon pohjan tuella.

[![moduulikehysPIEN.jpg](https://wiki.bithouse.fi/uploads/images/gallery/2026-07/scaled-1680-/moduulikehyspien.jpg)](https://wiki.bithouse.fi/uploads/images/gallery/2026-07/moduulikehyspien.jpg)
[![moduulikehys-pohjaPIEN.jpg](https://wiki.bithouse.fi/uploads/images/gallery/2026-07/scaled-1680-/moduulikehys-pohjapien.jpg)](https://wiki.bithouse.fi/uploads/images/gallery/2026-07/moduulikehys-pohjapien.jpg)
# Kokoamisohje: tarvittaessa asennettavat

![Kytkentäkuva-IntegralFI.png](https://wiki.bithouse.fi/uploads/images/gallery/2026-02/scaled-1680-/kytkentakuva-integralfi.png)

### <span style="background-color: rgb(236, 202, 250);">1. Näyttö</span>

<p class="callout info">Voidaan tehdä, kun liimauksesta on kulunut 24 h</p>

#### OSAT:

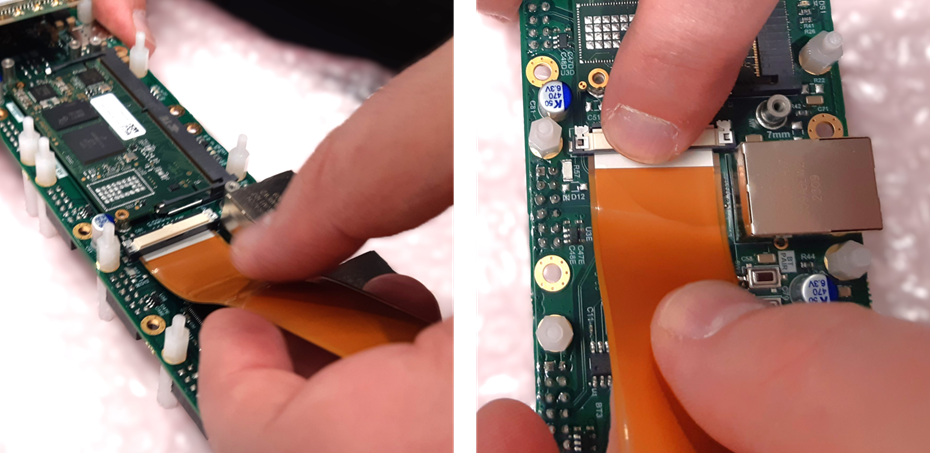
- näytön lisäkortti
- ruuvit
- lattakaapeli

[![PIENnäytön-valmistelu2.jpg](https://wiki.bithouse.fi/uploads/images/gallery/2026-07/scaled-1680-/piennayton-valmistelu2.jpg)](https://wiki.bithouse.fi/uploads/images/gallery/2026-07/piennayton-valmistelu2.jpg)
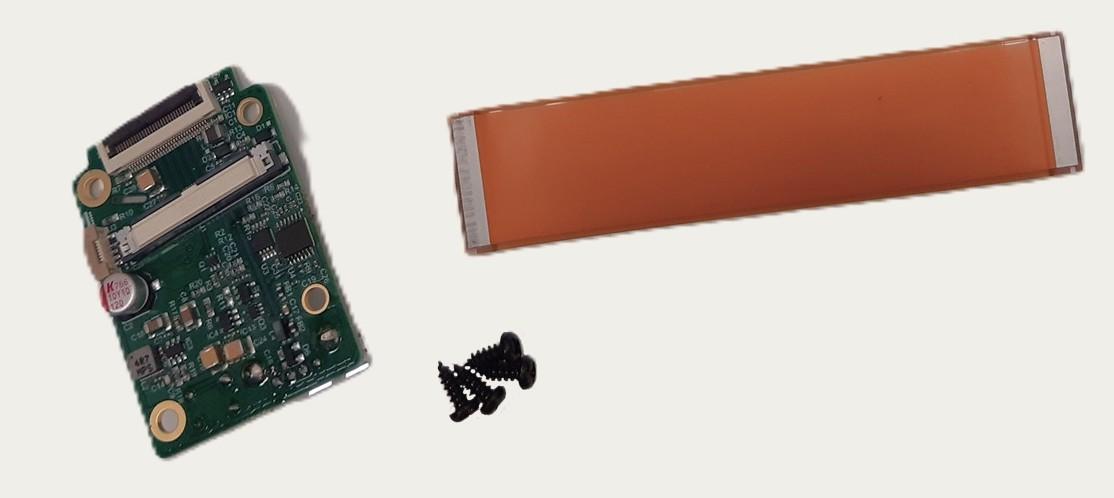
#### <span style="background-color: rgb(236, 202, 250);">1.1 Näytön lisäkortin kytkentä näyttöön</span>

- Kytke leveämpi kaapeli lisäkortin liittimeen kuvasarjan mukaisesti: 
    - Nosta liittimen kieleke ylös
    - Työnnä kaapeli liittimeen
    - Napsauta liittimen kieleke alas

[![PIENlisäkortti-lev-kaapel.jpg](https://wiki.bithouse.fi/uploads/images/gallery/2026-03/scaled-1680-/pienlisakortti-lev-kaapel.jpg)](https://wiki.bithouse.fi/uploads/images/gallery/2026-03/pienlisakortti-lev-kaapel.jpg)
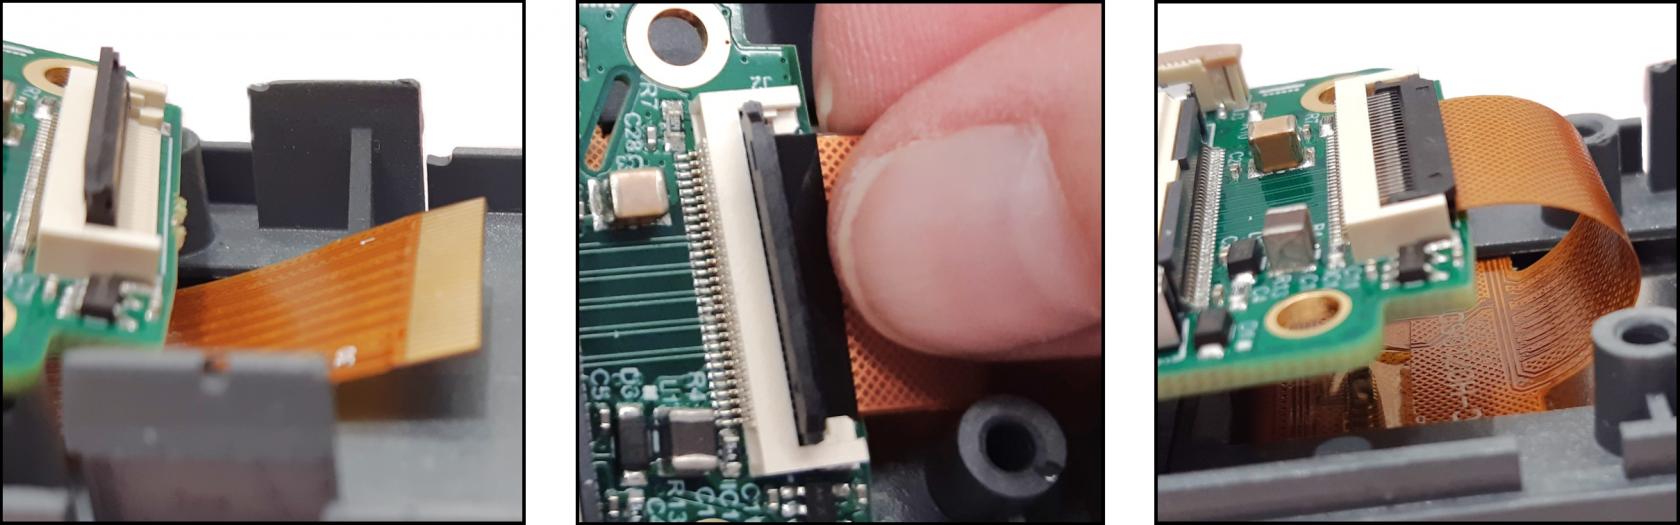
- <span style="color: rgb(0, 0, 0); background-color: rgb(255, 255, 255);"><span style="color: rgb(52, 73, 94);">Pujota näytön ohuempi kaapeli lisäkortin lovesta läpi.</span></span>
    - ohuemman kaapelin neliönmallisen osan sileä metallipuoli tulisi olla näyttöön päin.
- Aseta samalla lisäkortti kohdilleen ruuvaamista varten. 
    - USB-portti ja IP-resetnappi oikeille kohdilleen.

[![näytön-kaapelien-asento-ja-USB-PIENI.jpg](https://wiki.bithouse.fi/uploads/images/gallery/2026-04/scaled-1680-/pWQnayton-kaapelien-asento-ja-usb-pieni.jpg)](https://wiki.bithouse.fi/uploads/images/gallery/2026-04/nayton-kaapelien-asento-ja-usb-pieni.jpg)
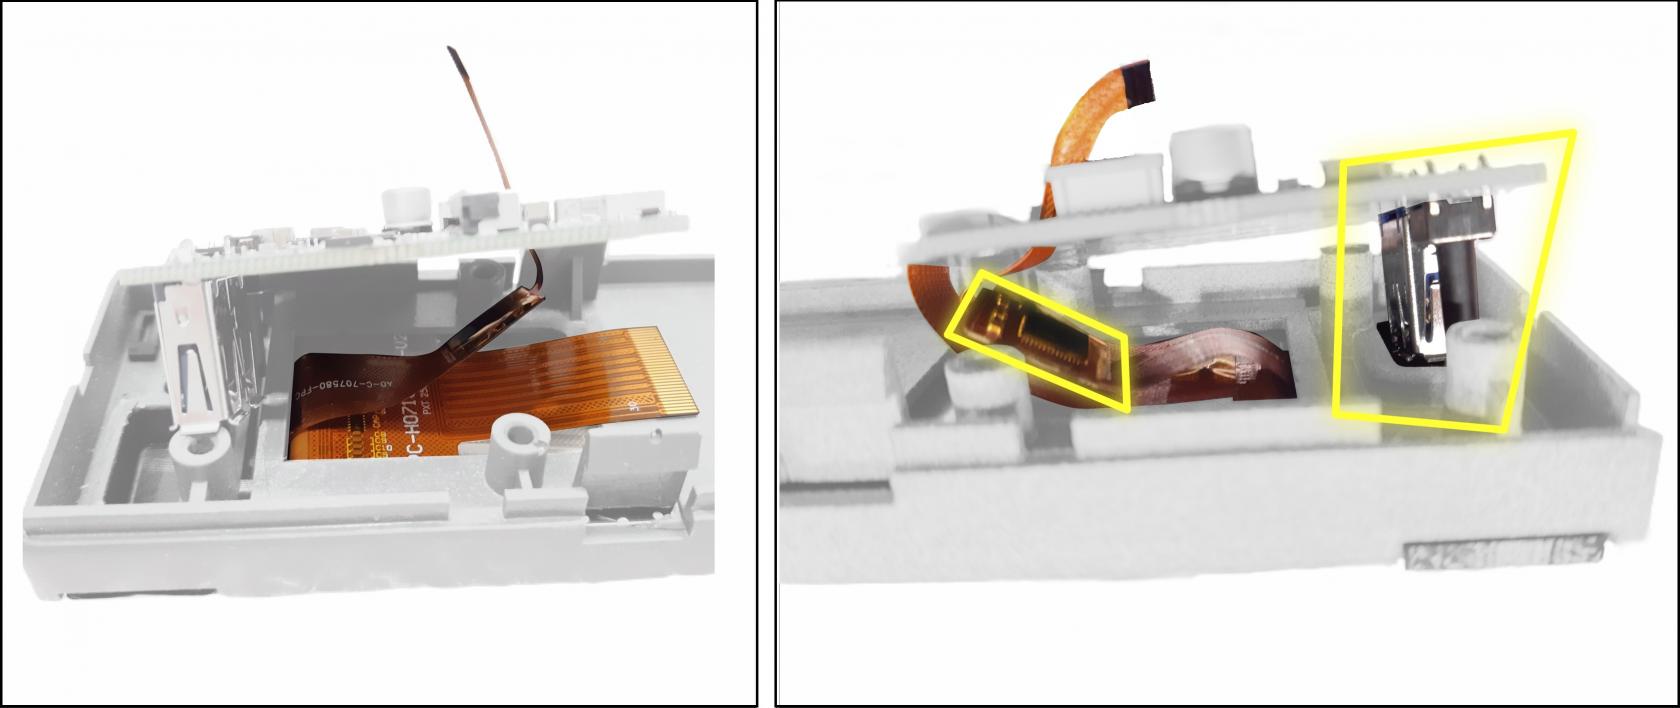
- Kiinnitä lisäkortti kehykseen neljällä ruuvilla kuvan mukaan.

[![lisäkortin_ruuvaus_PIEN.jpg](https://wiki.bithouse.fi/uploads/images/gallery/2026-04/scaled-1680-/lisakortin-ruuvaus-pien.jpg)](https://wiki.bithouse.fi/uploads/images/gallery/2026-04/lisakortin-ruuvaus-pien.jpg)
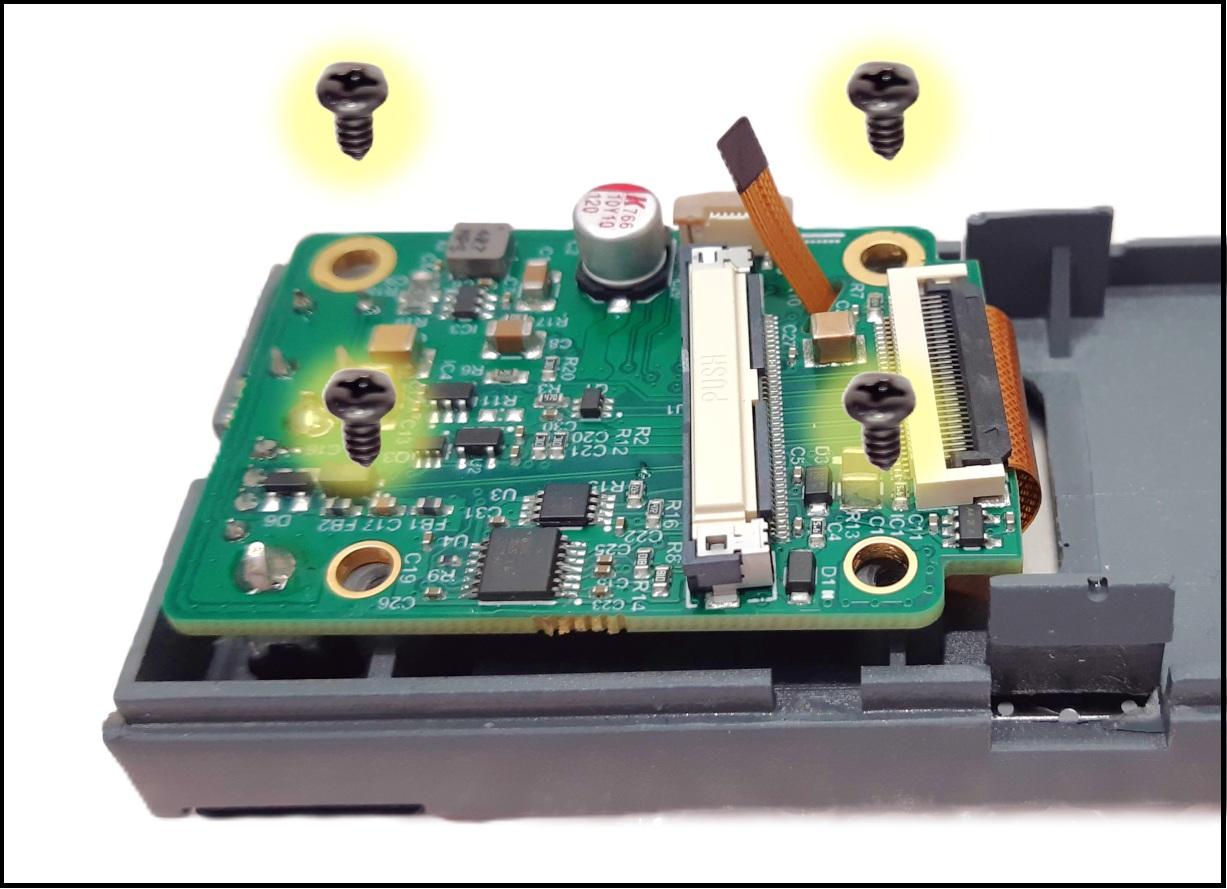
- Kytke lopuksi ohut kaapeli lisäkorttiin. 
    - Nosta liittimen kieleke ylös.
    - Työnnä kaapeli liittimeen. Tämä vaatii sorminäppäryyttä, ja voi olla ensimmäisellä kerralla vaikeaa.
    - Paina liittimen kieleke alas.
    - Varmista, että piuha ei ole vinossa liittimeen nähden (musta alue näkyy tasaisesti).

[![PIENlisäkortin_kytkentä_kapeampi_kaapeli.jpg](https://wiki.bithouse.fi/uploads/images/gallery/2026-04/scaled-1680-/pienlisakortin-kytkenta-kapeampi-kaapeli.jpg)](https://wiki.bithouse.fi/uploads/images/gallery/2026-04/pienlisakortin-kytkenta-kapeampi-kaapeli.jpg)
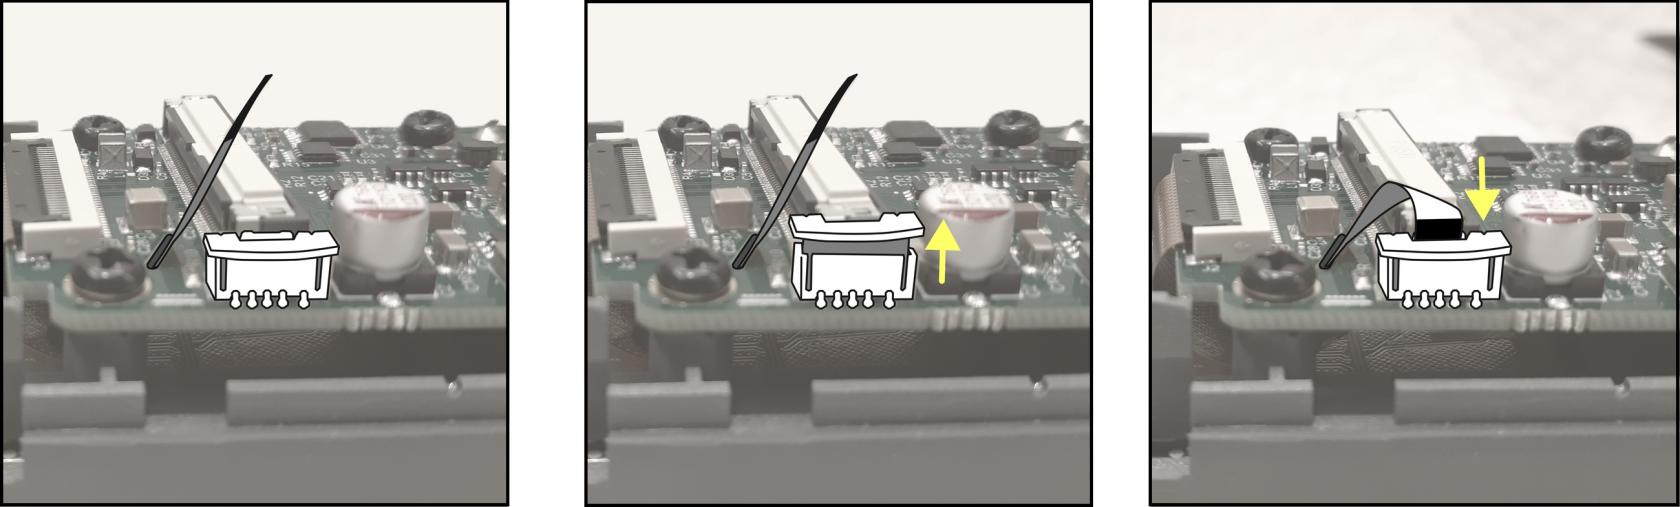
#### <span style="color: rgb(52, 73, 94); background-color: rgb(236, 202, 250);">1.2 Näytön lattakaapeli pääkorttiin</span>

- <span style="background-color: rgb(255, 255, 255);">Lattakaapeli kytketään pääkorttiin.</span>
- <span style="background-color: rgb(255, 255, 255);">Aseta kaapeli tasaisesti vaakasuoraan niin, että kumpikin reuna naksahtaa paikoilleen. Tämä vaatii sorminäppäryyttä ja voi olla ensimmäisellä kerralla vaikeaa.</span>
    - <span style="background-color: rgb(255, 255, 255);">Liittimen PUSH-merkittyä kohtaa painamalla kaapeli irtoaa liittimestä ja voi yrittää uudestaan.</span>

<span style="color: rgb(0, 0, 0); background-color: rgb(185, 106, 217);">[<span style="background-color: rgb(255, 255, 255);">![lattakaapeli_paikalleen.png](https://wiki.bithouse.fi/uploads/images/gallery/2026-01/scaled-1680-/ToOlattakaapeli-paikalleen.png)</span>](https://wiki.bithouse.fi/uploads/images/gallery/2026-01/ToOlattakaapeli-paikalleen.png)</span>

### 2. SIM-kortti

- SIM-kortti laitetaan vain tarvittaessa. 
    - - - Tämän näkee [INTEGRAL PRODUCTION](https://docs.google.com/spreadsheets/d/1pupkZCM5NyyzgvCC0XG2sC6sJNPZkWRU-GR4wH_WI8U/edit?gid=0#gid=0) tiedostossa.

### <span style="background-color: rgb(191, 237, 210);">3. Modeemi ja antenni</span>


Jos laite sisältää modeemin:

- Liu'uta modeemi paikoilleen. Kiinnitä toisesta päästä M2 -ruuveilla.

<p class="callout warning"><span style="color: rgb(0, 0, 0);">HUOM! Ruuvin vastakappaleet ovat ainoastaan kolvauksella kiinni piirilevyssä - kiristä ruuvit napakasti mutta älä käytä liikaa voimaa.</span></p>

![PIEN_modeemi_paikoilleen_ruuvit3.jpg](https://wiki.bithouse.fi/uploads/images/gallery/2026-02/scaled-1680-/pien-modeemi-paikoilleen-ruuvit3.jpg)

- Kiinnitä 4G-antenni kotelon aukkoon mutterilla. Kiristämiseen tarvit kaksi 8mm avainta.

<p class="callout info">Huom! Kiristysvaiheessa kiinnitä huomiota siihen, miten päin antennin liitin on kaapelin päässä. Kiristä antennin kaapeli siihen asentoon, että se on helppo painaa modeemin M-liittimeen.</p>

**[![kotelo-ja-kansi-selitteet-SIM.png](https://wiki.bithouse.fi/uploads/images/gallery/2026-07/scaled-1680-/kotelo-ja-kansi-selitteet-sim.png)](https://wiki.bithouse.fi/uploads/images/gallery/2026-07/kotelo-ja-kansi-selitteet-sim.png)![antenni kiinni koteloon.JPG](https://wiki.bithouse.fi/uploads/images/gallery/2025-08/scaled-1680-/antenni-kiinni-koteloon.JPG)**
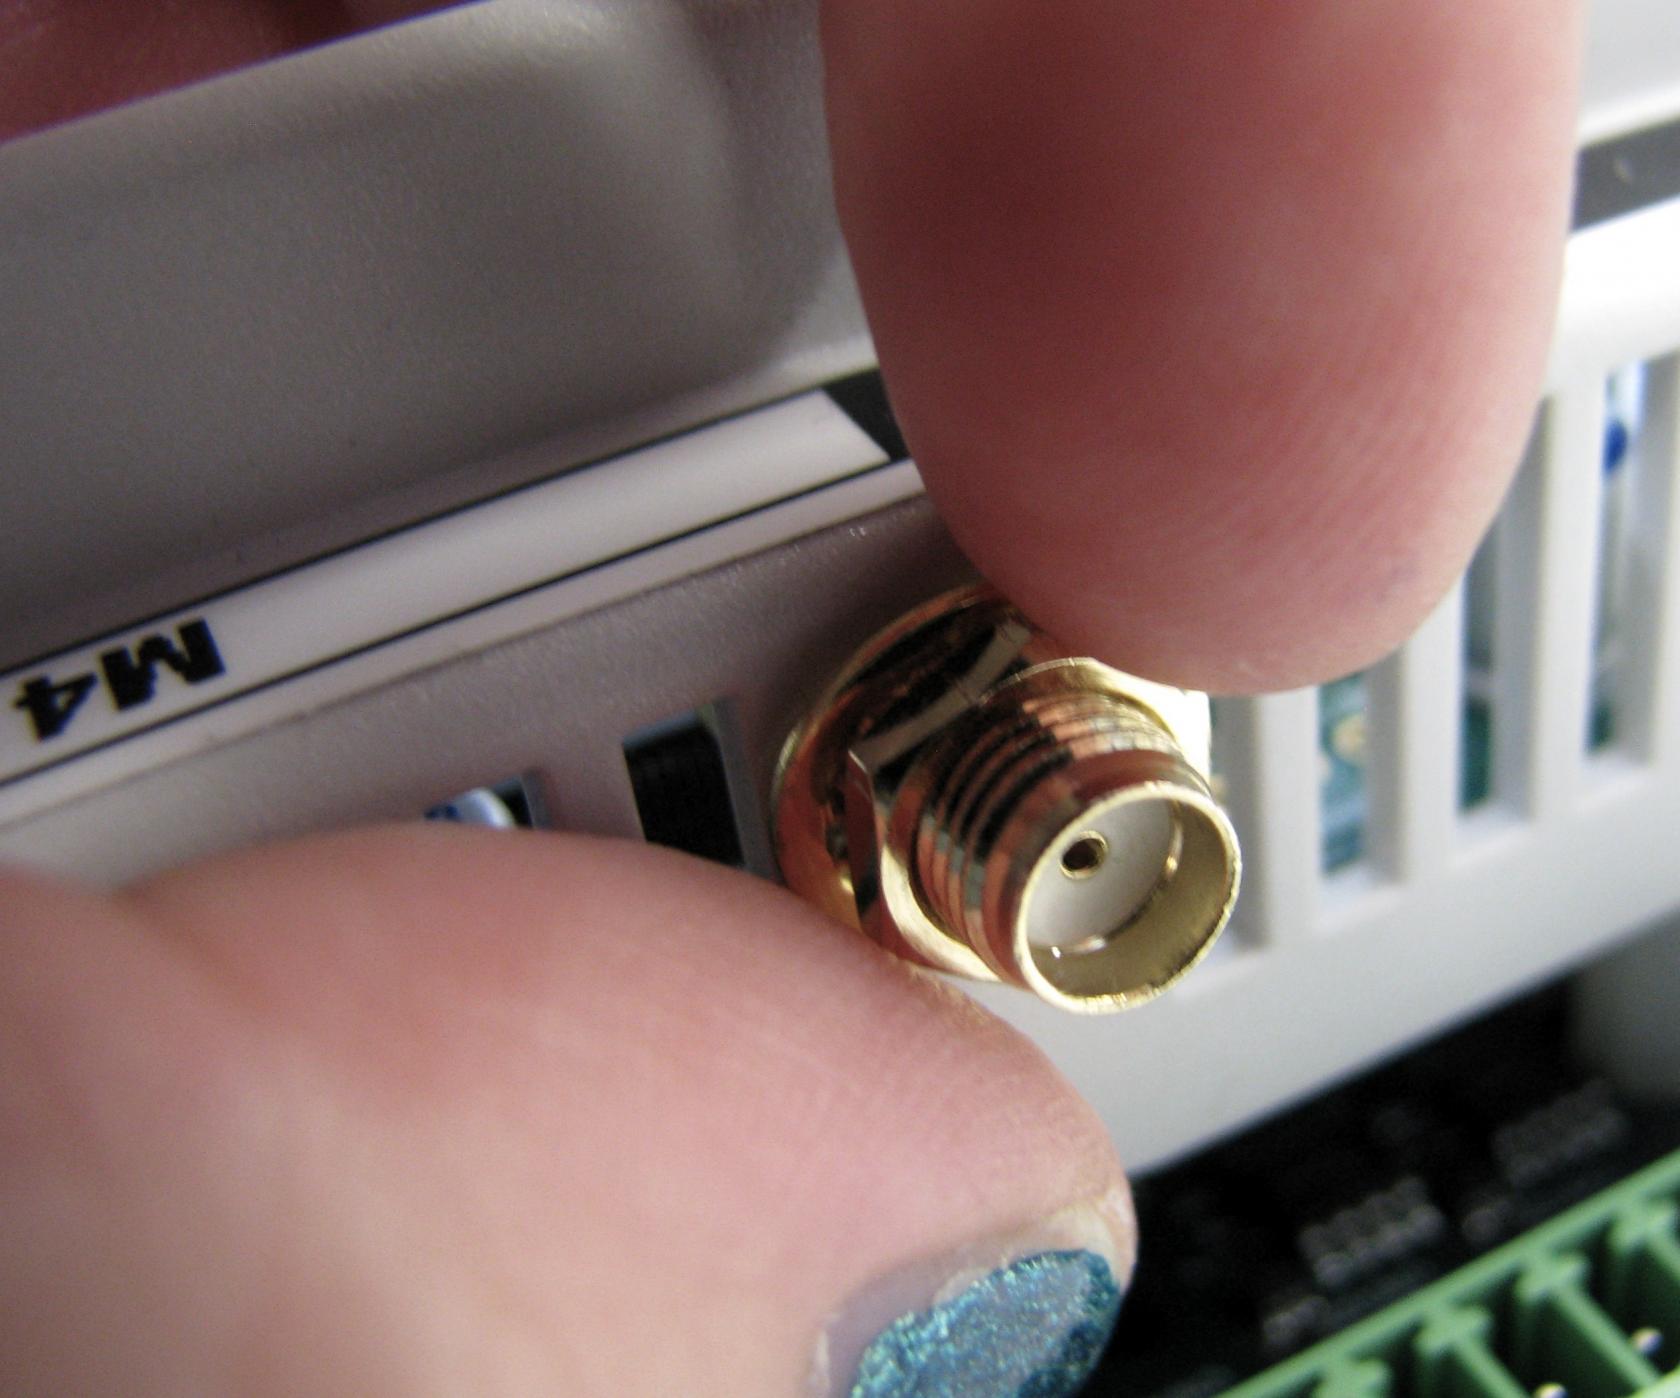
![antenni koteloon.jpg](https://wiki.bithouse.fi/uploads/images/gallery/2025-09/scaled-1680-/Q6xantenni-koteloon.jpg)

# Kotelo ja kansi/näyttö

### 1. Laite koteloon


- Aseta valmis kortti koteloon. Varmista, että antennikaapeli ei jää mihinkään väliin.

- Aseta kotelon pohja paikalleen. Muista laittaa kiskoklipsit paikoilleen.
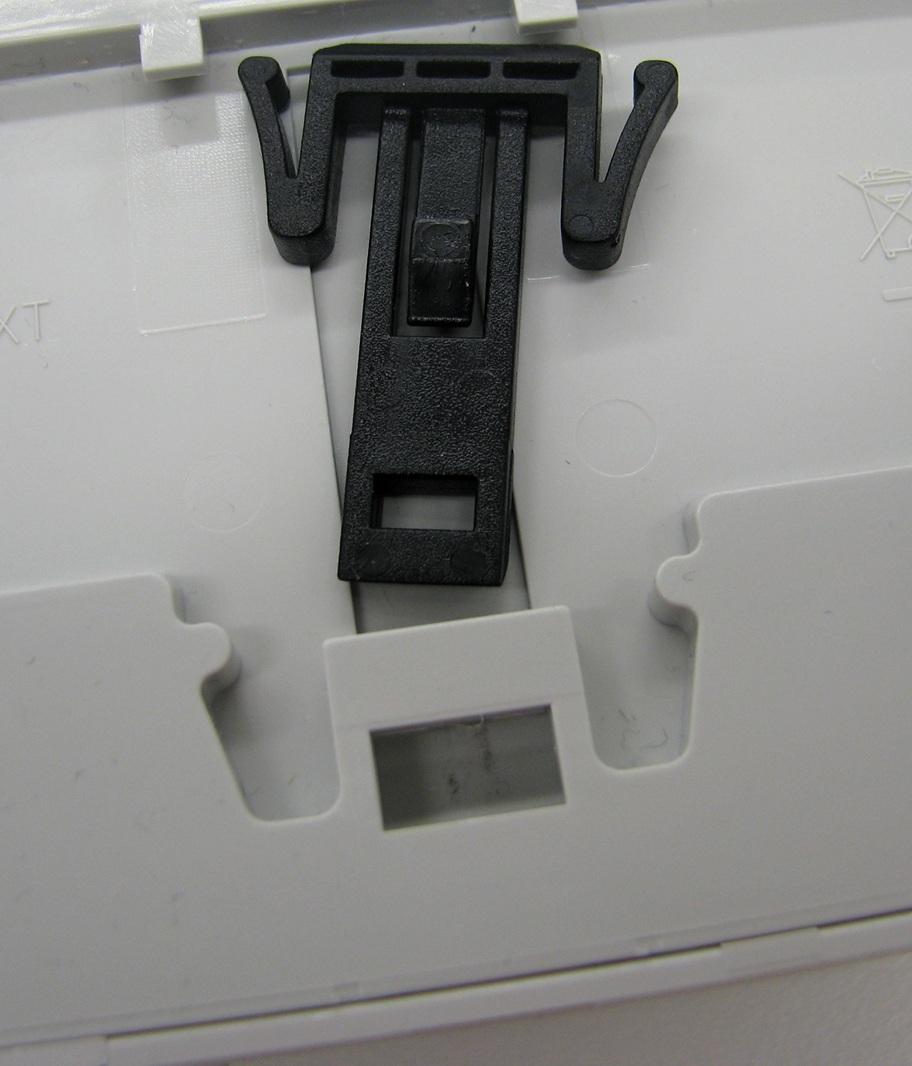
![kiskoklipsi1.jpg](https://wiki.bithouse.fi/uploads/images/gallery/2026-03/scaled-1680-/kiskoklipsi1.jpg)

- Jos laitteessa on modeemi ja antenni: kytke antenni modeemin **M-liittimeen** napakasti painamalla.

### ![kytke_antennipiuha_modeemiin.jpg](https://wiki.bithouse.fi/uploads/images/gallery/2025-04/scaled-1680-/pBAkytke-antennipiuha-modeemiin.jpg)
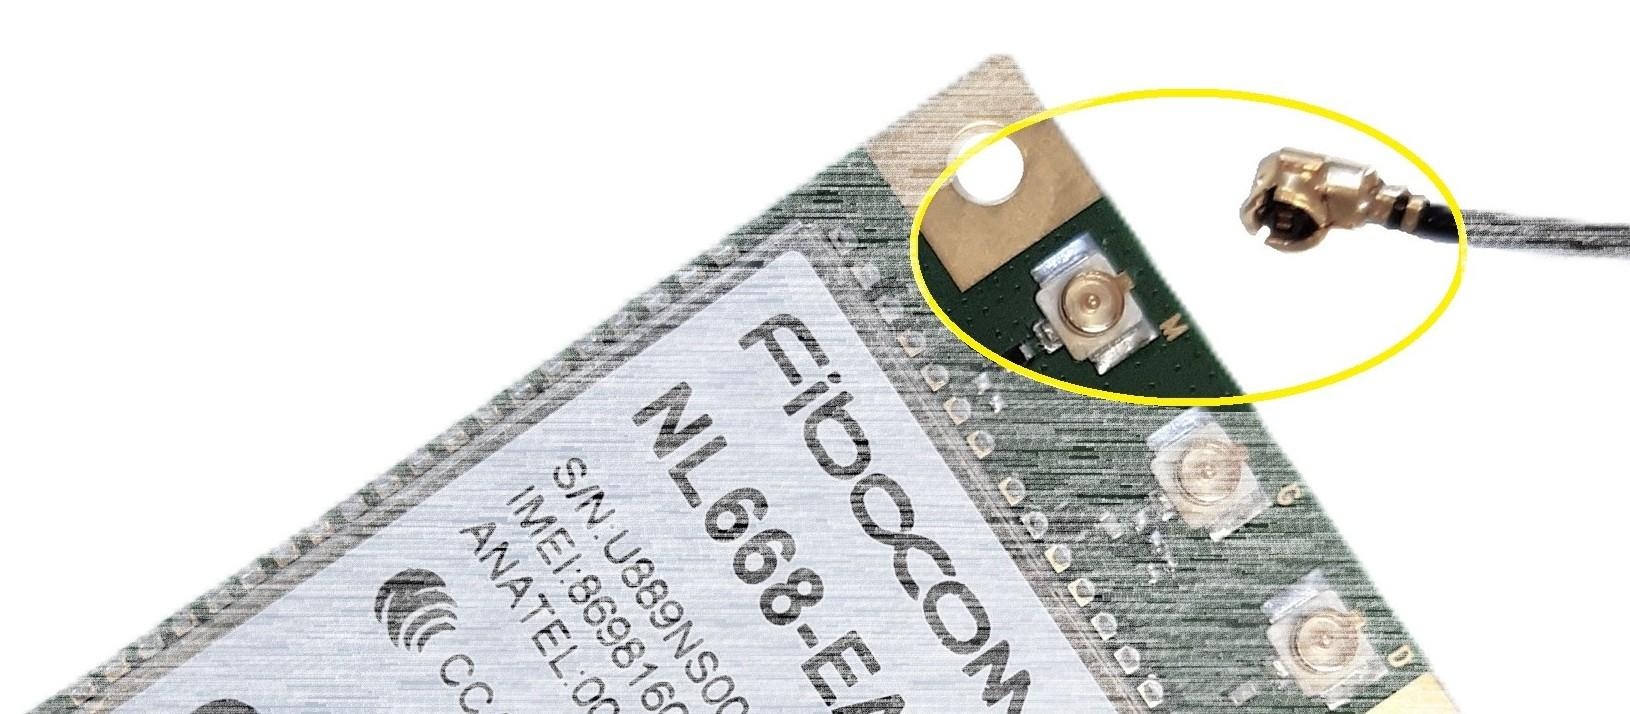
- Valmis kotelointi (laite, johon tulee näyttö ja modeemi)
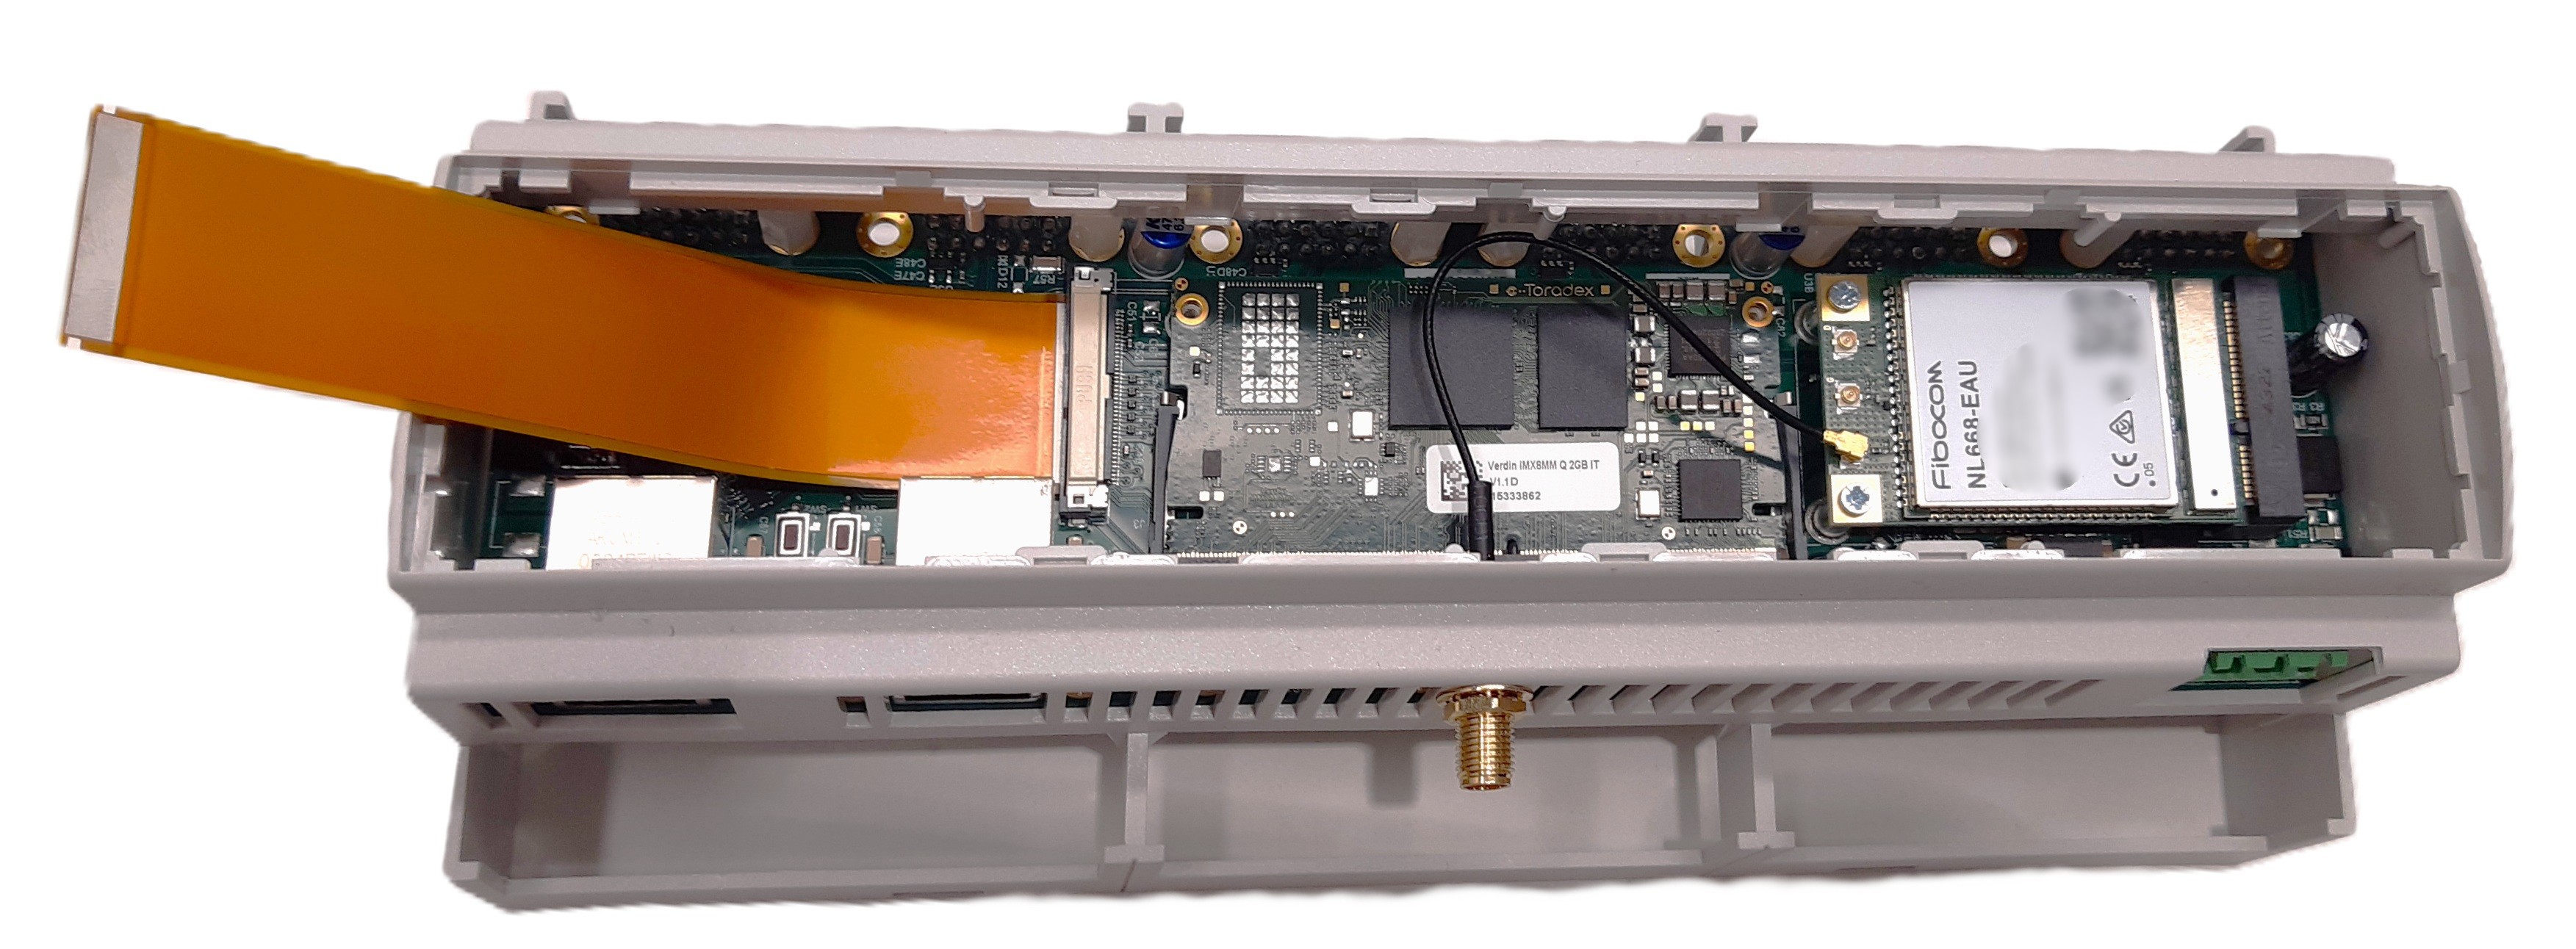
![https://wiki.bithouse.fi/uploads/images/gallery/2026-02/pienkansiaukiblur.jpg](https://wiki.bithouse.fi/uploads/images/gallery/2026-02/pienkansiaukiblur.jpg)

### 2. Näyttö tai kansi


#### <span style="background-color: rgb(236, 202, 250);">2.1 Laite, jossa näyttö</span>


- Kytke lattakaapeli pääkortista näytön lisäkorttiin. Taaskin huomioi, että ujutat kaapelin tasaisesti paikalleen ja kuulet molempien reunojen naksahtavan.

[![lattakaapeli_lisäkorttiin.jpg](https://wiki.bithouse.fi/uploads/images/gallery/2026-04/scaled-1680-/lattakaapeli-lisakorttiin.jpg)](https://wiki.bithouse.fi/uploads/images/gallery/2026-04/lattakaapeli-lisakorttiin.jpg)
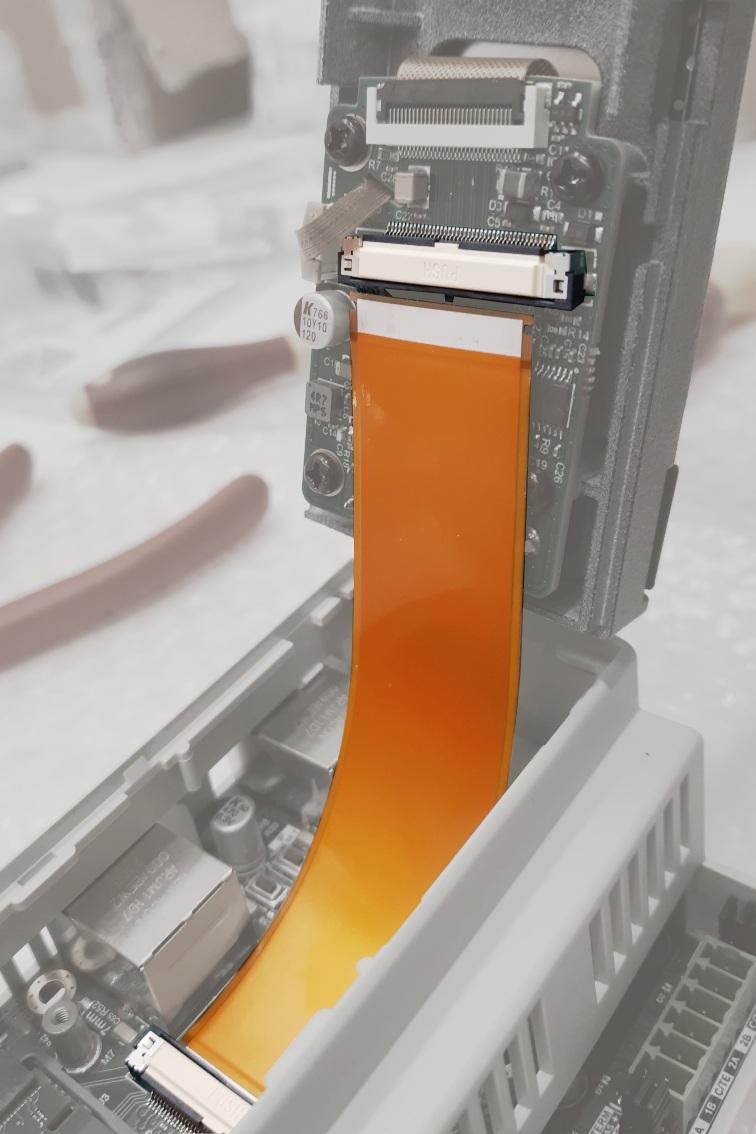

- Napsauta näyttökehys paikoilleen koteloon ja tunnustele, että se on hyvin kiinni (kaikki väkäset ovat napsahtaneet kiinni eikä reuna irvistä mistään)
- Näyttökehys voidaan tarvittaessa irrottaa kuvaan merkittyjen kolojen kohdalta, esimerkiksi talttapäistä ruuvimeisseliä käyttämällä.

[![näyttö-paikalleen.jpg](https://wiki.bithouse.fi/uploads/images/gallery/2026-03/scaled-1680-/naytto-paikalleen.jpg)](https://wiki.bithouse.fi/uploads/images/gallery/2026-03/naytto-paikalleen.jpg)
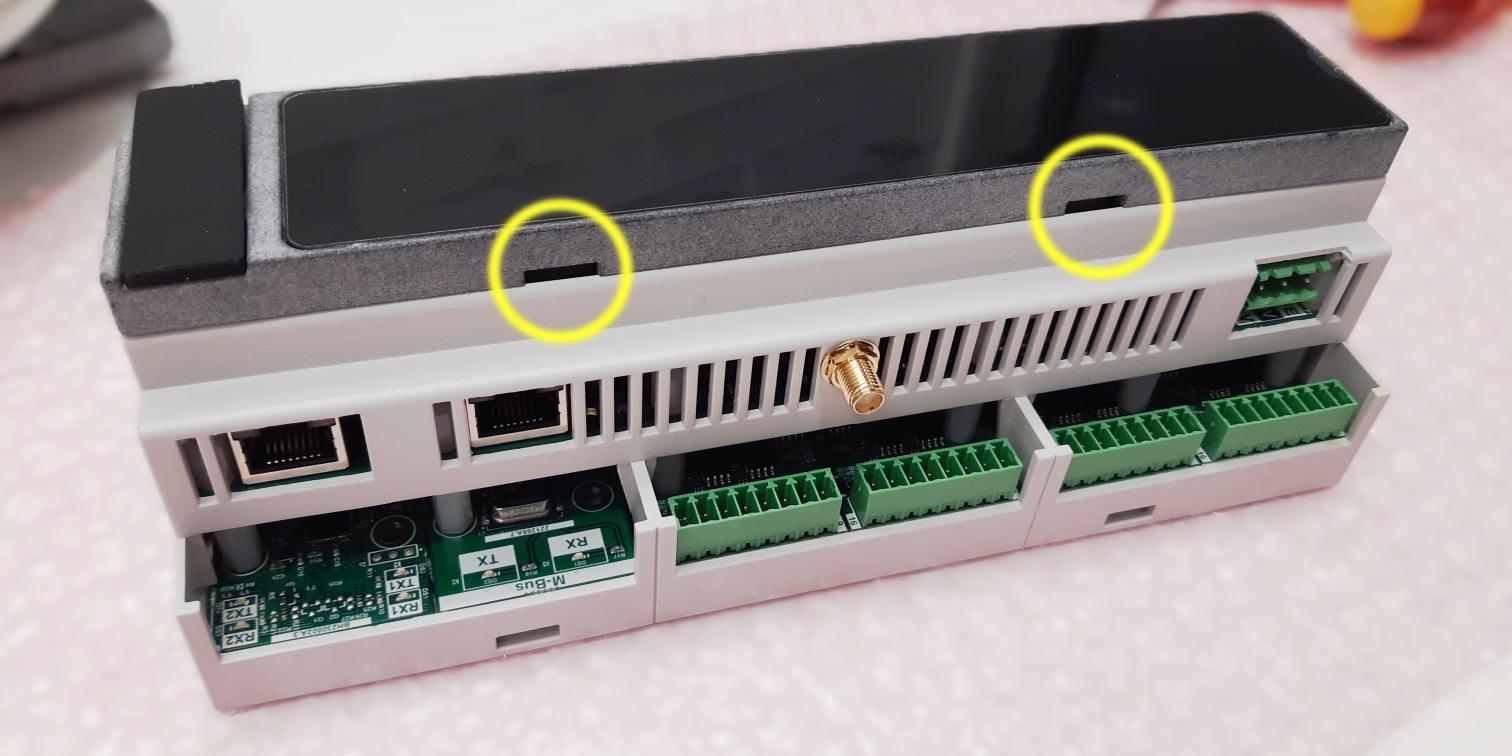
#### 2.2 Laite, jossa kansi

- Napsauta kansi paikoilleen. Voit kiinnittää kansitarran ja moduulitarrat halutessasi jo tässä vaiheessa.![tarrat-kansi.jpg](https://wiki.bithouse.fi/uploads/images/gallery/2025-04/scaled-1680-/tarrat-kansi.jpg)
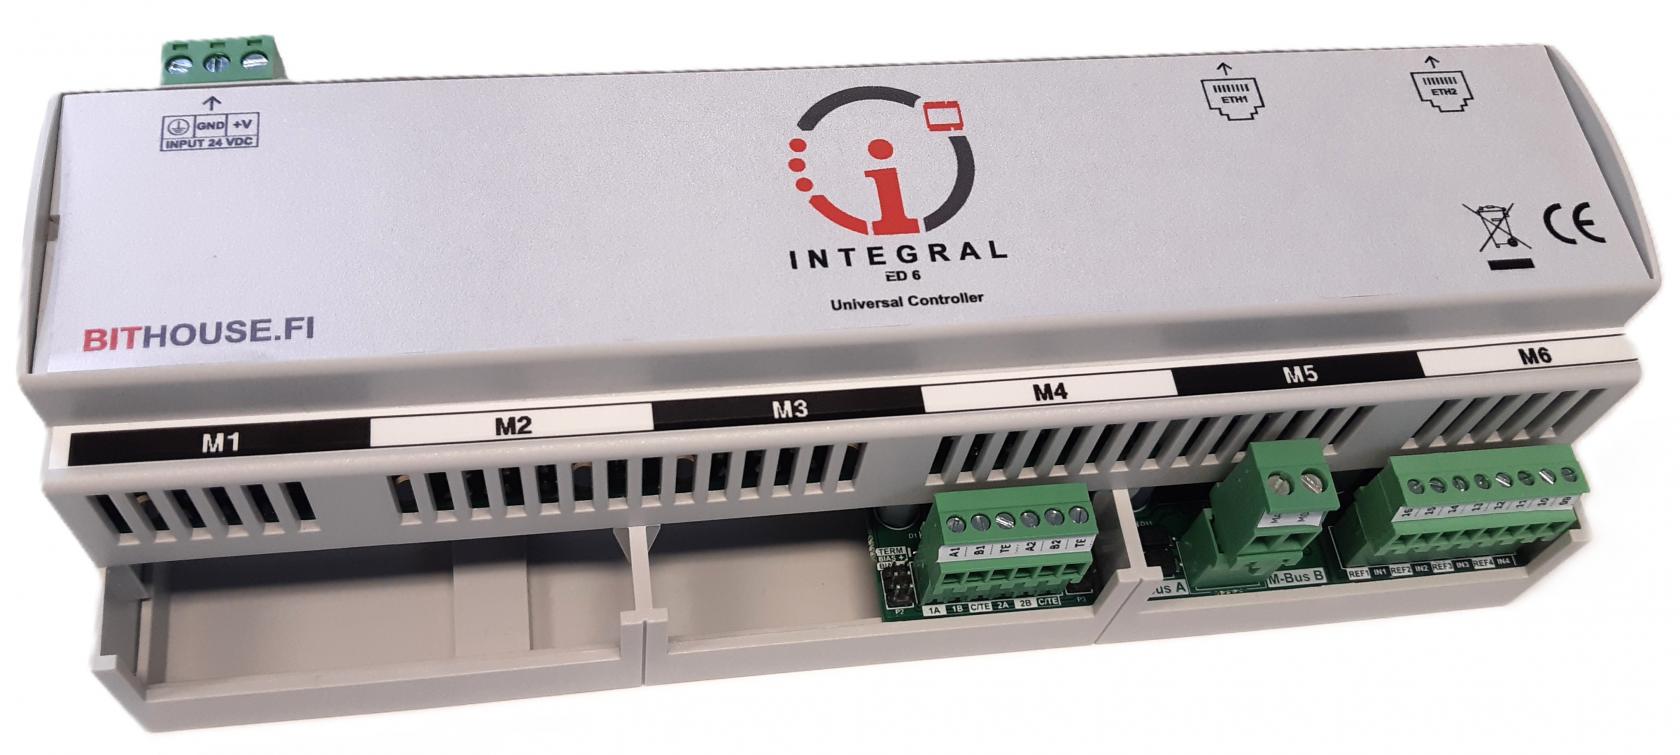
# OHJELMOINTI

# Prosessorimoduulin (CPU-SoM) ohjelmointi

### <span style="color: rgb(0, 0, 0); background-color: rgb(251, 238, 184);">1.Valmistelut</span>

Työpisteellä pitäisi olla valmiina:

- Verdin Development Board (kuvassa), johon on kytketty: 
    - Muistitikku, jossa tarvittava tiedosto prosessorin ohjelmointia varten
    - Näyttö HDMI-kaapelilla kytkettynä
    - Näppäimistö USB-kaapelilla kytkettynä
    - Virtajohto
    - Kokoamispisteen Linux-kone (USB-kaapeli X34-liittimessä) 
        - - - Tämä vain uudelleenohjelmointia varten

- Development Board on off-tilassa 
    - +V5 STB LED on päällä
    - X34-liittimen merkkivalo on päällä

- Ethernet-kaapeli

[![PIENdevboard-kytkennät.jpg](https://wiki.bithouse.fi/uploads/images/gallery/2026-02/scaled-1680-/BCWpiendevboard-kytkennat.jpg)](https://wiki.bithouse.fi/uploads/images/gallery/2026-02/BCWpiendevboard-kytkennat.jpg)
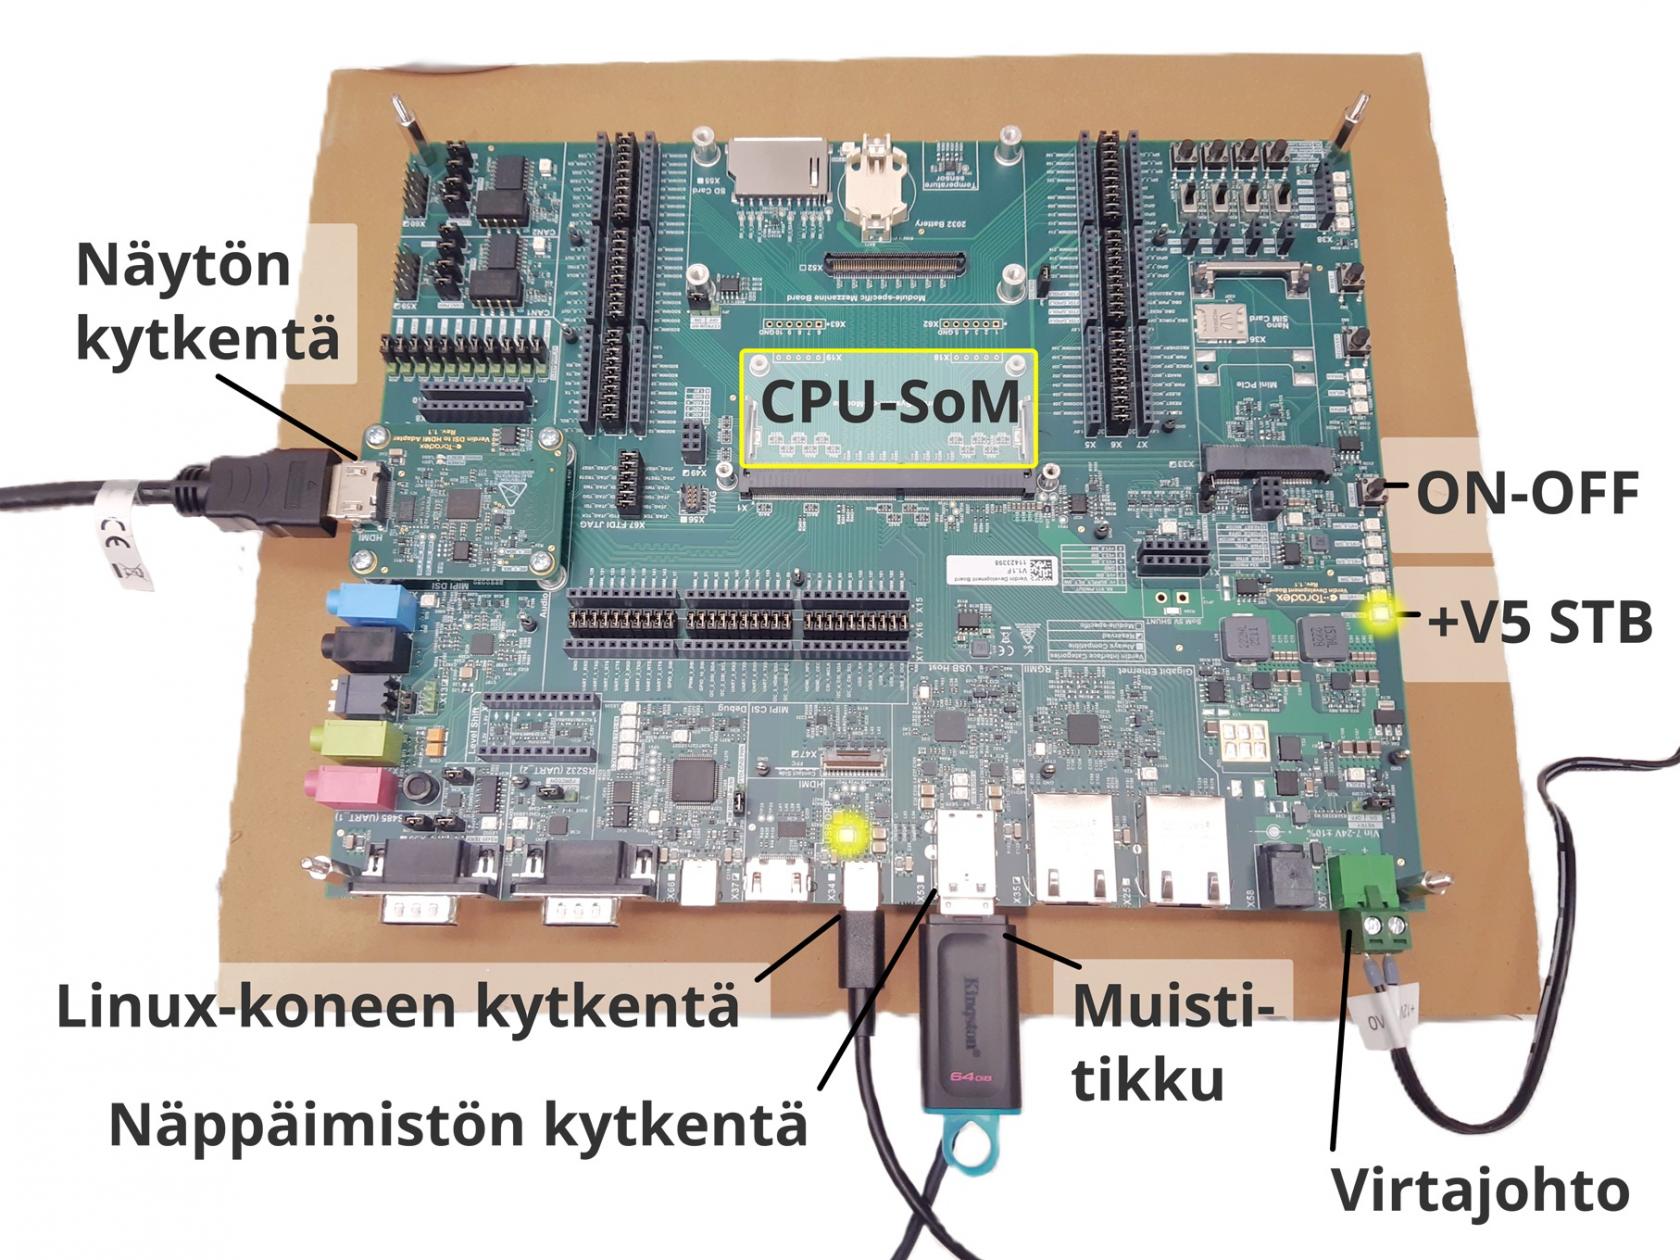
### <span style="background-color: rgb(251, 238, 184); color: rgb(0, 0, 0);">2. Ohjelmointi</span>

- Aseta CPU-SoM Development Boardille
- Paina ON/OFF -näppäintä

[![PIENkortti-devboardiin.jpg](https://wiki.bithouse.fi/uploads/images/gallery/2026-04/scaled-1680-/pienkortti-devboardiin.jpg)](https://wiki.bithouse.fi/uploads/images/gallery/2026-04/pienkortti-devboardiin.jpg)[ ![PIENON-OFF-painike2.jpg](https://wiki.bithouse.fi/uploads/images/gallery/2026-02/scaled-1680-/pienon-off-painike2.jpg)](https://wiki.bithouse.fi/uploads/images/gallery/2026-02/pienon-off-painike2.jpg)
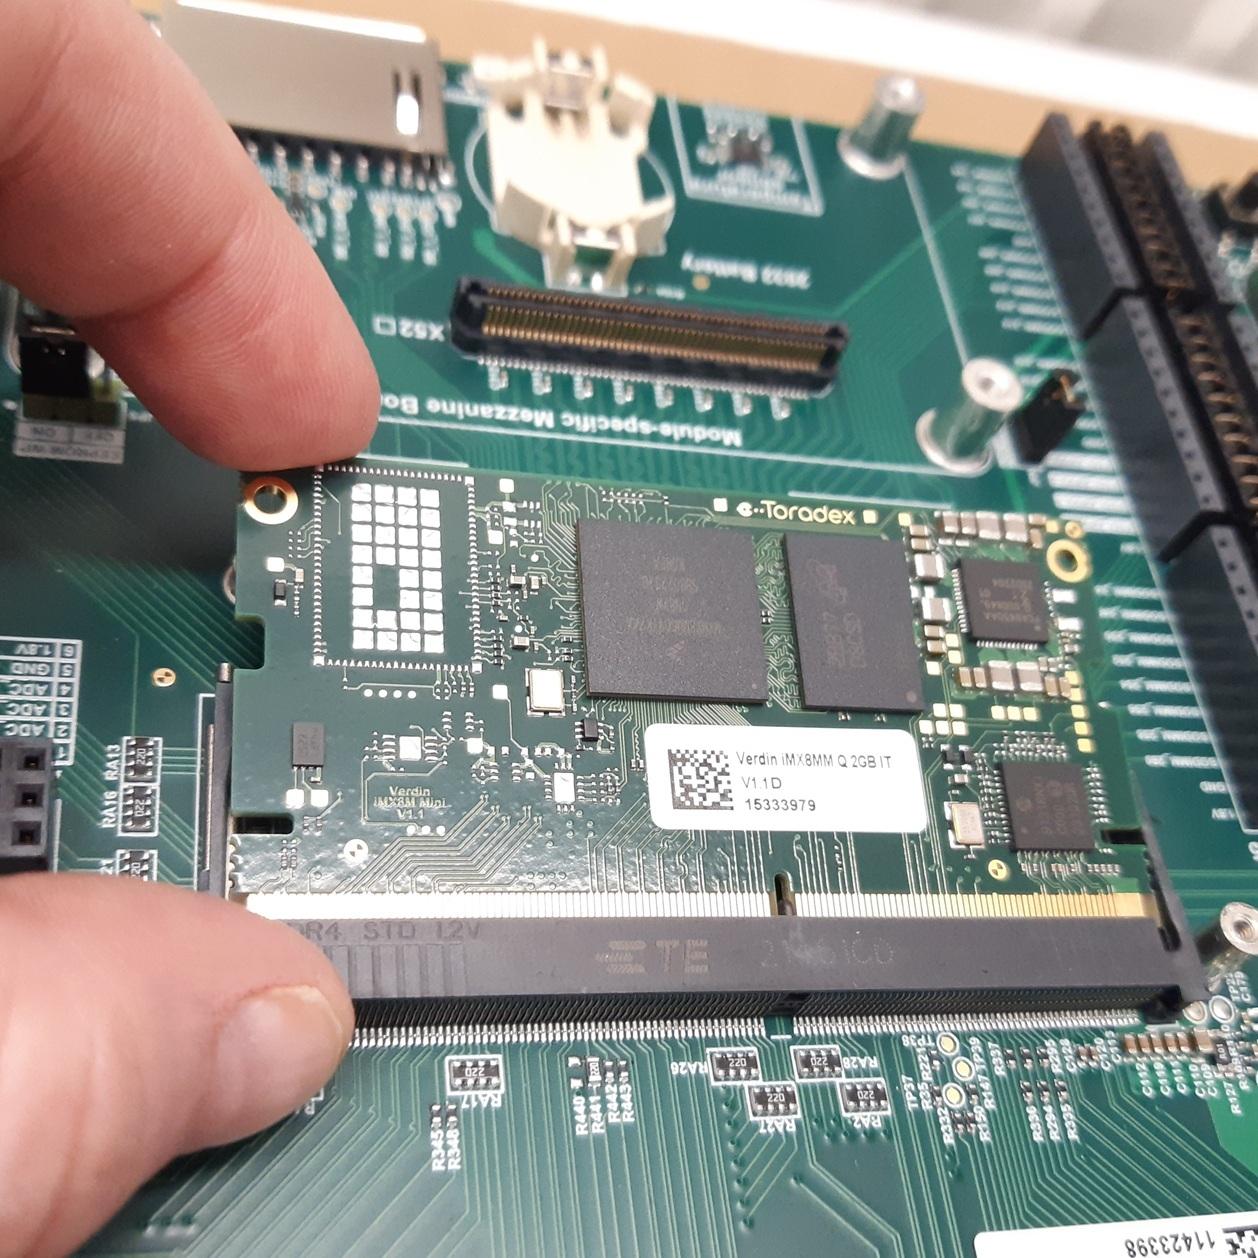
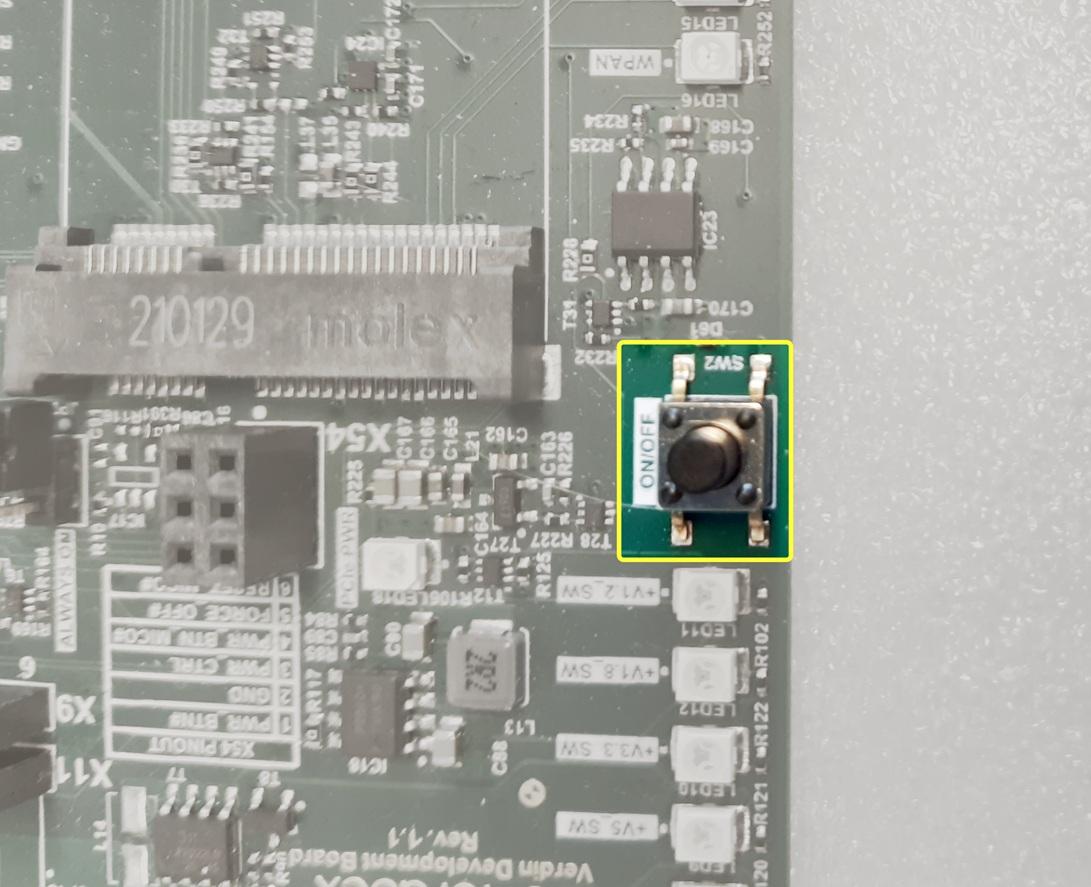
- Näyttöön avautuu Toradex easy installer
- Valitse listalta oikea image (nuolinäppäinten avulla). Jos et tiedä mikä on oikea, noudata seuraavaa ohjetta:

### <span style="background-color: rgb(251, 238, 184); color: rgb(0, 0, 0);">3. Imagen valinta</span>

<details id="bkmrk-valitse-listalta-ima"><summary></summary>


- Valitse listalta image jonka otsikko on integral **pääkortin versio**. Versio näkyy numerosarjan lopusta (modeemipaikan reunassa). 
    - Jos on useita, valitse **tuorein revisio**
    - Jos on samannimisiä, valitse **uusin päivämäärä**
- **Esimerkkikuvassa** alla ollaan kokoamassa integralia, jonka pääkortin versio on <span style="background-color: rgb(251, 238, 184);">A.22</span>. Tästä on kaksi <span style="background-color: rgb(191, 237, 210);">revisiota</span>, joista valitaan tuorein. Tuoreimmassa versiossa on myös <span style="background-color: rgb(199, 207, 243);">uusin päivämäärä</span>.[![Imagen-valinta03.jpg](https://wiki.bithouse.fi/uploads/images/gallery/2026-04/scaled-1680-/imagen-valinta03.jpg)](https://wiki.bithouse.fi/uploads/images/gallery/2026-04/imagen-valinta03.jpg)

</details>### <span style="background-color: rgb(251, 238, 184); color: rgb(0, 0, 0);">4. Imagen asennus</span>

- Aloita asennus painamalla näppäimistöltä **i** (install)

[![install.jpg](https://wiki.bithouse.fi/uploads/images/gallery/2026-04/scaled-1680-/35Einstall.jpg)](https://wiki.bithouse.fi/uploads/images/gallery/2026-04/35Einstall.jpg)

- Näyttöön avautuu valintaikkunoita. Valitse **"Yes"** ja **"Accept"**, painamalla näppäimistöltä **Y** ja **C** (alleviivatut kirjaimet)

[![image.png](https://wiki.bithouse.fi/uploads/images/gallery/2026-03/scaled-1680-/image.png)](https://wiki.bithouse.fi/uploads/images/gallery/2026-03/image.png)

[![accept.jpg](https://wiki.bithouse.fi/uploads/images/gallery/2026-02/scaled-1680-/accept.jpg)](https://wiki.bithouse.fi/uploads/images/gallery/2026-02/accept.jpg)

- Toradex Easy Installer asentaa imagen prosessorille. Tämä saattaa kestää hetken.

<p class="callout info">Jos tämä työvaihe on sinulle tuttu, voit aloittaa seuraavia vaiheita sillä välin kun image latautuu.</p>

- Valitse avautuvasta valintaikkunasta **"Power off"** painamalla näppäimistöltä **P**

[![image.png](https://wiki.bithouse.fi/uploads/images/gallery/2026-03/scaled-1680-/Vf8image.png)](https://wiki.bithouse.fi/uploads/images/gallery/2026-03/Vf8image.png)

- Irrota prosessorimoduuli development boardista. Lukituksen voi vapauttaa lyhyillä sivuilla olevista jousista, vetämällä niitä ulospäin.

### <span style="background-color: rgb(251, 238, 184); color: rgb(0, 0, 0);">4. Prosessorimoduulin (CPU-SoM) uudelleenohjelmointi</span>

<details id="bkmrk-kun-prosessorimoduul"><summary></summary>

Kun prosessorimoduuli on ohjelmoitu normaalisti (edellinen ohje), sitä ei voida tehdä uudelleen ilman että SoM:lle ladataan ensiksi uudelleen toradexin **Easy Install** apuohjelma (joka näyttää edellisen ohjeen valikot).

Easy install voidaan käynnistää USB-kaapelin ja Toradexin EasyInstall -apuohjelman avulla, jonka voi ladata eri SoM-tyypeille Toradexin sivuilta:

[https://developer.toradex.com/easy-installer/toradex-easy-installer/download-tezi/](https://developer.toradex.com/easy-installer/toradex-easy-installer/download-tezi/)

##### 4.1 Valmistelu

Sammuta Verdin Development Board joko on/off painikkeesta, tai käyttämällä jännitteen syöttöliitintä irti. Kytke syöttöliittin takaisin kiinni. Development Board (off) tilaan, mutta **+V5 STB** LED:iin syttyy valo.

##### 4.2 Kytkentä

Varmista seuraavat:

- Development Boardiin on kytketty USB-tikku, joka sisältää asennettavan käyttöjärjestelmän.
- USB-kaapeli on kytketty ohjelmointitietokoneen ja development boardin X34 liittimen väliin.

[![Screenshot_2026-01-26_12-41-29.png](https://wiki.bithouse.fi/uploads/images/gallery/2026-01/scaled-1680-/screenshot-2026-01-26-12-41-29.png)](https://wiki.bithouse.fi/uploads/images/gallery/2026-01/screenshot-2026-01-26-12-41-29.png)[![Screenshot_2026-01-26_12-39-29.png](https://wiki.bithouse.fi/uploads/images/gallery/2026-01/scaled-1680-/screenshot-2026-01-26-12-39-29.png)](https://wiki.bithouse.fi/uploads/images/gallery/2026-01/screenshot-2026-01-26-12-39-29.png)

##### 4.3 Easy Installerin asennus

- Käynnistä Toradex easyInstaller -asennusohjelma tietokoneelta

<p class="callout warning">Huomaa, että **eri SOM mallit käyttävät eri palautusohjelmaa!** Alla oleva ohjelma on **Verdin iMX8M Mini** sarjan laitteille (tunniste iMX8MM).</p>

[![Screenshot_2026-03-04_17-07-21.png](https://wiki.bithouse.fi/uploads/images/gallery/2026-03/scaled-1680-/screenshot-2026-03-04-17-07-21.png)](https://wiki.bithouse.fi/uploads/images/gallery/2026-03/screenshot-2026-03-04-17-07-21.png)

Tarvittaessa syötä seuraavat komennot:

```bash
>$ cd Verdin-iMX8MM_ToradexEasyInstaller_6.8.5+build.14
>$ sudo ./recovery-linux.sh
```

- Ohjelma jää odottamaan että se löytää USB-väylästä **Verdin Development Board:in** palautustilassa.

[![image.png](https://wiki.bithouse.fi/uploads/images/gallery/2026-01/scaled-1680-/image.png)](https://wiki.bithouse.fi/uploads/images/gallery/2026-01/image.png)

- Paina (ja pidä painettuna) **RECOVERY-painike**, ja samaan aikaan napauta **ON/OFF**-painiketta.

[![PIENuudelleenohjelmointi.jpg](https://wiki.bithouse.fi/uploads/images/gallery/2026-02/scaled-1680-/kmVpienuudelleenohjelmointi.jpg)](https://wiki.bithouse.fi/uploads/images/gallery/2026-02/kmVpienuudelleenohjelmointi.jpg)
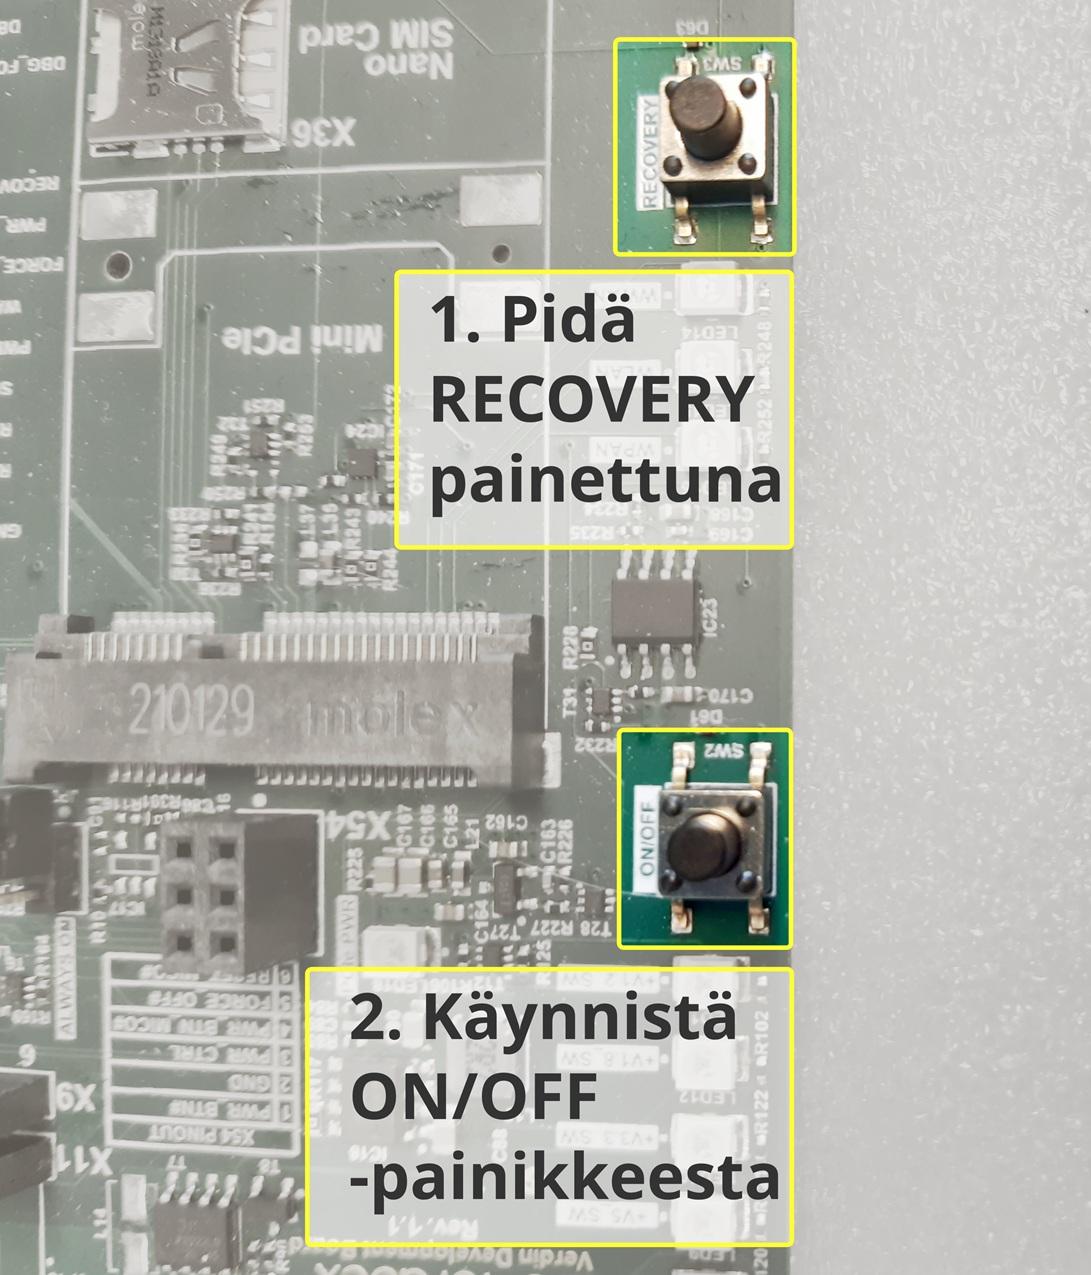
- EasyInstaller -ohjelma tunnistaa Recovery-tilassa oleva prosessorimoduuli, ja aloittaa palautus:

[![image.png](https://wiki.bithouse.fi/uploads/images/gallery/2026-01/scaled-1680-/uPAimage.png)](https://wiki.bithouse.fi/uploads/images/gallery/2026-01/uPAimage.png)
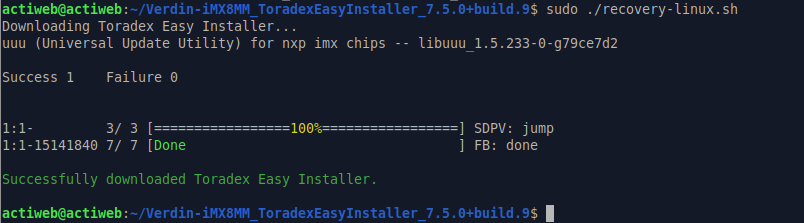
<p class="callout success">**VALMIS:** Nyt SoM-prosessorimoduuli on palautettu tehdastilaan, ja se voidaan ohjelmoida normaalisti uudelleen. </p>

</details>

# Moduulien ohjelmointi, device setup ja moduulien testaus

### 1. Valmistelut

#### 1.1 IP-osoitteen tarkistus 

- Mene ensin osoitteeseen **192.168.10.134** ja varmista, ettei muita laitteita ole tässä osoitteessa.  
    
    - Jos muita laitteita ei ole, selainikkuna valittaa time-outista
    - Jos muita laitteita on, ilmestyy kirjautumisikkuna. Tässä saattaa olla myös kyse siitä, että jotain on jäänyt selaimen välimuistiin - muista päivittää ikkuna varmistaaksesi asian.

 Jos osoite on vapaa, jatka seuraavasti:


#### 1.2 Integralin kytkeminen Workbench/Testbenchiin


[![PIENdevice-setup-setup.jpg](https://wiki.bithouse.fi/uploads/images/gallery/2026-02/scaled-1680-/piendevice-setup-setup.jpg)](https://wiki.bithouse.fi/uploads/images/gallery/2026-02/piendevice-setup-setup.jpg)


##### 1.2.1 Kytkennät

- Kytke virtajohdin virtaliittimestä pistorasiaan. 
    - **Ensin** virtaliitin
    - Sitten pistorasiaan
- Eth1-porttiin syttyy oranssi valo. **Odota**, että valo sammuu.
- Kytke Ethernet-kaapeli johonkin vapaaseen Eth-porttiin.

[![kytke_integral03.jpg](https://wiki.bithouse.fi/uploads/images/gallery/2026-07/scaled-1680-/kytke-integral03.jpg)](https://wiki.bithouse.fi/uploads/images/gallery/2026-07/kytke-integral03.jpg)

##### 1.2.2 Selainikkunan avaaminen

- Linux-koneelta: 
    - [![Workbench-server-icon.png](https://wiki.bithouse.fi/uploads/images/gallery/2026-02/scaled-1680-/workbench-server-icon.png)](https://wiki.bithouse.fi/uploads/images/gallery/2026-02/workbench-server-icon.png) Käynnistä Integral Workbench Server (mustavihreä ikoni). Avautuu teksti-ikkuna.
    - [![Workbench-user-mode-icon.png](https://wiki.bithouse.fi/uploads/images/gallery/2026-02/scaled-1680-/workbench-user-mode-icon.png)](https://wiki.bithouse.fi/uploads/images/gallery/2026-02/workbench-user-mode-icon.png) Käynnistä Workbench user mode (turkoosi vasara). Avautuu selainikkuna.

[![mainmenu.png](https://wiki.bithouse.fi/uploads/images/gallery/2026-04/scaled-1680-/mainmenu.png)](https://wiki.bithouse.fi/uploads/images/gallery/2026-04/mainmenu.png)

<p class="callout success">Olet nyt Integral testbenchin Main menussa, ja Integral on kytketty koneeseen.</p>


### <span style="background-color: rgb(194, 224, 244);">2. Moduulien ohjelmointi</span>

<p class="callout info">Moduulit pyritään ohjelmoimaan valmiiksi etukäteen. Jos joudut ohjelmoimaan moduulit, tee se tässä vaiheessa.</p>

<details id="bkmrk-klikkaa-run-valitse-"><summary></summary>

[![mainmenu-moduleprogramming.png](https://wiki.bithouse.fi/uploads/images/gallery/2026-04/scaled-1680-/mainmenu-moduleprogramming.png)](https://wiki.bithouse.fi/uploads/images/gallery/2026-04/mainmenu-moduleprogramming.png)

- Klikkaa **Run**

**[![module-programming-2.png](https://wiki.bithouse.fi/uploads/images/gallery/2026-02/scaled-1680-/module-programming-2.png)](https://wiki.bithouse.fi/uploads/images/gallery/2026-02/module-programming-2.png)**

- Valitse Integral-moduulit alasvetovalikosta kuhunkin moduulipaikkaan.

<p class="callout warning">Huomioi moduulipaikkojen järjestys! Moduulipaikka 1 on virtaliittimen puoleisessa päädyssä.</p>

<p class="callout warning">**USB-C-4P-**moduulia ei ohjelmoida. Valitse None.</p>

[![module-programming-3 - rajattu.png](https://wiki.bithouse.fi/uploads/images/gallery/2026-03/scaled-1680-/module-programming-3-rajattu.png)](https://wiki.bithouse.fi/uploads/images/gallery/2026-03/module-programming-3-rajattu.png) [![moduulipaikat-simple.png](https://wiki.bithouse.fi/uploads/images/gallery/2026-03/scaled-1680-/moduulipaikat-simple.png)](https://wiki.bithouse.fi/uploads/images/gallery/2026-03/moduulipaikat-simple.png)

- Klikkaa **Confirm**
    - Ohjelma hakee Dropboxista uusimmat firmwaret ja asentaa ne vastaaviin moduuleihin.
    - Lisäksi ohjelma luo laitteelle sarjanumeron.

[![module-programming-4.png](https://wiki.bithouse.fi/uploads/images/gallery/2026-02/scaled-1680-/module-programming-4.png)](https://wiki.bithouse.fi/uploads/images/gallery/2026-02/module-programming-4.png)

- Klikkaa **Back to home screen**

### **[![module-programming-5.png](https://wiki.bithouse.fi/uploads/images/gallery/2026-02/scaled-1680-/module-programming-5.png)](https://wiki.bithouse.fi/uploads/images/gallery/2026-02/module-programming-5.png)**

##### <span style="background-color: rgb(194, 224, 244);">2.1 Moduulien uudelleenohjelmointi</span>

Jos joudut ohjelmoimaan moduulit uudestaan, paina im-programming -ikkunassa RESET, ja suorita samat vaiheet kuin ensimmäiselläkin kerralla.

</details>### 3. Device setup


<p class="callout info">Huom! Jos moduulit on ohjelmoitu jo aiemmin, ja aloitat Testbenchin käytön Setup-vaiheesta, odota noin 3 minuuttia kytkemisen jälkeen, että laite herää.</p>

Seuraavaksi konfiguroidaan käyttöjärjestelmä:

[![mainmenu-operatingsystemsetup.png](https://wiki.bithouse.fi/uploads/images/gallery/2026-04/scaled-1680-/mainmenu-operatingsystemsetup.png)](https://wiki.bithouse.fi/uploads/images/gallery/2026-04/mainmenu-operatingsystemsetup.png)
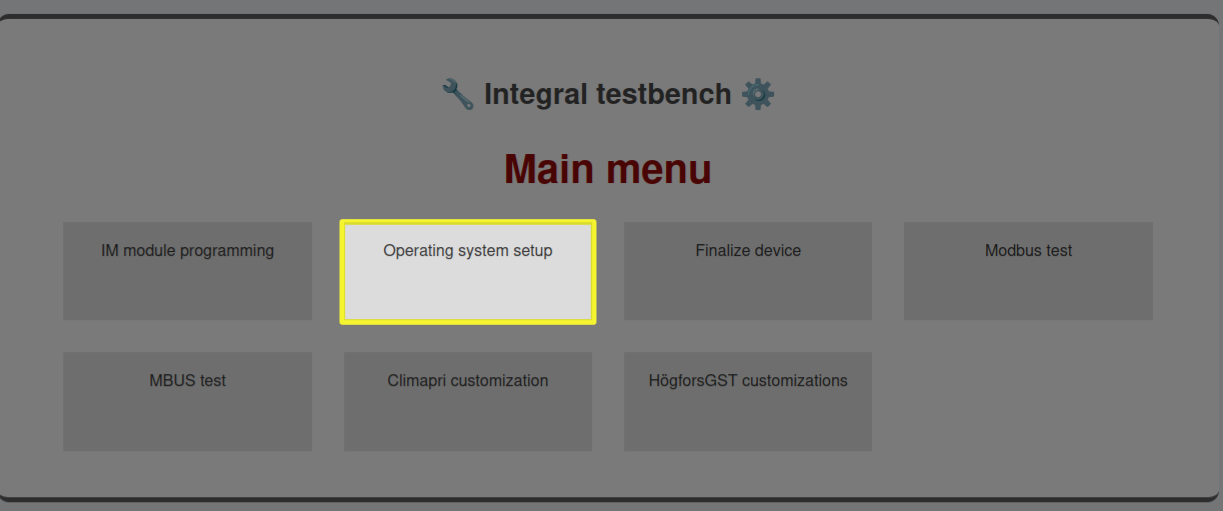
- Klikkaa **Run**

**[![operating-system-setup-2.png](https://wiki.bithouse.fi/uploads/images/gallery/2026-02/scaled-1680-/operating-system-setup-2.png)](https://wiki.bithouse.fi/uploads/images/gallery/2026-02/operating-system-setup-2.png)**

Ohjelma konfiguroi käyttöjärjestelmän. Tämä on monivaiheinen toimenpide, jossa voi kestää 7-8 minuuttia. Eth1-portin vilkkuva oranssi valo kertoo, että toimenpide on edelleen käynnissä.

Toimenpide sisältää seuraavat asiat:

- - MAC-osoitteen asettaminen Eth2-portille
    - Actiweb-ohjelmistoalustan ja siihen liittyvien pakettien asentaminen
    - Palomuurin konfigurointi
    - Kernelin watchdog-ajastimen setup
    - Käyttöliittymän salasanan vaihtaminen
    - Sarjanumeron ym. tallentaminen CSV-tiedostoon

[![operating-system-setup-31.png](https://wiki.bithouse.fi/uploads/images/gallery/2026-02/scaled-1680-/operating-system-setup-31.png)](https://wiki.bithouse.fi/uploads/images/gallery/2026-02/operating-system-setup-31.png)
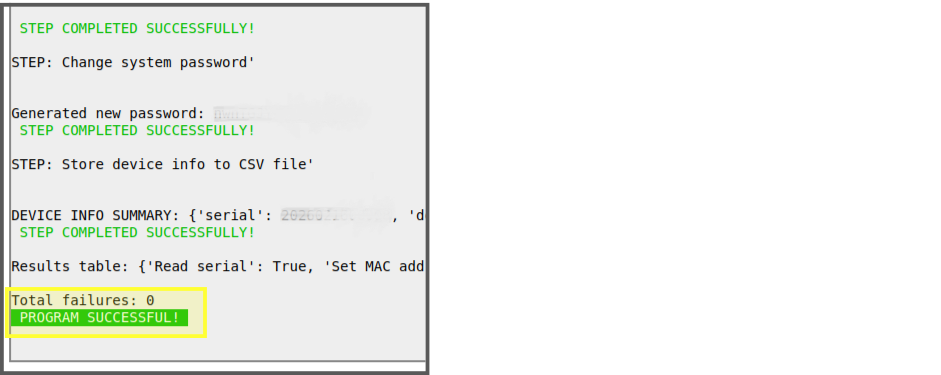

<p class="callout info">Setup kestää noin 7-8 min. Jos työvaihe on tuttu, voit tehdä esimerkiksi liittimien tarrojen liimailua tässä kohtaa.</p>

##### 3.1 Näytön tarkistus

- Set-upin jälkeen näytössä tulisi näkyä aloitusvalikko tai vastaava.

<p class="callout warning">Testaa, että näyttö reagoi kosketukseen.</p>

##### 3.2 Tietojen tarkistus

- Lopuksi tarkistetaan että tiedot ovat tallentuneet **produced\_devices.csv** -tiedostoon (sijaitsee actiweb-käyttäjän kotihakemistossa):

1. Sarjanumero 
    - - On muotoa \[vuosiluku\]\[kuukausi\]\[päivä\]\[juokseva numero 5 merkkiä\], esim. 2026081500345
2. Device ID
3. Admin-salasana
4. Linux-salasana
5. Päivämäärä
6. Eth2 portin MAC-osoite

<p class="callout success">Tässä vaiheessa on hyvä kirjoittaa sarjanumero lapulle ja teipata se Integralin päätyyn. Näin laitteet eivät mene sekaisin, jos kokoaa monta kerralla.</p>

##### 3.2 Operating system setup uudelleen


<details id="bkmrk-%C2%A0-operating-system-s"><summary></summary>

**Operating system setup** ‑toimintoa ei voi suorittaa useita kertoja peräkkäin, koska toiminto vaihtaa laitteelle uuden salasanan. Seuraavalla yrityksellä toiminto yrittää kirjautua Integraliin vanhalla salasanalla, mikä estää toiminnon onnistumisen.

Toimi seuraavasti:

- Kytke Integral irti piuhoista.
- Tee tilaa CPU-SoM-kortin irrotusta varten 
    - Irrota antennipiuha modeemista + irrota virtaliitin + ota Integral ulos kotelosta.
    - <span style="background-color: rgb(251, 238, 184);">**TAI**</span>
    - Ruuvaa antennipiuha irti kotelosta (tämä on hankalampi kiristää kunnolla takaisin laitettaessa, mutta on vähemmän vaiheita).
- Irrota CPU-SoM Integralin pääkortista.
- Tee **[Prosessorimoduulin (CPU-SoM) uudelleenohjelmointi](https://wiki.bithouse.fi/books/integral-universaali-alakeskusprosessori/page/prosessorimoduulin-cpu-som-ohjelmointi#bkmrk-3.3-prosessorimoduul).**
- Aseta CPU-SoM takaisin Integralin pääkorttiin (liitä takaisin virtaliitin jos olet irrottanut sen 2-kohdassa).
- Tee [**Valmistelu.**](https://wiki.bithouse.fi/books/integral-universaali-alakeskusprosessori/page/moduulien-ohjelmointi-ja-testaus#bkmrk-5.-set-up-1)
- Tee tämän ohjeen **Device setup.**
- Kokoa takaisin aiemmin purkamasi osat.

<p class="callout info">Uudelleen konfiguroidessa toiminto ilmoittaa virheestä: source already added. Tämä kuuluu asiaan.</p>

<p class="callout warning">HUOM! Jos yrittää tehdä **Operating system setup** -toiminnon väärällä salasanalla, laite lukitsee turvallisuussyistä itsensä määräajaksi.</p>

- Mene kahville.

</details>
### <span style="background-color: rgb(194, 224, 244);">4. Testaukset (niille moduuleille joita laitteessa on) </span>

Testataan ne moduulit, joita laitteeseen on asennettu. Kaikille ei ole vielä testiä, mutta testataan ne, jotka pystytään.

<p class="callout info">Testaus tehdään vasta Setup-vaiheen jälkeen.</p>

#### <span style="background-color: rgb(194, 224, 244);">4.1 IM-IO816</span>

- Testi tulossa.

#### <span style="background-color: rgb(194, 224, 244);">4.2 IM-RS485-2P (modbus)</span>

- Kytke testausliitin IM-RS485-2P -moduuliin.

[![RS-testiliitin.jpg](https://wiki.bithouse.fi/uploads/images/gallery/2026-07/scaled-1680-/rs-testiliitin.jpg)](https://wiki.bithouse.fi/uploads/images/gallery/2026-07/rs-testiliitin.jpg)
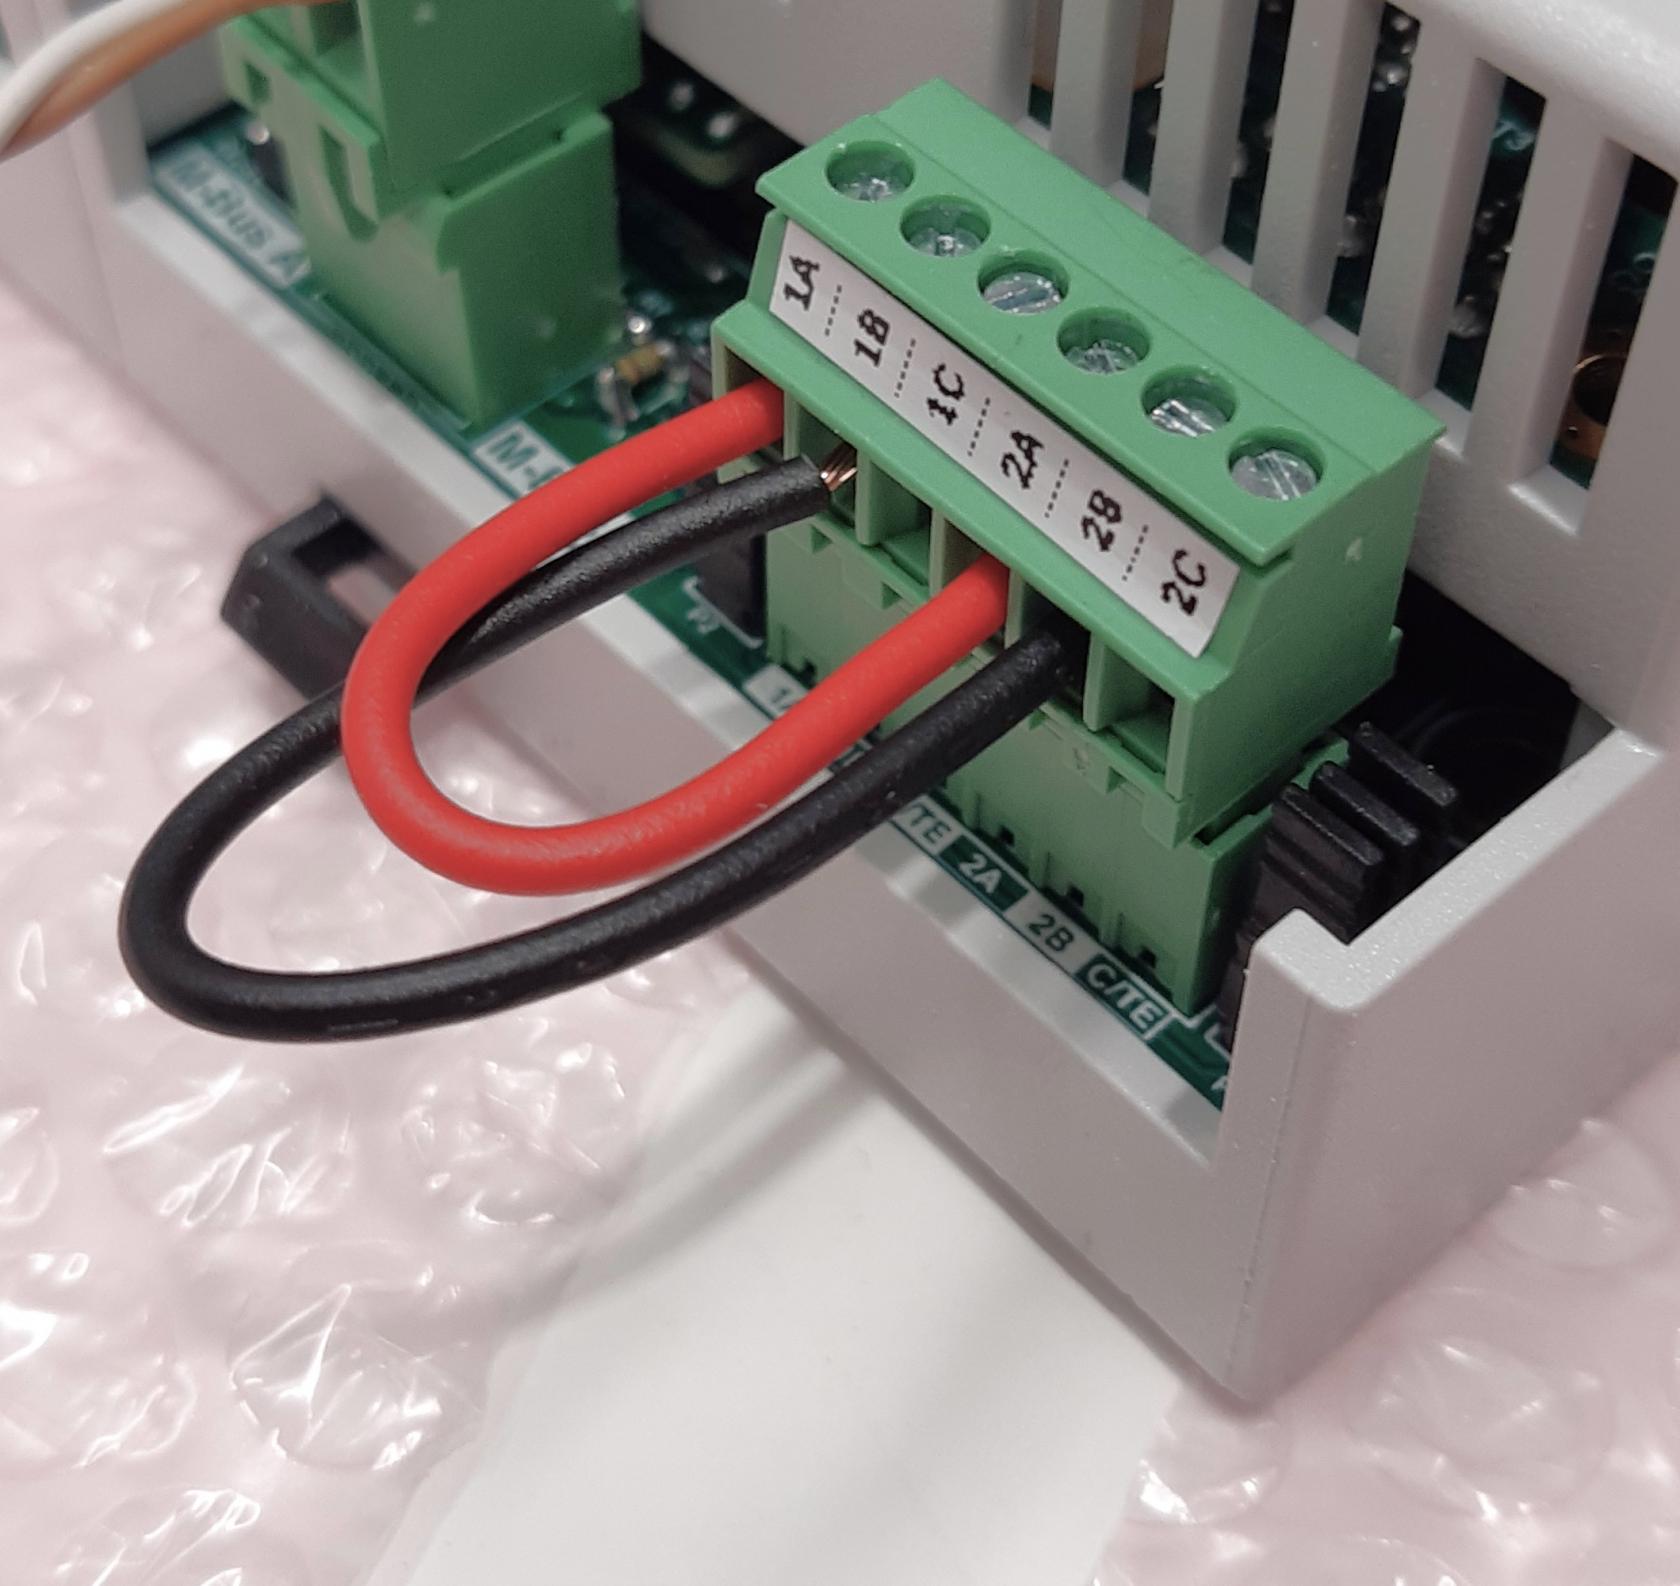
<span style="color: rgb(251, 238, 184);">[![mainmenu-modbustest.png](https://wiki.bithouse.fi/uploads/images/gallery/2026-04/scaled-1680-/mainmenu-modbustest.png)](https://wiki.bithouse.fi/uploads/images/gallery/2026-04/mainmenu-modbustest.png)</span>

- Valitse Modbus-testi.
- Klikkaa **Run**.

<span style="color: rgb(251, 238, 184);"><span style="color: rgb(251, 238, 184);">[![modbus-test-success.png](https://wiki.bithouse.fi/uploads/images/gallery/2026-07/scaled-1680-/modbus-test-success.png)](https://wiki.bithouse.fi/uploads/images/gallery/2026-07/modbus-test-success.png)</span></span>

#### <span style="background-color: rgb(194, 224, 244);">4.3 IM-MBUS-10/250</span>

- Kytke IM-MBUS-10 tai IM-MBUS-250 mittariin, joka on testausta varten kokoamispisteellä.

[![mbus-testilaite.jpg](https://wiki.bithouse.fi/uploads/images/gallery/2026-07/scaled-1680-/mbus-testilaite.jpg)](https://wiki.bithouse.fi/uploads/images/gallery/2026-07/mbus-testilaite.jpg)
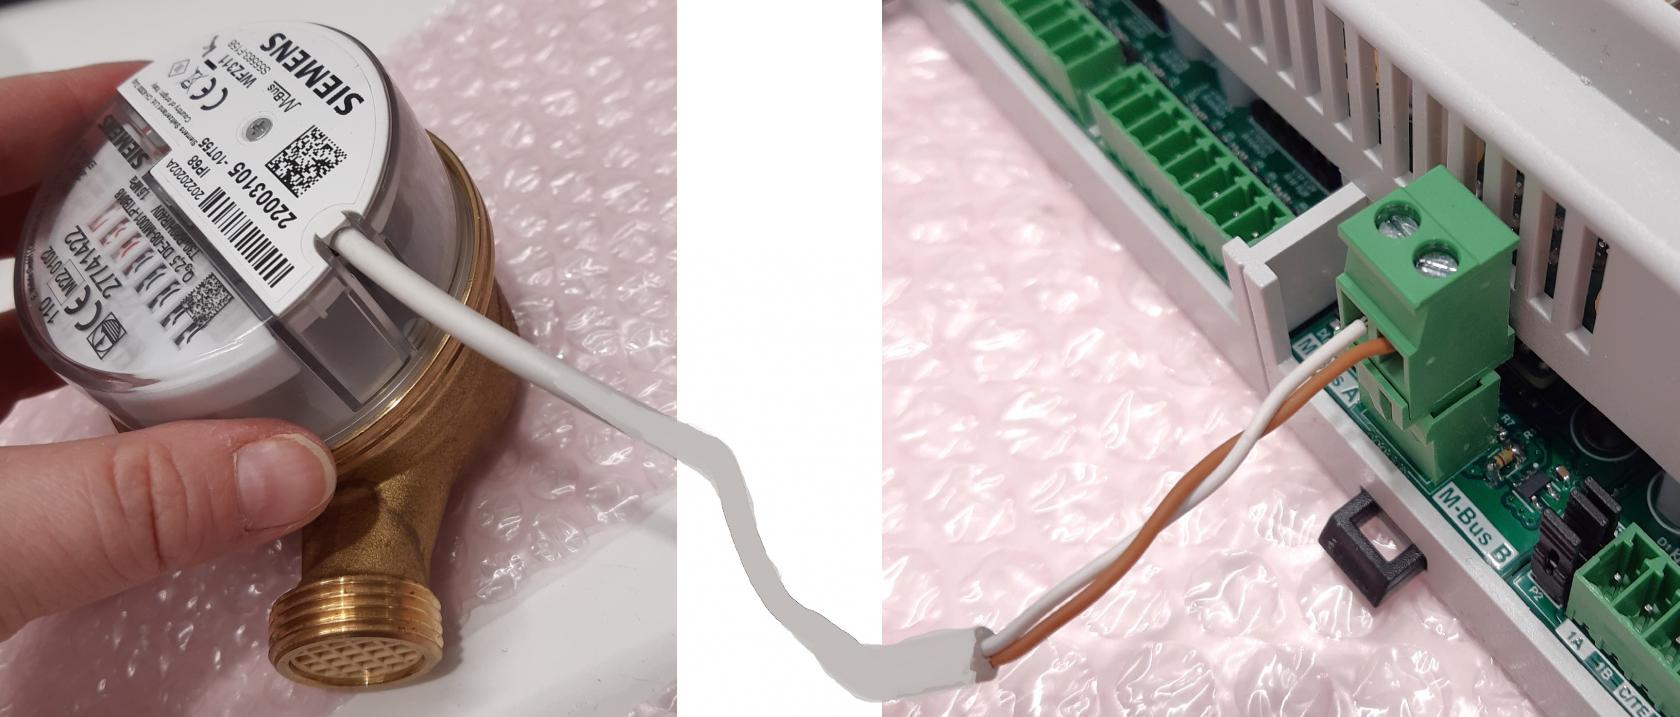
<span style="color: rgb(251, 238, 184);">[![mainmenu-mbustest.png](https://wiki.bithouse.fi/uploads/images/gallery/2026-04/scaled-1680-/mainmenu-mbustest.png)](https://wiki.bithouse.fi/uploads/images/gallery/2026-04/mainmenu-mbustest.png)</span>

- Valitse Mbus-testi.
- Klikkaa **Run**.


[![mbus-test-success.png](https://wiki.bithouse.fi/uploads/images/gallery/2026-07/scaled-1680-/mbus-test-success.png)](https://wiki.bithouse.fi/uploads/images/gallery/2026-07/mbus-test-success.png)
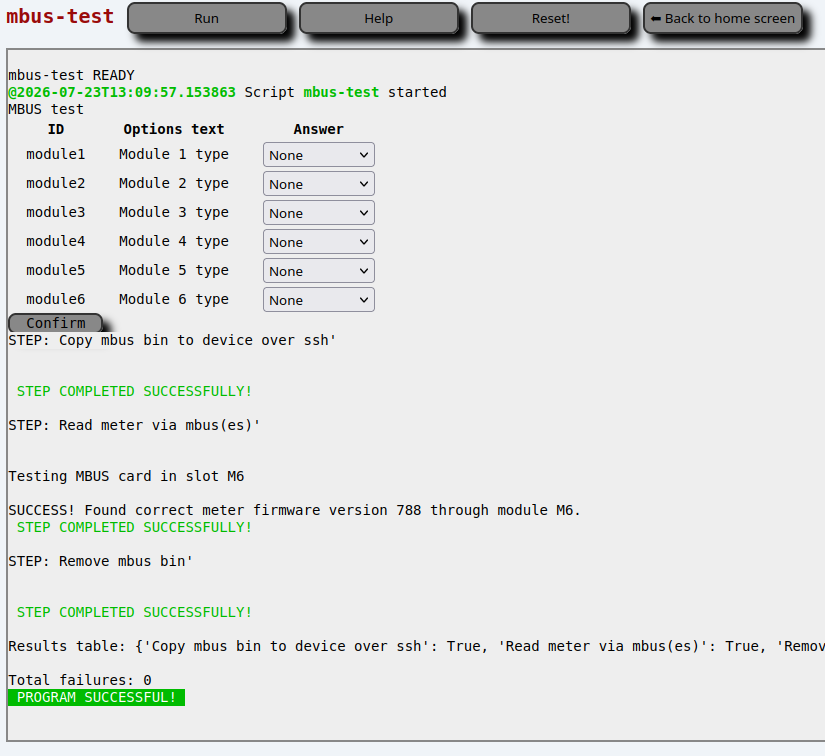
#### <span style="background-color: rgb(194, 224, 244);">4.4 IM-USB-C-4P</span>

- Terminaali auki (ctrl-alt-t) 
    - ssh actiweb@192.168.10.134
- ei mitään kiini im-usb-4c:ssä 
    - lsusb -&gt; näyttää kaikki laitteet
- Kiinitetään USB-tikku/-tikut 
    - lsusb -&gt; näyttää 1/2/3/4 uutta riviä
    - toistetaan tarvittaessa, koska testipisteellä ei välttämättä ole neljää tikkua joilla testata

[![USB-test.jpg](https://wiki.bithouse.fi/uploads/images/gallery/2026-07/scaled-1680-/usb-test.jpg)](https://wiki.bithouse.fi/uploads/images/gallery/2026-07/usb-test.jpg)
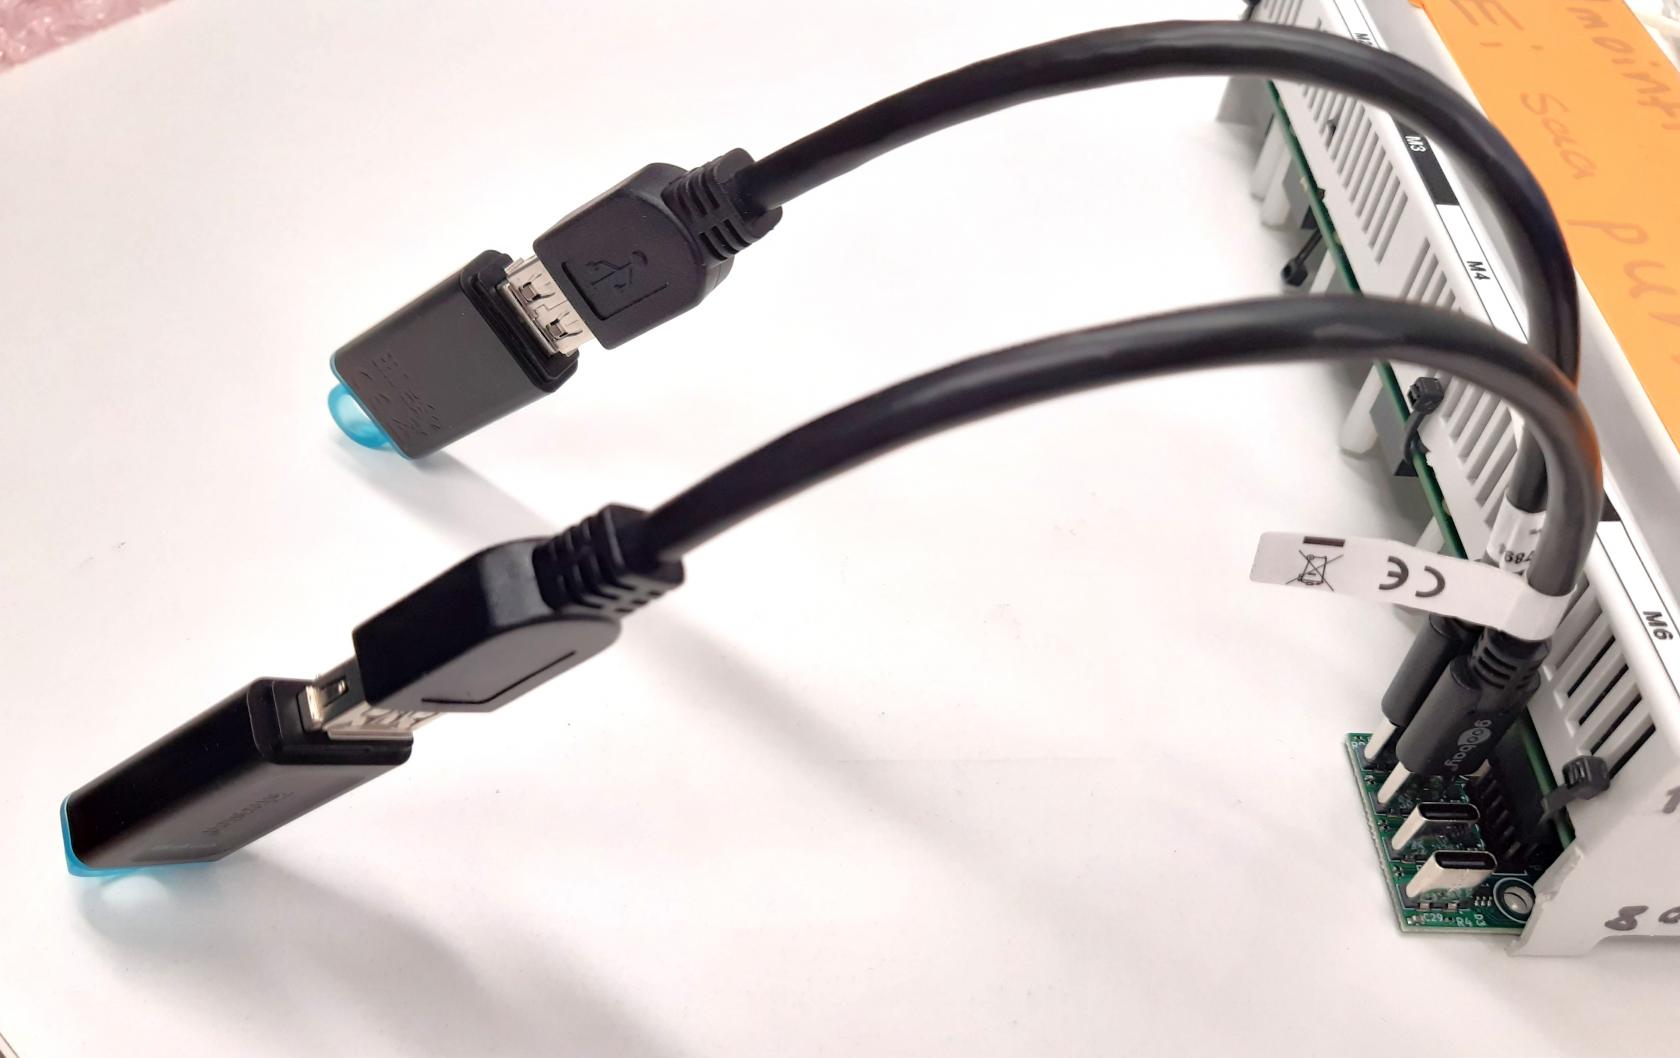
- tikku/tikut irti 
    - lsusb -&gt; ei näytä tikkua/tikkuja

Esimerkkikuvassa testattu kaksi porttia kerrallaan.

[![usb-test-success-highlight.jpg](https://wiki.bithouse.fi/uploads/images/gallery/2026-07/scaled-1680-/usb-test-success-highlight.jpg)](https://wiki.bithouse.fi/uploads/images/gallery/2026-07/usb-test-success-highlight.jpg)
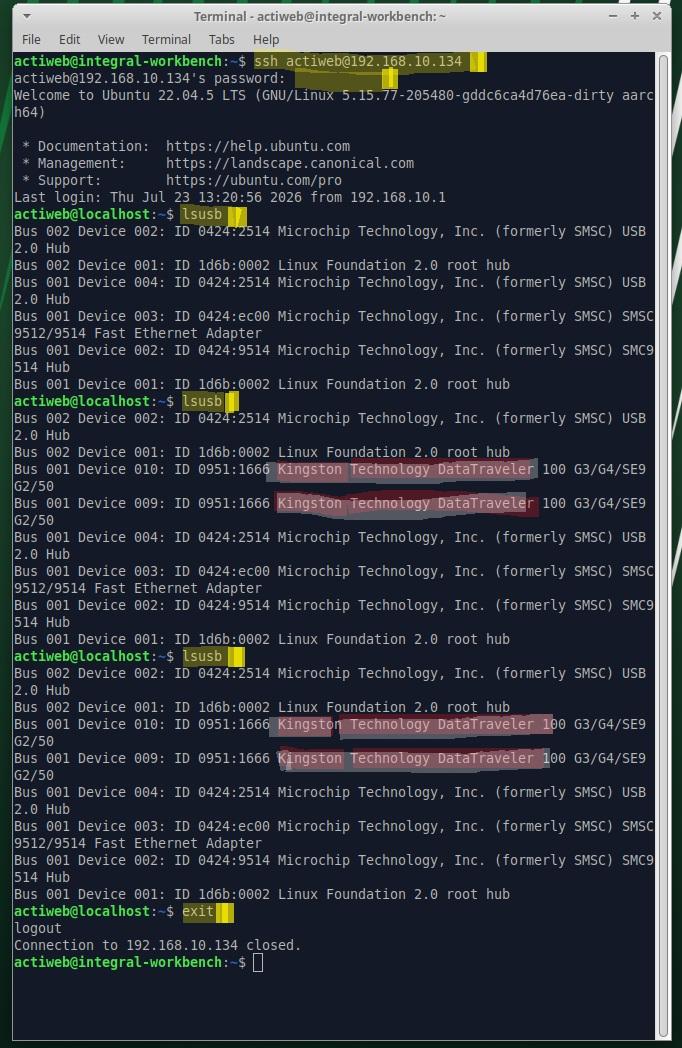
# VPN ja Customization (asiakaskohtaiset asennukset)

### 1. VPN

#### 1.1 Avaa tarvittavat tiedostot

- Avaa Produced\_devices.CSV -tiedosto (Actiweb-käyttäjän kotihakemistosta)
- Avaa VPN jump pikalinkit.ods -tiedosto (työpöydältä)

<p class="callout info">VPN jump pikalinkit -tiedostosta on lukittu tarvittavat solut joten siihen ei voi syöttää vääriin kohtiin tietoa.</p>

- kopioi Produced\_devices.CSV -tiedostosta **Device ID**
- Liitä se punaisella merkittyihin soluihin, jolloin tiedosto automaattisesti muokkaa tarvittavat rivit 
    - Mikäli solut vaihtavat väriä (ei enää punainen), tee uudestaan 
        - UNDO ja uus yritys
        - Liitä mieluummin Excelin syöttöriville kuin suoraan soluun, niin onnistuu paremmin

<table border="0" cellspacing="0" id="bkmrk-vpn-linkin-luonti-co" style="width: 100%;"><colgroup width="83"></colgroup> <colgroup width="56"></colgroup> <colgroup width="41"></colgroup> <colgroup span="2" width="72"></colgroup> <colgroup width="204"></colgroup> <colgroup width="72"></colgroup> <colgroup width="53"></colgroup> <colgroup width="449"></colgroup><tbody><tr><td align="center" bgcolor="#FFFF00" colspan="9" data-sheets-value="{ "1": 2, "2": "VPN linkin luonti"}" height="37" rowspan="2" style="border: 2px solid rgb(0, 0, 0); width: 99.8608%;" valign="middle">**<span style="color: #000000; font-size: x-large;">VPN linkin luonti</span>**</td></tr><tr></tr><tr><td align="center" bgcolor="#D9F2D0" colspan="3" data-sheets-value="{ "1": 2, "2": "common name"}" height="18" style="border: 2px solid rgb(0, 0, 0); width: 33.2869%;" valign="bottom">**<span style="color: #000000;">common name</span>**</td><td align="center" bgcolor="#F2CFEE" colspan="3" data-sheets-value="{ "1": 2, "2": "url"}" style="border: 2px solid rgb(0, 0, 0); width: 33.2869%;" valign="bottom">**<span style="color: #000000;">url</span>**</td><td align="center" bgcolor="#FBE3D6" colspan="2" data-sheets-value="{ "1": 2, "2": "customer"}" style="border: 2px solid rgb(0, 0, 0); width: 22.1913%;" valign="bottom">**<span style="color: #000000;">customer</span>**</td><td align="center" bgcolor="#4E95D9" data-sheets-value="{ "1": 2, "2": "address"}" style="border-top: 2px solid rgb(0, 0, 0); border-bottom: 2px solid rgb(0, 0, 0); border-left: 2px solid rgb(0, 0, 0); width: 11.0956%;" valign="bottom">**<span style="color: #000000;">address</span>**</td></tr><tr><td align="center" bgcolor="#FF3838" colspan="3" data-sheets-value="{ "1": 2, "2": "INSERT DEVICE ID"}" height="34" style="border-width: 2px 1px 2px 2px; border-style: solid; border-color: rgb(0, 0, 0); width: 33.2869%;" valign="middle"><span style="color: #000000; font-family: Liberation Sans;">INSERT DEVICE ID</span></td><td align="center" bgcolor="#FF3838" colspan="3" data-sheets-value="{ "1": 2, "2": "INSERT DEVICE ID"}" style="border-width: 2px 1px; border-style: solid; border-color: rgb(0, 0, 0); width: 33.2869%;" valign="middle"><span style="color: #000000; font-family: Liberation Sans;">INSERT DEVICE ID</span></td><td align="center" bgcolor="#FFFFFF" colspan="2" data-sheets-value="{ "1": 2, "2": "generic"}" style="border-width: 2px 1px; border-style: solid; border-color: rgb(0, 0, 0); width: 22.1913%;" valign="middle"><span style="color: #000000; font-size: medium;">generic</span></td><td align="center" bgcolor="#FFFFFF" data-sheets-value="{ "1": 2, "2": ""}" style="border-top: 2px solid rgb(0, 0, 0); border-bottom: 2px solid rgb(0, 0, 0); width: 11.0956%;" valign="middle"><span style="color: #000000; font-size: medium;">  
</span></td></tr><tr><td align="center" bgcolor="#FFFFFF" colspan="9" data-sheets-value="{ "1": 2, "2": "Permission key:"}" height="18" style="border-width: 2px 2px 1px; border-style: solid; border-color: rgb(0, 0, 0); width: 99.8608%;" valign="bottom"><span style="color: #000000;">Permission key:</span></td></tr><tr><td align="center" bgcolor="#FFFFFF" colspan="9" data-sheets-value="{ "1": 2, "2": "G76NK9645U367R9K6W49"}" height="18" style="border-bottom: 2px solid rgb(0, 0, 0); border-left: 2px solid rgb(0, 0, 0); border-right: 2px solid rgb(0, 0, 0); width: 99.8608%;" valign="bottom"><span style="color: #000000; font-family: Liberation Sans;">G76NK9645U367R9K6W49</span></td></tr><tr><td align="left" bgcolor="#FFFFFF" data-sheets-value="{ "1": 2, "2": ""}" height="18" style="width: 11.0956%;" valign="bottom"><span style="color: #000000;">  
</span></td><td align="left" bgcolor="#FFFFFF" data-sheets-value="{ "1": 2, "2": ""}" style="width: 11.0956%;" valign="bottom"><span style="color: #000000;">  
</span></td></tr><tr><td align="center" bgcolor="#CAEEFB" colspan="9" data-sheets-value="{ "1": 2, "2": "Terminaalissa seuraavat järjestyksessä:"}" height="30" style="border: 2px solid rgb(0, 0, 0); width: 99.8608%;" valign="middle">**<span style="color: #000000; font-size: large;">Terminaalissa seuraavat järjestyksessä:</span>**</td></tr><tr><td align="center" bgcolor="#FFFFFF" data-sheets-numberformat="{ "1": 2, "2": "0", "3": 1}" data-sheets-value="{ "1": 3, "3": 1}" height="30" style="border-width: 2px 1px 1px 2px; border-style: solid; border-color: rgb(0, 0, 0); width: 11.0956%;" valign="middle"><span style="color: #000000;">1</span></td><td align="center" bgcolor="#FFFFFF" colspan="8" data-sheets-value="{ "1": 2, "2": "ssh machine@192.168.0.250"}" style="border-top: 2px solid rgb(0, 0, 0); border-bottom: 1px solid rgb(0, 0, 0); border-right: 2px solid rgb(0, 0, 0); width: 88.7652%;" valign="middle"><span style="color: #000000;">ssh [machine@192.168.0.250](mailto:machine@192.168.0.250)</span></td></tr><tr><td align="center" bgcolor="#FFFFFF" data-sheets-numberformat="{ "1": 2, "2": "0", "3": 1}" data-sheets-value="{ "1": 3, "3": 2}" height="30" style="border-width: 1px 1px 1px 2px; border-style: solid; border-color: rgb(0, 0, 0); width: 11.0956%;" valign="middle"><span style="color: #000000;">2</span></td><td align="center" bgcolor="#FFFFFF" colspan="8" data-sheets-value="{ "1": 2, "2": "cd pkigenerator"}" style="border-top: 1px solid rgb(0, 0, 0); border-bottom: 1px solid rgb(0, 0, 0); border-right: 2px solid rgb(0, 0, 0); width: 88.7652%;" valign="middle"><span style="color: #000000;">cd pkigenerator</span></td></tr><tr><td align="center" bgcolor="#FFFFFF" data-sheets-numberformat="{ "1": 2, "2": "0", "3": 1}" data-sheets-value="{ "1": 3, "3": 3}" height="30" style="border-width: 1px 1px 1px 2px; border-style: solid; border-color: rgb(0, 0, 0); width: 11.0956%;" valign="middle"><span style="color: #000000;">3</span></td><td align="center" bgcolor="#FFFFFF" colspan="8" data-sheets-value="{ "1": 2, "2": ".\/bit_vpn create --common-name INSERT DEVICE ID --url INSERT DEVICE ID --customer generic --street-address '  '"}" style="border-top: 1px solid rgb(0, 0, 0); border-bottom: 1px solid rgb(0, 0, 0); border-right: 2px solid rgb(0, 0, 0); width: 88.7652%;" valign="middle"><span style="color: #000000;">./bit\_vpn create --common-name INSERT DEVICE ID --url INSERT DEVICE ID --customer generic --street-address ' '</span></td></tr><tr><td align="center" bgcolor="#FFFFFF" data-sheets-numberformat="{ "1": 2, "2": "0", "3": 1}" data-sheets-value="{ "1": 3, "3": 4}" height="30" style="border-width: 1px 1px 1px 2px; border-style: solid; border-color: rgb(0, 0, 0); width: 11.0956%;" valign="middle"><span style="color: #000000;">4</span></td><td align="center" bgcolor="#FFFFFF" colspan="8" data-sheets-value="{ "1": 2, "2": "G76NK9645U367R9K6W49"}" style="border-top: 1px solid rgb(0, 0, 0); border-bottom: 1px solid rgb(0, 0, 0); border-right: 2px solid rgb(0, 0, 0); width: 88.7652%;" valign="middle"><span style="color: #000000;">G76NK9645U367R9K6W49</span></td></tr><tr><td align="center" bgcolor="#FFFFFF" data-sheets-numberformat="{ "1": 2, "2": "0", "3": 1}" data-sheets-value="{ "1": 3, "3": 5}" height="30" style="border-width: 1px 1px 1px 2px; border-style: solid; border-color: rgb(0, 0, 0); width: 11.0956%;" valign="middle"><span style="color: #000000;">5</span></td><td align="center" bgcolor="#FFFFFF" colspan="8" data-sheets-value="{ "1": 2, "2": ".\/bit_vpn userhosts-reconfigure"}" style="border-top: 1px solid rgb(0, 0, 0); border-bottom: 1px solid rgb(0, 0, 0); border-right: 2px solid rgb(0, 0, 0); width: 88.7652%;" valign="middle"><span style="color: #000000;">./bit\_vpn userhosts-reconfigure</span></td></tr><tr><td align="center" bgcolor="#FFFFFF" data-sheets-numberformat="{ "1": 2, "2": "0", "3": 1}" data-sheets-value="{ "1": 3, "3": 6}" height="30" style="border-width: 1px 1px 1px 2px; border-style: solid; border-color: rgb(0, 0, 0); width: 11.0956%;" valign="middle"><span style="color: #000000;">6</span></td><td align="center" bgcolor="#FFFFFF" colspan="8" data-sheets-value="{ "1": 2, "2": ".\/bit_vpn config-push --openvpn --nginx --userhost"}" style="border-top: 1px solid rgb(0, 0, 0); border-bottom: 1px solid rgb(0, 0, 0); border-right: 2px solid rgb(0, 0, 0); width: 88.7652%;" valign="middle"><span style="color: #000000;">./bit\_vpn config-push --openvpn --nginx --userhost</span></td></tr><tr><td align="center" bgcolor="#FFFFFF" data-sheets-numberformat="{ "1": 2, "2": "0", "3": 1}" data-sheets-value="{ "1": 3, "3": 7}" height="30" style="border-width: 1px 1px 1px 2px; border-style: solid; border-color: rgb(0, 0, 0); width: 11.0956%;" valign="middle"><span style="color: #000000;">7</span></td><td align="center" bgcolor="#FFFFFF" colspan="8" data-sheets-value="{ "1": 2, "2": ".\/bit_vpn push-to-client -cn INSERT DEVICE ID --ip-address 192.168.0.134"}" style="border-top: 1px solid rgb(0, 0, 0); border-bottom: 1px solid rgb(0, 0, 0); border-right: 2px solid rgb(0, 0, 0); width: 88.7652%;" valign="middle"><span style="color: #000000;">./bit\_vpn push-to-client -cn INSERT DEVICE ID --ip-address 192.168.0.134</span></td></tr><tr><td align="center" bgcolor="#FFFFFF" data-sheets-value="{ "1": 2, "2": ""}" height="30" style="border-width: 1px 1px 1px 2px; border-style: solid; border-color: rgb(0, 0, 0); width: 11.0956%;" valign="middle"><span style="color: #000000;">  
</span></td><td align="center" bgcolor="#FFFF6D" colspan="8" data-sheets-value="{ "1": 2, "2": "TÄSSÄ VAIHEESSA KYSY LINUX(SYSTEM) SALASANA!!!!!!!"}" style="border-top: 1px solid rgb(0, 0, 0); border-bottom: 1px solid rgb(0, 0, 0); border-right: 2px solid rgb(0, 0, 0); width: 88.7652%;" valign="middle">**<span style="color: #c9211e;">TÄSSÄ VAIHEESSA KYSYTÄÄN LINUX(SYSTEM) SALASANA</span>**</td></tr><tr><td align="center" bgcolor="#FFFFFF" data-sheets-numberformat="{ "1": 2, "2": "0", "3": 1}" data-sheets-value="{ "1": 3, "3": 8}" height="30" style="border-width: 1px 1px 1px 2px; border-style: solid; border-color: rgb(0, 0, 0); width: 11.0956%;" valign="middle"><span style="color: #000000;">8</span></td><td align="center" bgcolor="#FFFFFF" colspan="8" data-sheets-value="{ "1": 2, "2": "exit"}" style="border-top: 1px solid rgb(0, 0, 0); border-bottom: 1px solid rgb(0, 0, 0); border-right: 2px solid rgb(0, 0, 0); width: 88.7652%;" valign="middle"><span style="color: #000000;">exit</span></td></tr><tr><td align="center" bgcolor="#FFFFFF" data-sheets-numberformat="{ "1": 2, "2": "0", "3": 1}" data-sheets-value="{ "1": 3, "3": 9}" height="30" style="border-width: 1px 1px 1px 2px; border-style: solid; border-color: rgb(0, 0, 0); width: 11.0956%;" valign="middle"><span style="color: #000000;">9</span></td><td align="center" bgcolor="#FFFFFF" colspan="8" data-sheets-value="{ "1": 2, "2": "ssh actiweb@192.168.0.134"}" style="border-top: 1px solid rgb(0, 0, 0); border-bottom: 1px solid rgb(0, 0, 0); border-right: 2px solid rgb(0, 0, 0); width: 88.7652%;" valign="middle"><span style="color: #000000;">ssh actiweb@192.168.10.134</span></td></tr><tr><td align="center" bgcolor="#FFFFFF" data-sheets-numberformat="{ "1": 2, "2": "0", "3": 1}" data-sheets-value="{ "1": 3, "3": 10}" height="30" style="border-width: 1px 1px 1px 2px; border-style: solid; border-color: rgb(0, 0, 0); width: 11.0956%;" valign="middle"><span style="color: #000000;">10</span></td><td align="center" bgcolor="#FFFFFF" colspan="8" data-sheets-value="{ "1": 2, "2": "sudo .\/clientSetup.sh"}" style="border-top: 1px solid rgb(0, 0, 0); border-bottom: 1px solid rgb(0, 0, 0); border-right: 2px solid rgb(0, 0, 0); width: 88.7652%;" valign="middle"><span style="color: #000000;">sudo ./clientSetup.sh</span></td></tr><tr><td align="center" bgcolor="#FFFFFF" data-sheets-numberformat="{ "1": 2, "2": "0", "3": 1}" data-sheets-value="{ "1": 3, "3": 11}" height="30" style="border-width: 1px 1px 1px 2px; border-style: solid; border-color: rgb(0, 0, 0); width: 11.0956%;" valign="middle"><span style="color: #000000;">11</span></td><td align="center" bgcolor="#FFFFFF" colspan="8" data-sheets-value="{ "1": 2, "2": "ip addr show"}" style="border-top: 1px solid rgb(0, 0, 0); border-bottom: 2px solid rgb(0, 0, 0); border-right: 2px solid rgb(0, 0, 0); width: 88.7652%;" valign="middle"><span style="color: #000000;">ip addr show</span></td></tr><tr><td align="left" bgcolor="#FFFFFF" data-sheets-value="{ "1": 2, "2": ""}" height="37" style="width: 11.0956%;" valign="bottom"><span style="color: #000000;">  
</span></td><td align="center" bgcolor="#FFFF6D" colspan="8" data-sheets-value="{ "1": 2, "2": "Tässä tarkistetaan onko VPN yhteys kunnossa! Mene osoitteeseen 192.168.0.60. Device Id on oltavana siinä yleensä alimmana rivinä! Voi mennä hetki ! Päivittele sivu jos ei näöy!"}" style="border-top: 1px solid rgb(0, 0, 0); border-bottom: 1px solid rgb(0, 0, 0); border-right: 2px solid rgb(0, 0, 0); width: 88.7652%;" valign="middle">**<span style="color: #c9211e;">Tässä tarkistetaan onko VPN yhteys kunnossa (osoite 192.168.0.60). Jos laite ei näy heti listalla niin odota/päivitä.</span>**

</td></tr></tbody></table>

#### 1.2 Terminaali (komentokehoite)

- **Avaa terminaali** (2 vaihtoehtoista tapaa): 
    - \[se yks näppäin joka ois windows-näppäin jos tässä ois windows\] + T
    - ctrl-alt-t

- **Copy-paste rivi kerrallaan** VPN-excelistä 
    - Kopiointi voi olla vähän ärsyttävää riippuen valitsetko hiiren klikkauksilla 'copy' vai käytätkö näppäimistöltä Ctrl+C 
        - joillain riveillä on tekstiä, joka kopioituu vain valitsemalla Excelin syöttöriviltä (ei siis solusta itsestään vaan siitä kohtaa mihin sisältöä kirjoitetaan)
        - joillain riveillä puolestaan ei SAA kopioida sieltä syöttöriviltä koska siinä on automaattisesti päivittyvää sisältöä (juuri ne mitä kopioit aiemmin Produced Devices -tiedostosta ja jotka siitä kopioituivat automaattisesti tarvittaville riveille)

<p class="callout info">Paste eli liittäminen terminaaliin pitää valita **hiirellä**, koska pikanäppäin Ctrl+V ei toimi terminaalissa.</p>

##### 1.2.1 Erityishuomioita tiettyjen VPN-tiedoston rivien kohdalla

- Syötettyäsi **rivin 3** komennon, kysytään onko tiedot oikein ja haluatko jatkaa **y/N**. Siinä kohtaa tarkista, että Device id vastaa sitä laitetta, jota olet työstämässä. Vastaa kyllä jos homma ok.
- Syötettyäsi **rivin 7** komennon, sinun pitää kopioida **Linux-password** Produced Devices -tiedostosta ja liittää se terminaaliin.
- Syötettyäsi **rivin 10** komennon, kysytään **y/N** että haluatko jatkaa. Kyllä haluat.


#### 1.3 Tarkistus että onnistui

- Mene osoitteeseen [192.168.0.60](http://192.168.0.60)
- Siellä on lista VPN-yhteyksistä, siellä pitäis näkyä oikee laite (device ID:n perusteella tunnistat).
- Luultavasti listan viimeisenä.

[![VPN-vastaavuus-cropped.png](https://wiki.bithouse.fi/uploads/images/gallery/2026-08/scaled-1680-/vpn-vastaavuus-cropped.png)](https://wiki.bithouse.fi/uploads/images/gallery/2026-08/vpn-vastaavuus-cropped.png)
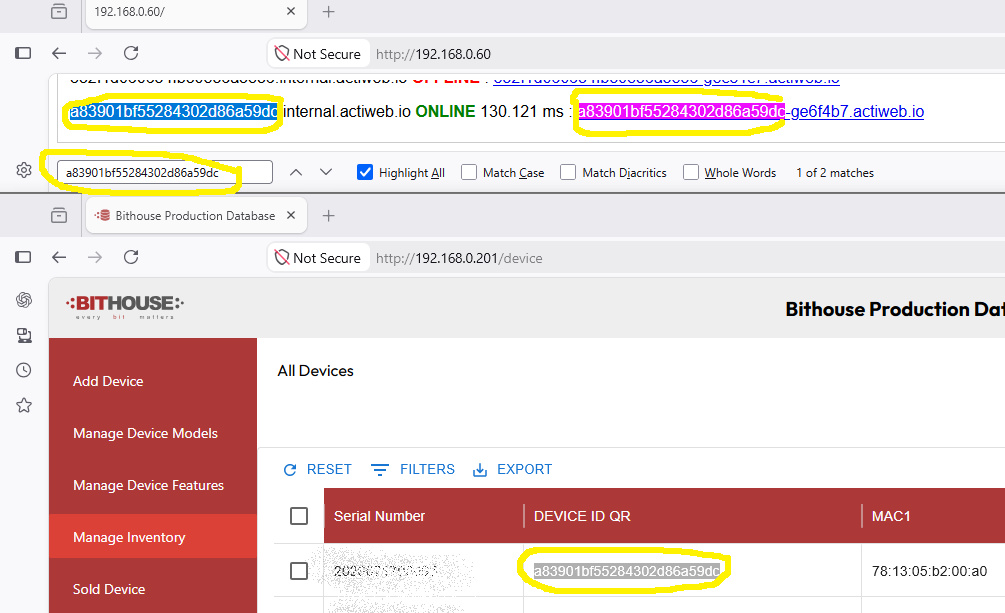
- Testaa VPN-listan linkki että toimii. 
    - tarkista admin/admin(actiweb) salasanalla että pääset sisään.
    - Jos ei pääse on selvitettävä, mistä johtuu.

[![login-actiweb.jpg](https://wiki.bithouse.fi/uploads/images/gallery/2026-08/scaled-1680-/login-actiweb.jpg)](https://wiki.bithouse.fi/uploads/images/gallery/2026-08/login-actiweb.jpg)[ ![login-actiweb2.jpg](https://wiki.bithouse.fi/uploads/images/gallery/2026-08/scaled-1680-/login-actiweb2.jpg)](https://wiki.bithouse.fi/uploads/images/gallery/2026-08/login-actiweb2.jpg)
### 2. Asiakaskohtaiset asennukset


Mikäli laite on menossa jollekulle seuraavista asiakkaista, tehdään asiakaskohtaiset asennukset:

- Högfors GST
- ClimaPri

<p class="callout warning">**ClimaPri** customization -vaiheen tekee tällä hetkellä Risto Kokkola. Toimita laite hänelle tämän vaiheen suorittamiseksi.</p>

<span style="color: rgb(251, 238, 184);">[![mainmenu-Climapricustomize.png](https://wiki.bithouse.fi/uploads/images/gallery/2026-04/scaled-1680-/mainmenu-climapricustomize.png)](https://wiki.bithouse.fi/uploads/images/gallery/2026-04/mainmenu-climapricustomize.png)</span>

#### <span style="color: rgb(0, 0, 0);">2.1 HögforsGST Oy</span>

- <span style="color: rgb(0, 0, 0);">Tarvitsee julkisen VPN-etäyhteysosoitteen.</span>

[![image.png](https://wiki.bithouse.fi/uploads/images/gallery/2026-05/scaled-1680-/tsjimage.png)](https://wiki.bithouse.fi/uploads/images/gallery/2026-05/tsjimage.png)

<span style="color: rgb(0, 0, 0);">Eli tämä:</span>

- <span style="color: rgb(0, 0, 0);">osoitteesta [192.168.0.60](https://192.168.0.60)</span>
- <span style="color: rgb(0, 0, 0);">valitse DEVICE ID:n perusteella oikea rivi</span>
- <span style="color: rgb(0, 0, 0);">sisältäen https:// osan</span>
- <span style="color: rgb(0, 0, 0);">loppuu .io</span>
    - <span style="color: rgb(0, 0, 0);">EI kauttaviivoja tai mitään sen jälkeen</span>

[![image.png](https://wiki.bithouse.fi/uploads/images/gallery/2026-05/scaled-1680-/1xRimage.png)](https://wiki.bithouse.fi/uploads/images/gallery/2026-05/1xRimage.png)

#### 2.2 ClimaPri Oy

- Climapri kustomointia varten täytyy tietää keskuksen LVI-tuotenumero (esim **2018806**)
    
    [![image.png](https://wiki.bithouse.fi/uploads/images/gallery/2026-08/scaled-1680-/fFcimage.png)](https://wiki.bithouse.fi/uploads/images/gallery/2026-08/fFcimage.png)
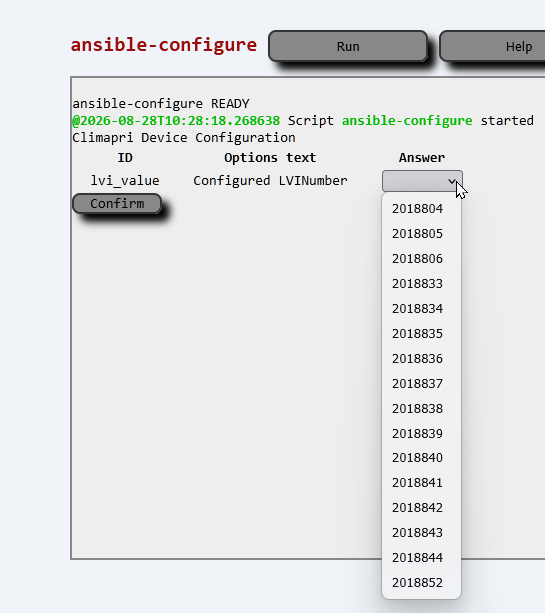
    
     Listasta valitaan haluttu tuotenumero, jonka jälkeen painetaan **Confirm**
    
    Asennus kestää noin 20 minuuttia.

# VIIMEISTELY

# FINALIZE VASTA KUN ON VARMAA ETTÄ KAIKKI ON OK

Viimeistely tehdään vasta, kun setup ja customization on varmasti kunnossa.

<p class="callout warning">Viimeistely poistaa väliaikaiset avaimet, joten muita Integral Testbench/Workbench -toimintoja ei voi enää suorittaa.</p>

- Valitse **Finalize**.

[![mainmenu-finalizedevice.png](https://wiki.bithouse.fi/uploads/images/gallery/2026-04/scaled-1680-/mainmenu-finalizedevice.png)](https://wiki.bithouse.fi/uploads/images/gallery/2026-04/mainmenu-finalizedevice.png)

- Klikkaa **Run**.

<span style="background-color: rgb(185, 106, 217); color: rgb(251, 238, 184);">\[TÄHÄN KUVA FINALISE-VALIKOSTA\]</span>

# Production database + liittimet ja tarrat

### 1. <span class="font-outfit text-xl font-bold my-auto">Bithouse Production Database</span>

Kirjaudu omilla tunnuksillasi Bithouse Production Databaseen (osoitteessa [192.168.0.201](http://192.168.0.201))

<span class="font-outfit text-xl font-bold my-auto">Syötä laitteen tiedot tuotantotietokantaan.</span>

- <span class="font-outfit text-xl font-bold my-auto">Tuotantotietokannan ohje:</span><span class="font-outfit text-xl font-bold my-auto"> [https://wiki.bithouse.fi/books/bithouse-production-database](https://wiki.bithouse.fi/books/bithouse-production-database)</span>

<table border="1" id="bkmrk-feature-type-sarake-" style="border-collapse: collapse; width: 100%;"><colgroup><col style="width: 14.5382%;"></col><col style="width: 13.3466%;"></col><col style="width: 34.6786%;"></col><col style="width: 37.2976%;"></col></colgroup><thead><tr><td>**Feature**</td><td>**Type**</td><td>**Sarake produced\_devices.csv -tiedostossa**</td><td>**Lisätieto**</td></tr></thead><tbody><tr><td>SERIAL BASE</td><td>String</td><td>serial (päivämäärä alussa, 8 numeroa)</td><td>esim. 20260727</td></tr><tr><td>SERIAL ENDING</td><td>Serial Type</td><td>serial (juokseva luku lopussa, 5 numeroa)</td><td>esim. 00021</td></tr><tr><td>DEVICE ID QR</td><td>String</td><td>device\_id</td><td>  
</td></tr><tr><td>ACTIWEB PASS</td><td>String</td><td>admin pw</td><td>  
</td></tr><tr><td>SYSTEM PASS</td><td>String</td><td>linux pw</td><td>  
</td></tr><tr><td>PCB</td><td>String</td><td>-</td><td>pääkortin versio, nykyisin A.22</td></tr><tr><td>MAC1</td><td>Mac Type</td><td>mac\_address</td><td>  
</td></tr><tr><td>CUSTOMER</td><td>String</td><td>-</td><td>laita jos tiedossa, ei pakollinen</td></tr><tr><td>SITE</td><td>String</td><td>-</td><td>laita jos tiedossa, ei pakollinen</td></tr><tr><td>NOTE</td><td>String</td><td>-</td><td>tähän se, mitä ei voi laittaa muualle, esim. SIM-kortin numero</td></tr></tbody></table>

### 2. Liittimet ja tarrat


#### 2.1 Kotelon tarrat


##### 2.1.1 Moduulipaikkoja osoittavat tarrat

- Liimaa tarrat 
    - Moduulipaikkoja osoittavat tarrat kannen/näytön molemmin puolin. Huomioi, että tarra osoittaa moduulipaikat oikeinpäin

[![moduulipaikat.png](https://wiki.bithouse.fi/uploads/images/gallery/2026-04/scaled-1680-/moduulipaikat.png)](https://wiki.bithouse.fi/uploads/images/gallery/2026-04/moduulipaikat.png)


##### <span style="background-color: rgb(236, 202, 250);">2.1.2 Ethernet-portteja ja virtaliittimen liityntäpisteitä osoittava tarra</span>

- Vain näytöllisiin laitteisiin
- Liimaa tarra osoittamaan Ethernet-portit ja virtaliittimen liityntäpisteet.

[![eth_ja_pwr.png](https://wiki.bithouse.fi/uploads/images/gallery/2026-04/scaled-1680-/eth-ja-pwr.png)](https://wiki.bithouse.fi/uploads/images/gallery/2026-04/eth-ja-pwr.png)

#### 2.2 Liittimet


##### <span style="background-color: rgb(194, 224, 244);">2.2.1 Moduulien liittimet merkintöineen</span>

<table border="1" id="bkmrk-liitin-moduulin-muka" style="border-collapse: collapse; width: 69.7138%;"><colgroup><col style="width: 33.1909%;"></col><col style="width: 66.7507%;"></col></colgroup><thead><tr><td>**Liitin moduulin mukaan**</td><td>**Kuva tarran asettelusta**</td></tr></thead><tbody><tr><td>IM-IO816 / 1...8</td><td>[![01_08.jpg](https://wiki.bithouse.fi/uploads/images/gallery/2026-04/scaled-1680-/01-08.jpg)](https://wiki.bithouse.fi/uploads/images/gallery/2026-04/01-08.jpg)</td></tr><tr><td>IM-IO816 / 9...16</td><td>[![09_16.jpg](https://wiki.bithouse.fi/uploads/images/gallery/2026-04/scaled-1680-/09-16.jpg)](https://wiki.bithouse.fi/uploads/images/gallery/2026-04/09-16.jpg)</td></tr><tr><td>IM-MBUS-10

IM-MBUS-250

</td><td>[![mbus_new.png](https://wiki.bithouse.fi/uploads/images/gallery/2026-04/scaled-1680-/mbus-new.png)](https://wiki.bithouse.fi/uploads/images/gallery/2026-04/mbus-new.png)</td></tr><tr><td>IM-RS485-2P</td><td>[![rs485.jpg](https://wiki.bithouse.fi/uploads/images/gallery/2026-04/scaled-1680-/rs485.jpg)](https://wiki.bithouse.fi/uploads/images/gallery/2026-04/rs485.jpg)</td></tr><tr><td>IM-USB-C-4P</td><td>ei tarroja</td></tr></tbody></table>

##### 2.2.2 Virtaliitin merkintöineen

[![PWR.png](https://wiki.bithouse.fi/uploads/images/gallery/2026-04/scaled-1680-/pwr.png)](https://wiki.bithouse.fi/uploads/images/gallery/2026-04/pwr.png)


##### 2.2.3 Tarkistuskuvat

<p class="callout warning">Tarkista huolellisesti, että tarrat osoittavat liityntäpisteiden symbolit/numerot oikein.</p>

- **IM-IO816**-moduulin liityntäpisteet menevät aina korttiin merkityn järjestyksen mukaan, mutta kortin versiosta riippuen merkinnät saattavat olla selkeämpiä tai vähemmän helppolukuisia. Mikäli kortille on merkitty esim. 51-58, ne ovat vastaavasti liityntäpisteet 01-08 (kts. kuva)

[![liitinmerkinnätIO816 -lähikuva.jpg](https://wiki.bithouse.fi/uploads/images/gallery/2025-09/scaled-1680-/liitinmerkinnatio816-lahikuva.jpg)](https://wiki.bithouse.fi/uploads/images/gallery/2025-09/liitinmerkinnatio816-lahikuva.jpg)
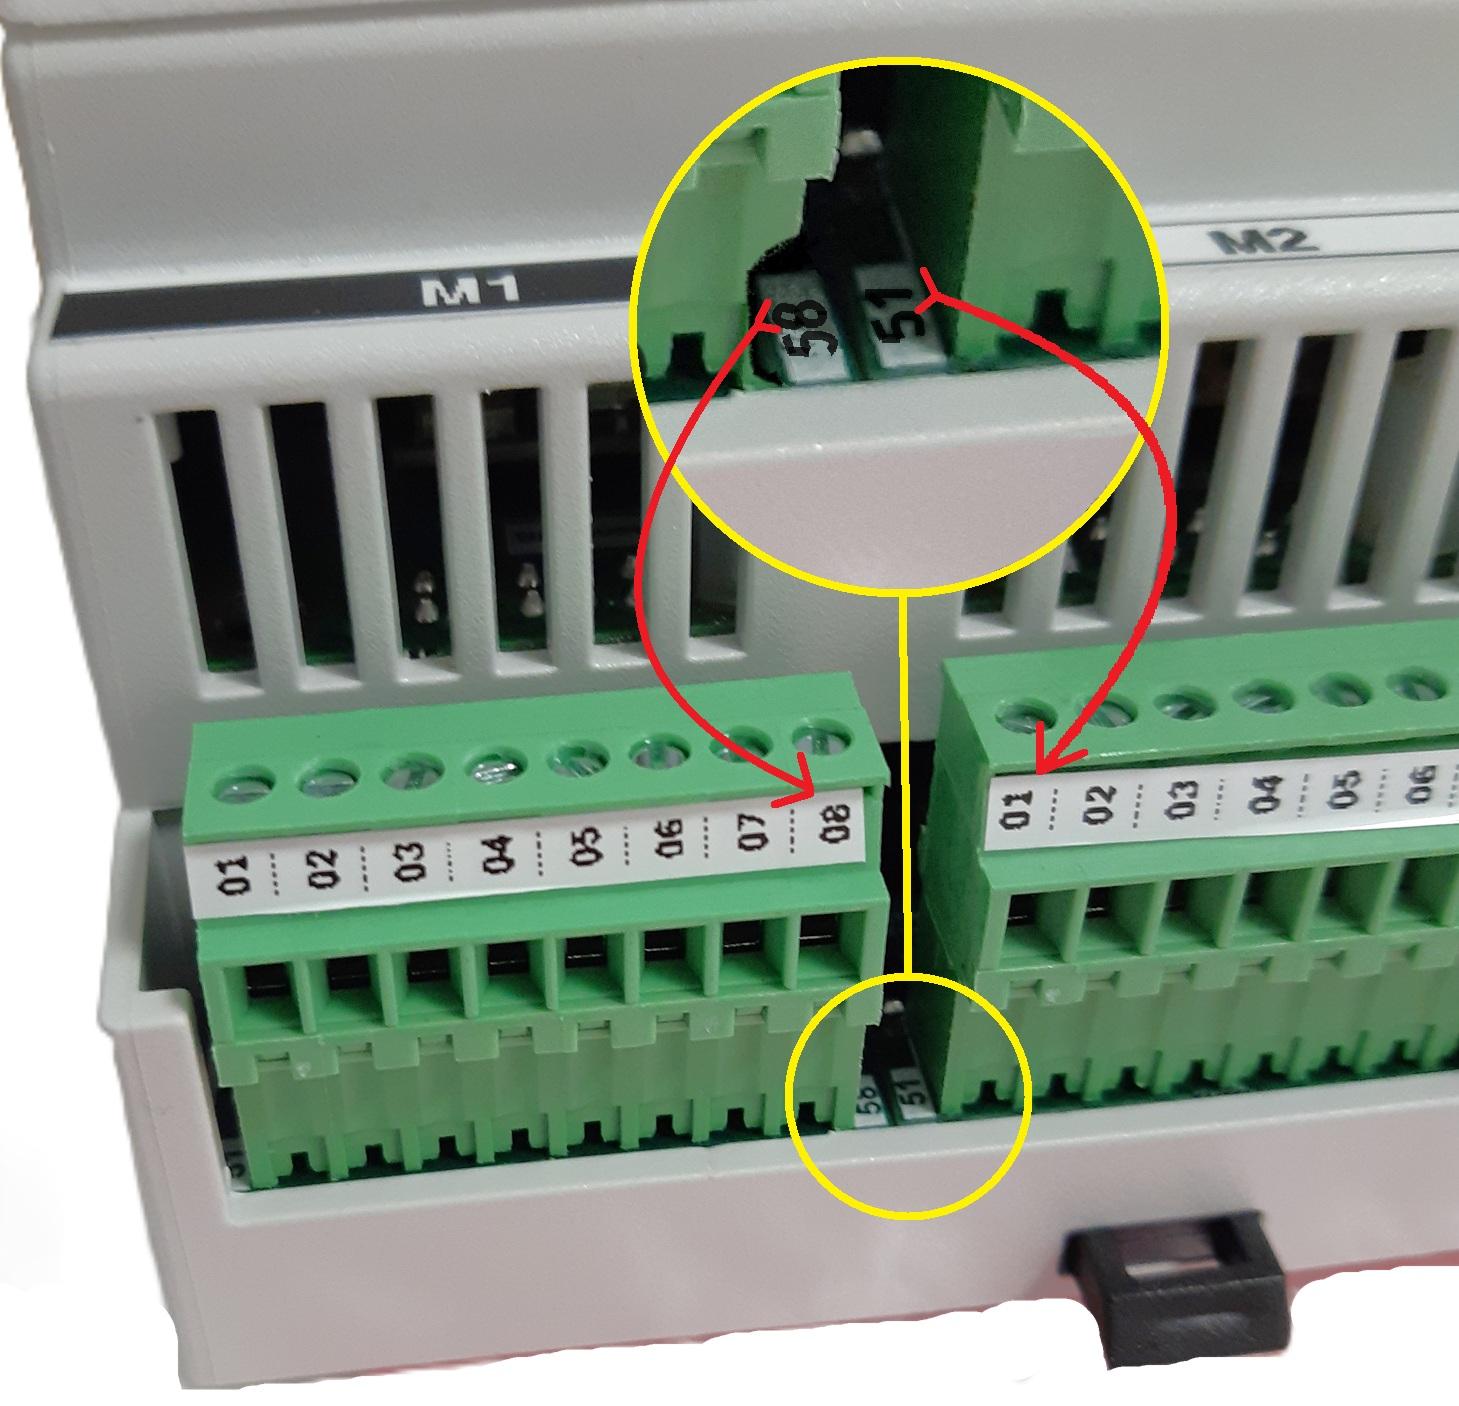
<p class="callout warning">Tarkista, että kaikki tarrojen merkinnät ovat samoin päin.</p>

Jos joku merkintä on eri suuntaan luettava:

- Virtaliittimen tai kotelon tarra on vanhaa mallia
- Tarrat eivät osoita oikeita liityntäpisteitä

[![tarkistus-samasuunta.png](https://wiki.bithouse.fi/uploads/images/gallery/2026-04/scaled-1680-/tarkistus-samasuunta.png)](https://wiki.bithouse.fi/uploads/images/gallery/2026-04/tarkistus-samasuunta.png)
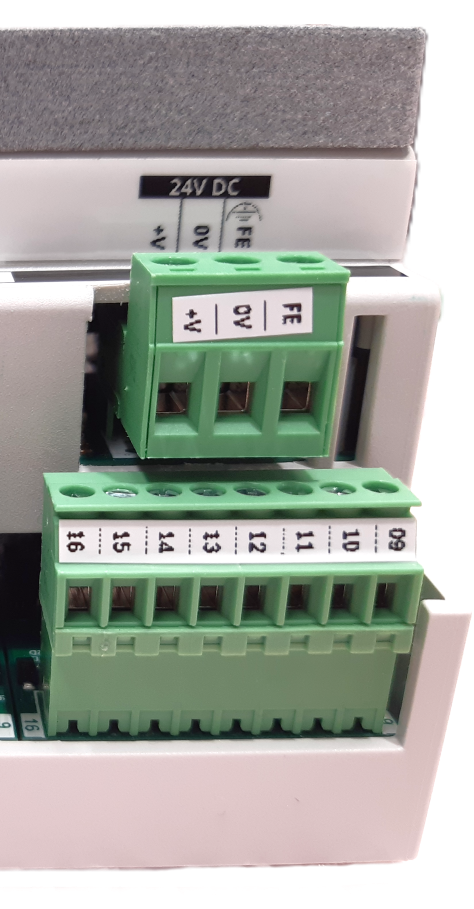
#### 2.3 Sarjanumerotarra


- Mene tuotantotietokantaan 192.168.0.201.  
    
    - Manage Inventory -välilehti
    - Valitse laite ja tulosta tarra.

[![tarran luominen blur.png](https://wiki.bithouse.fi/uploads/images/gallery/2026-07/scaled-1680-/tarran-luominen-blur.png)](https://wiki.bithouse.fi/uploads/images/gallery/2026-07/tarran-luominen-blur.png)
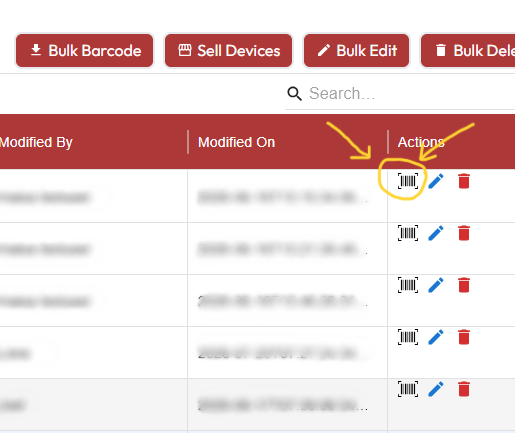
- - Tarra on 24 mm:n musta teksti valkoisella tarralla.

[![image.png](https://wiki.bithouse.fi/uploads/images/gallery/2026-05/scaled-1680-/X0bimage.png)](https://wiki.bithouse.fi/uploads/images/gallery/2026-05/X0bimage.png)
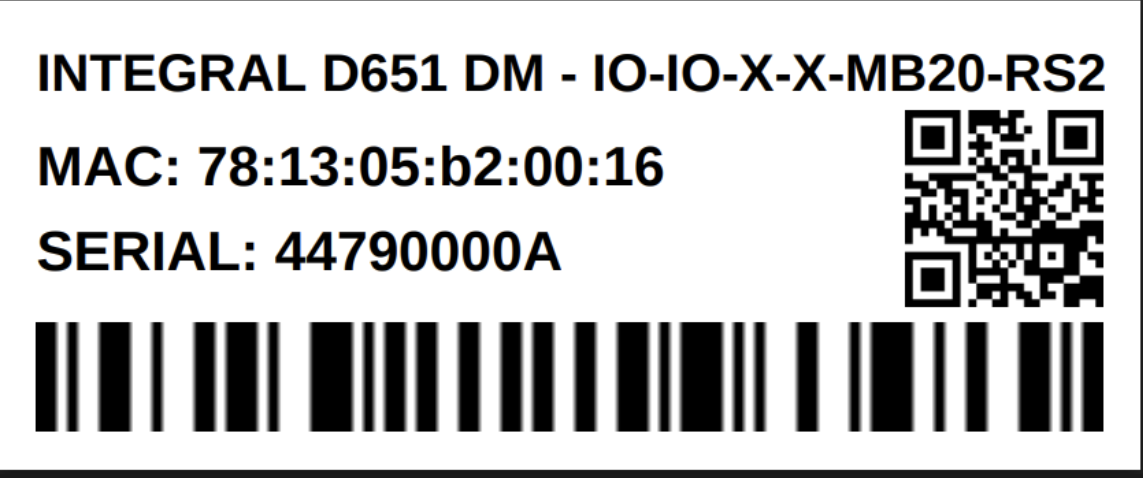
# Integral Universaali Alakeskusprosessori kokoamisohje

### <span style="background-color: rgb(236, 240, 241);">1. Tarvittavat osat tuotekoodin mukaan</span>


<details id="bkmrk-osat-ovat-hyllyss%C3%A4-k"><summary></summary>


Tuotekoodi on muodossa:

**INTEGRAL D6<span style="background-color: rgb(248, 202, 198);">?? <span style="text-decoration: underline; background-color: rgb(255, 255, 255);">DM</span></span><span style="background-color: rgb(255, 255, 255);"> - X-X-X-X-X-X</span>**

jossa

1. **<span style="background-color: rgb(241, 196, 15);">Integral </span><span style="background-color: rgb(191, 237, 210);"><span style="background-color: rgb(242, 131, 119);">D</span>6 </span><span style="background-color: rgb(255, 255, 255);">= <span style="background-color: rgb(241, 196, 15);">tuotteen nimi<span style="background-color: rgb(194, 224, 244);"><span style="background-color: rgb(242, 131, 119);"> DIN-koteloitu laite </span><span style="background-color: rgb(191, 237, 210);">kuudella moduulipaikalla</span></span></span></span>**
2. <span style="background-color: rgb(248, 202, 198);">**??** = prosessorin tunnus</span>
3. <span style="background-color: rgb(255, 255, 255);">**D** = tuleeko näyttö ( D=kyllä, tyhjä=ei )</span>
4. <span style="background-color: rgb(255, 255, 255);">**M** = tuleeko modeemi ( M=kyllä, tyhjä=ei )</span>
5. <span style="background-color: rgb(255, 255, 255);">**<span style="background-color: rgb(255, 255, 255);"> X-X-X-X-X-X</span>** = moduulipaikat järjestyksessä M1-M6</span>

#### <span style="background-color: rgb(251, 238, 184);">1.1</span> (D6)<span style="background-color: rgb(251, 238, 184);">??</span>... = CPU-SoM

SoMit ovat etukäteen ohjelmoituja, ja niiden pakkauksessa pitäisi lukea sekä ohjelmointipäivämäärä että ohjelmaversio. Jos näitä tietoja ei ole merkitty, SoMit tulisi ohjelmoida [ohjeen ](https://wiki.bithouse.fi/books/integral-universaali-alakeskusprosessori/page/prosessorimoduulin-cpu-som-ohjelmointi)mukaisesti.

<details id="bkmrk-integral-tuotekoodi-"><summary></summary>


<table border="1" cellpadding="0" cellspacing="0" id="bkmrk-integral-tuotekoodi--1" style="border-collapse: collapse; width: 702px; border-width: 1px; border-spacing: 0px; border-color: rgb(0, 0, 0); height: 185px;" width="846"><thead><tr style="height: 0.5px;"><td class="xl66 align-left" height="40" style="height: 47.6px; width: 102.867px; border-width: 1px; border-color: rgb(0, 0, 0);" width="118">**INTEGRAL Tuotekoodi**</td><td class="xl67 align-left" style="width: 72.2px; border-width: 1px; border-color: rgb(0, 0, 0); height: 47.6px;" width="88">**Koodi**</td><td class="xl66 align-left" style="width: 219.2px; border-width: 1px; border-color: rgb(0, 0, 0); height: 47.6px;" width="512">**Nimi**</td><td class="xl66 align-left" style="width: 71.2px; border-width: 1px; border-color: rgb(0, 0, 0); height: 47.6px;" width="64">**Määrä**</td><td class="xl66 align-left" style="width: 302.2px; border-width: 1px; border-color: rgb(0, 0, 0); height: 47.6px;" width="64">**Huom!**</td></tr></thead><tbody><tr style="height: 29.8px;"><td class="xl70 align-left" height="20" style="height: 29.8px; border-width: 1px; border-top: 1px rgb(0, 0, 0); width: 102.867px; border-color: rgb(0, 0, 0);" width="118"><span style="background-color: rgb(251, 238, 184);">D6**<span class="font5">30</span>**</span></td><td class="xl70 align-left" style="border-width: 1px; border-top-style: none; border-left: 1px rgb(0, 0, 0); width: 72.2px; border-color: rgb(0, 0, 0); height: 29.8px;" width="88"> </td><td class="xl71 align-left" style="border-width: 1px; border-top-style: none; border-left: 1px rgb(0, 0, 0); width: 219.2px; border-color: rgb(0, 0, 0); height: 29.8px;" width="512"><span lang="EN-US">Verdin AM62 Dual 1GB ET</span></td><td class="xl72 align-left" style="border-width: 1px; border-top-style: none; border-left: 1px rgb(0, 0, 0); width: 71.2px; border-color: rgb(0, 0, 0); height: 29.8px;" width="64">1</td><td class="xl70 align-left" style="border-width: 1px; border-top-style: none; border-left: 1px rgb(0, 0, 0); width: 302.2px; border-color: rgb(0, 0, 0); height: 29.8px;" width="64"> </td></tr><tr style="height: 29.8px;"><td class="xl70 align-left" height="20" style="height: 29.8px; border-width: 1px; border-top: 1px rgb(0, 0, 0); width: 102.867px; border-color: rgb(0, 0, 0);" width="118"><span style="background-color: rgb(251, 238, 184);">D6**<span class="font5">50</span>**</span></td><td class="xl70 align-left" style="border-width: 1px; border-top-style: none; border-left: 1px rgb(0, 0, 0); width: 72.2px; border-color: rgb(0, 0, 0); height: 29.8px;" width="88">  
</td><td class="xl71 align-left" style="border-width: 1px; border-top-style: none; border-left: 1px rgb(0, 0, 0); width: 219.2px; border-color: rgb(0, 0, 0); height: 29.8px;" width="512"><span lang="EN-US">Verdin AM62 Quad 2GB WB IT</span></td><td class="xl72 align-left" style="border-width: 1px; border-top-style: none; border-left: 1px rgb(0, 0, 0); width: 71.2px; border-color: rgb(0, 0, 0); height: 29.8px;" width="64">1</td><td class="xl70 align-left" style="border-width: 1px; border-top-style: none; border-left: 1px rgb(0, 0, 0); width: 302.2px; border-color: rgb(0, 0, 0); height: 29.8px;" width="64"> </td></tr><tr style="height: 29.8px;"><td style="border-width: 1px; border-top: 1px rgb(0, 0, 0); width: 102.867px; border-color: rgb(0, 0, 0); height: 29.8px;"><span style="background-color: rgb(251, 238, 184);">D6**5<span class="font5">0</span>**</span></td><td style="border-width: 1px; border-top-style: none; border-left: 1px rgb(0, 0, 0); width: 72.2px; border-color: rgb(0, 0, 0); height: 29.8px;">  
</td><td style="border-width: 1px; border-top-style: none; border-left: 1px rgb(0, 0, 0); width: 219.2px; border-color: rgb(0, 0, 0); height: 29.8px;"><span lang="EN-US">Verdin iMX8MM Q 2GB IT</span></td><td style="border-width: 1px; border-top-style: none; border-left: 1px rgb(0, 0, 0); width: 71.2px; border-color: rgb(0, 0, 0); height: 29.8px;">1</td><td style="border-width: 1px; border-top-style: none; border-left: 1px rgb(0, 0, 0); width: 302.2px; border-color: rgb(0, 0, 0); height: 29.8px;">Vain näitä hyllyssä tällä hetkellä</td></tr><tr style="height: 29.8px;"><td class="xl70 align-left" height="20" style="height: 29.8px; border-width: 1px; border-top: 1px rgb(0, 0, 0); width: 102.867px; border-color: rgb(0, 0, 0);" width="118"><span style="background-color: rgb(251, 238, 184);">D6**<span class="font5">70</span>**</span></td><td class="xl70 align-left" style="border-width: 1px; border-top-style: none; border-left: 1px rgb(0, 0, 0); width: 72.2px; border-color: rgb(0, 0, 0); height: 29.8px;" width="88"> </td><td class="xl71 align-left" style="border-width: 1px; border-top-style: none; border-left: 1px rgb(0, 0, 0); width: 219.2px; border-color: rgb(0, 0, 0); height: 29.8px;" width="512"><span lang="EN-US">Verdin iMX8M Plus Quad 8GB WB IT</span></td><td class="xl72 align-left" style="border-width: 1px; border-top-style: none; border-left: 1px rgb(0, 0, 0); width: 71.2px; border-color: rgb(0, 0, 0); height: 29.8px;" width="64">1</td><td class="xl70 align-left" style="border-width: 1px; border-top-style: none; border-left: 1px rgb(0, 0, 0); width: 302.2px; border-color: rgb(0, 0, 0); height: 29.8px;" width="64">  
</td></tr></tbody></table>

</details>
**<span style="background-color: rgb(255, 255, 255);">3. D</span>** = **Näyttö**

  
Jos Integral on näytöllinen, käytä hyllystä löytyvää valmiiksi liimattua näyttöä. Mikäli valmiiksi liimattua näyttöä ei ole saatavilla, näyttö on liimattava vähintään 24 tuntia ennen Integralin kokoamista. Katso näytön valmistus tästä [Ohjeesta!](https://wiki.bithouse.fi/books/integral-universaali-alakeskusprosessori/page/nayton-liimaus)


**<span style="background-color: rgb(236, 202, 250);">3.</span> tyhjä = Ei näyttöä, vain kansi**

<details id="bkmrk-integral-tuotekoodi--4"><summary></summary>


<table border="1" cellpadding="0" cellspacing="0" id="bkmrk-integral-tuotekoodi--5" style="border-collapse: collapse; width: 845px; border-width: 1px; border-spacing: 0px; border-color: rgb(0, 0, 0);" width="834"><thead><tr style="height: 15.0pt;"><td class="xl68" height="40" style="height: 30pt; width: 113.283px; border-width: 1px; border-color: rgb(0, 0, 0);" width="87">**INTEGRAL tuotekoodi**</td><td class="xl69" style="width: 70.6833px; border-width: 1px; border-color: rgb(0, 0, 0);" width="96">**Koodi**</td><td class="xl70" style="width: 158.367px; border-width: 1px; border-color: rgb(0, 0, 0);" width="523">**Nimi**</td><td class="xl70" style="width: 59.45px; border-width: 1px; border-color: rgb(0, 0, 0);" width="64">**Määrä**</td><td class="xl70" style="width: 437.45px; border-width: 1px; border-color: rgb(0, 0, 0);" width="64">**Huom!**</td></tr></thead><tbody><tr style="height: 15.0pt;"><td class="xl71" height="20" style="height: 15pt; border-width: 1px; border-top: 1px rgb(0, 0, 0); border-color: rgb(0, 0, 0); width: 113.283px;"> </td><td class="xl66" style="border-width: 1px; border-top-style: none; border-left: 1px rgb(0, 0, 0); border-color: rgb(0, 0, 0); width: 70.6833px;"> </td><td class="xl66" style="border-width: 1px; border-top-style: none; border-left: 1px rgb(0, 0, 0); border-color: rgb(0, 0, 0); width: 158.367px;">Kansi</td><td class="xl67" style="border-width: 1px; border-top-style: none; border-left: 1px rgb(0, 0, 0); border-color: rgb(0, 0, 0); width: 59.45px;">1</td><td class="xl67" style="border-width: 1px; border-top-style: none; border-left: 1px rgb(0, 0, 0); border-color: rgb(0, 0, 0); width: 437.45px;">  
</td></tr><tr><td style="border-width: 1px; border-top: 1px rgb(0, 0, 0); border-color: rgb(0, 0, 0); width: 113.283px;"><span style="background-color: rgb(191, 237, 210);">  
</span></td><td style="border-width: 1px; border-top-style: none; border-left: 1px rgb(0, 0, 0); border-color: rgb(0, 0, 0); width: 70.6833px;"> </td><td style="border-width: 1px; border-top-style: none; border-left: 1px rgb(0, 0, 0); border-color: rgb(0, 0, 0); width: 158.367px;">Kansitarra</td><td style="border-width: 1px; border-top-style: none; border-left: 1px rgb(0, 0, 0); border-color: rgb(0, 0, 0); width: 59.45px;">1</td><td style="border-width: 1px; border-top-style: none; border-left: 1px rgb(0, 0, 0); border-color: rgb(0, 0, 0); width: 437.45px;">Toistaisesksi!  
**Tulevaisuudessa saamme kannet, joissa tarra on valmiiksi painettuna.**  
</td></tr></tbody></table>

</details>
**<span style="background-color: rgb(191, 237, 210);">4.</span> <span style="background-color: rgb(191, 237, 210);">M</span> = Modeemi**

<details id="bkmrk-integral-tuotekoodi--6"><summary></summary>


<table border="1" cellpadding="0" cellspacing="0" id="bkmrk-integral-tuotekoodi--7" style="border-collapse: collapse; width: 738px; border-width: 1px; border-spacing: 0px; border-color: rgb(0, 0, 0); height: 137px;" width="834"><thead><tr style="height: 15.0pt;"><td class="xl68" height="40" style="height: 30pt; width: 86.0833px; border-width: 1px; border-color: rgb(0, 0, 0);">**INTEGRAL tuotekoodi**</td><td class="xl69" style="width: 102.483px; border-width: 1px; border-color: rgb(0, 0, 0);">**Koodi**</td><td class="xl70" style="width: 421.167px; border-width: 1px; border-color: rgb(0, 0, 0);">**Nimi**</td><td class="xl70" style="width: 62.25px; border-width: 1px; border-color: rgb(0, 0, 0);">**Määrä**</td><td class="xl70" style="width: 116.25px; border-width: 1px; border-color: rgb(0, 0, 0);">**Huom!**</td></tr></thead><tbody><tr style="height: 15.0pt;"><td class="xl71" height="20" style="height: 15pt; border-width: 1px; border-top: 1px rgb(0, 0, 0); border-color: rgb(0, 0, 0); width: 86.0833px;"><span style="background-color: rgb(191, 237, 210);">**M**</span></td><td class="xl66" style="border-width: 1px; border-top-style: none; border-left: 1px rgb(0, 0, 0); border-color: rgb(0, 0, 0); width: 102.483px;">11461tai 11462 </td><td class="xl66" style="border-width: 1px; border-top-style: none; border-left: 1px rgb(0, 0, 0); border-color: rgb(0, 0, 0); width: 421.167px;"><span lang="EN-US">Fibocom NL668-EU-05 LTE Cat-4 mPCIe</span></td><td class="xl67" style="border-width: 1px; border-top-style: none; border-left: 1px rgb(0, 0, 0); border-color: rgb(0, 0, 0); width: 62.25px;">1</td><td class="xl67" style="border-width: 1px; border-top-style: none; border-left: 1px rgb(0, 0, 0); border-color: rgb(0, 0, 0); width: 116.25px;">  
</td></tr><tr><td style="border-width: 1px; border-top: 1px rgb(0, 0, 0); border-color: rgb(0, 0, 0); width: 86.0833px;"><span style="background-color: rgb(191, 237, 210);">  
</span></td><td style="border-width: 1px; border-top-style: none; border-left: 1px rgb(0, 0, 0); border-color: rgb(0, 0, 0); width: 102.483px;">170216-01</td><td style="border-width: 1px; border-top-style: none; border-left: 1px rgb(0, 0, 0); border-color: rgb(0, 0, 0); width: 421.167px;"><span lang="EN-US">RF Interface Cable SMA/IPEX MHF, 8 cm (antennipiuha)</span></td><td style="border-width: 1px; border-top-style: none; border-left: 1px rgb(0, 0, 0); border-color: rgb(0, 0, 0); width: 62.25px;">1</td><td style="border-width: 1px; border-top-style: none; border-left: 1px rgb(0, 0, 0); border-color: rgb(0, 0, 0); width: 116.25px;">rikka+mutteri</td></tr><tr><td style="border-width: 1px; border-top: 1px rgb(0, 0, 0); border-color: rgb(0, 0, 0); width: 86.0833px;"><span style="background-color: rgb(191, 237, 210);">  
</span></td><td style="border-width: 1px; border-top-style: none; border-left: 1px rgb(0, 0, 0); border-color: rgb(0, 0, 0); width: 102.483px;">  
</td><td style="border-width: 1px; border-top-style: none; border-left: 1px rgb(0, 0, 0); border-color: rgb(0, 0, 0); width: 421.167px;"><span lang="EN-US">Ruuvit M2</span></td><td style="border-width: 1px; border-top-style: none; border-left: 1px rgb(0, 0, 0); border-color: rgb(0, 0, 0); width: 62.25px;">2</td><td style="border-width: 1px; border-top-style: none; border-left: 1px rgb(0, 0, 0); border-color: rgb(0, 0, 0); width: 116.25px;">  
</td></tr></tbody></table>

</details>
**<span style="background-color: rgb(194, 224, 244);">5. </span><span style="background-color: rgb(255, 255, 255);"><span style="background-color: rgb(255, 255, 255);">X-X-X-X-X-X</span> = moduulipaikat järjestyksessä M1-M6</span>**

<details id="bkmrk-valmiiksi-merkityt-l"><summary></summary>


<table border="1" cellpadding="0" cellspacing="0" id="bkmrk-integral-tuotekoodi--8" style="border-collapse: collapse; width: 634pt; border-width: 1px; border-spacing: 0px; border-color: rgb(0, 0, 0); height: 182.6px;" width="846"><colgroup><col style="width: 99px;" width="87"></col><col style="width: 80px;" width="112"></col><col style="width: 320px;" width="527"></col><col style="width: 63px;" width="56"></col><col style="width: 284px;" width="64"></col></colgroup><thead><tr style="height: 46.6px;"><td class="xl71" height="40" style="height: 46.6px; width: 65pt; border-width: 1px; border-color: rgb(0, 0, 0);" width="87">**INTEGRAL tuotekoodi**</td><td class="xl72" style="width: 84pt; border-width: 1px; border-color: rgb(0, 0, 0); height: 46.6px;" width="112">**Koodi**</td><td class="xl73" style="width: 395pt; border-width: 1px; border-color: rgb(0, 0, 0); height: 46.6px;" width="527">**Nimi**</td><td class="xl73" style="width: 42pt; border-width: 1px; border-color: rgb(0, 0, 0); height: 46.6px;" width="56">**Määrä**</td><td class="xl73" style="width: 48pt; border-width: 1px; border-color: rgb(0, 0, 0); height: 46.6px;" width="64">**Huom!**</td></tr></thead><tbody><tr style="height: 29.8px;"><td class="xl69" height="40" rowspan="4" style="border-width: 1px; border-bottom-style: solid; height: 136px; border-top: 1px rgb(0, 0, 0); border-color: rgb(0, 0, 0);" width="87"><span style="background-color: rgb(194, 224, 244);">IO</span><span style="background-color: rgb(194, 224, 244);">  
</span><span style="background-color: rgb(194, 224, 244);">[![IM-IO816.jpg](https://wiki.bithouse.fi/uploads/images/gallery/2026-03/scaled-1680-/im-io816.jpg)](https://wiki.bithouse.fi/uploads/images/gallery/2026-03/im-io816.jpg)</span></td><td class="xl67" style="border-width: 1px; border-top-style: none; border-left: 1px rgb(0, 0, 0); border-color: rgb(0, 0, 0); height: 29.8px;">IM-IO816</td><td class="xl66" style="border-width: 1px; border-top-style: none; border-left: 1px rgb(0, 0, 0); border-color: rgb(0, 0, 0); height: 29.8px;">Integral säätimen I/O-moduuli</td><td class="xl66" style="border-width: 1px; border-top-style: none; border-left: 1px rgb(0, 0, 0); border-color: rgb(0, 0, 0); height: 29.8px;">1</td><td class="xl66" style="border-width: 1px; border-top-style: none; border-left: 1px rgb(0, 0, 0); border-color: rgb(0, 0, 0); height: 29.8px;">  
</td></tr><tr style="height: 46.6px;"><td class="xl67" height="20" style="height: 46.6px; border-width: 1px; border-top-style: none; border-left: 1px rgb(0, 0, 0); border-color: rgb(0, 0, 0);">1862917</td><td class="xl68" style="border-width: 1px; border-top-style: none; border-left: 1px rgb(0, 0, 0); border-color: rgb(0, 0, 0); height: 46.6px;">Pluggable Terminal Block, 3.5 mm, 8 Ways, 28AWG to 16AWG, 1.5 mm², Screw, 8 A</td><td class="xl66" style="border-width: 1px; border-top-style: none; border-left: 1px rgb(0, 0, 0); border-color: rgb(0, 0, 0); height: 46.6px;">2</td><td class="xl66" style="border-width: 1px; border-top-style: none; border-left: 1px rgb(0, 0, 0); border-color: rgb(0, 0, 0); height: 46.6px;">  
</td></tr><tr style="height: 29.8px;"><td style="border-width: 1px; border-top-style: none; border-left: 1px rgb(0, 0, 0); border-color: rgb(0, 0, 0); height: 29.8px;">  
</td><td style="border-width: 1px; border-top-style: none; border-left: 1px rgb(0, 0, 0); border-color: rgb(0, 0, 0); height: 29.8px;">Tarra \[1...8\]</td><td style="border-width: 1px; border-top-style: none; border-left: 1px rgb(0, 0, 0); border-color: rgb(0, 0, 0); height: 29.8px;">1</td><td style="border-width: 1px; border-top-style: none; border-left: 1px rgb(0, 0, 0); border-color: rgb(0, 0, 0); height: 29.8px;">Toistaiseksi  
**Valmiiksi liittimet tulostetuilla merkeilla on tulossa 8.2026**</td></tr><tr style="height: 29.8px;"><td style="border-width: 1px; border-top-style: none; border-left: 1px rgb(0, 0, 0); border-color: rgb(0, 0, 0); height: 29.8px;">  
</td><td style="border-width: 1px; border-top-style: none; border-left: 1px rgb(0, 0, 0); border-color: rgb(0, 0, 0); height: 29.8px;">Tarra \[9...16\]</td><td style="border-width: 1px; border-top-style: none; border-left: 1px rgb(0, 0, 0); border-color: rgb(0, 0, 0); height: 29.8px;">1</td><td style="border-width: 1px; border-top-style: none; border-left: 1px rgb(0, 0, 0); border-color: rgb(0, 0, 0); height: 29.8px;">Toistaiseksi**Valmiiksi liittimet tulostetuilla merkeilla on tulossa 8.2026**</td></tr></tbody></table>

<table border="1" cellpadding="0" cellspacing="0" id="bkmrk-integral-tuotekoodi--9" style="border-collapse: collapse; width: 634pt; border-width: 1px; border-spacing: 0px; border-color: rgb(0, 0, 0); height: 182.6px;" width="846"><colgroup><col style="width: 100px;" width="87"></col><col style="width: 99px;" width="112"></col><col style="width: 396px;" width="527"></col><col style="width: 65px;" width="56"></col><col style="width: 186px;" width="64"></col></colgroup><thead><tr style="height: 46.6px;"><td class="xl71" height="40" style="height: 46.6px; width: 65pt; border-width: 1px; border-color: rgb(0, 0, 0);" width="87">**INTEGRAL tuotekoodi**</td><td class="xl72" style="width: 84pt; border-width: 1px; border-color: rgb(0, 0, 0); height: 46.6px;" width="112">**Koodi**</td><td class="xl73" style="width: 395pt; border-width: 1px; border-color: rgb(0, 0, 0); height: 46.6px;" width="527">**Nimi**</td><td class="xl73" style="width: 42pt; border-width: 1px; border-color: rgb(0, 0, 0); height: 46.6px;" width="56">**Määrä**</td><td class="xl73" style="width: 48pt; border-width: 1px; border-color: rgb(0, 0, 0); height: 46.6px;" width="64">**Huom!**</td></tr></thead><tbody><tr style="height: 29.8px;"><td class="xl68" height="60" rowspan="4" style="border-width: 1px; border-bottom-style: solid; height: 136px; border-top: 1px rgb(0, 0, 0); border-color: rgb(0, 0, 0);"><span style="background-color: rgb(194, 224, 244);">RS2</span>  
<span style="background-color: rgb(194, 224, 244);">[![IM-RS485-2.jpg](https://wiki.bithouse.fi/uploads/images/gallery/2026-03/scaled-1680-/im-rs485-2.jpg)](https://wiki.bithouse.fi/uploads/images/gallery/2026-03/im-rs485-2.jpg)</span></td><td class="xl67" style="border-width: 1px; border-top-style: none; border-left: 1px rgb(0, 0, 0); border-color: rgb(0, 0, 0); height: 29.8px;">IM-RS485-2P</td><td class="xl66" style="border-width: 1px; border-top-style: none; border-left: 1px rgb(0, 0, 0); border-color: rgb(0, 0, 0); height: 29.8px;">Integral säätimen RS485-väyläsovitin, 2 väylää</td><td class="xl66" style="border-width: 1px; border-top-style: none; border-left: 1px rgb(0, 0, 0); border-color: rgb(0, 0, 0); height: 29.8px;">1</td><td class="xl66" style="border-width: 1px; border-top-style: none; border-left: 1px rgb(0, 0, 0); border-color: rgb(0, 0, 0); height: 29.8px;"> </td></tr><tr style="height: 46.6px;"><td class="xl74" height="20" style="height: 46.6px; border-width: 1px; border-top-style: none; border-left: 1px rgb(0, 0, 0); border-color: rgb(0, 0, 0);">1862894</td><td class="xl74" style="border-width: 1px; border-top-style: none; border-left: 1px rgb(0, 0, 0); border-color: rgb(0, 0, 0); height: 46.6px;">Pluggable Terminal Block, 3.5 mm, 6 Ways, 28AWG to 16AWG, 1.5 mm², Screw, 8 A</td><td class="xl74" style="border-width: 1px; border-top-style: none; border-left: 1px rgb(0, 0, 0); border-color: rgb(0, 0, 0); height: 46.6px;">1</td><td class="xl66" style="border-width: 1px; border-top-style: none; border-left: 1px rgb(0, 0, 0); border-color: rgb(0, 0, 0); height: 46.6px;"> </td></tr><tr style="height: 29.8px;"><td class="xl75" height="20" style="height: 29.8px; border-width: 1px; border-top-style: none; border-left: 1px rgb(0, 0, 0); border-color: rgb(0, 0, 0);">JUMPER-H/B</td><td class="xl75" style="border-width: 1px; border-top-style: none; border-left: 1px rgb(0, 0, 0); border-color: rgb(0, 0, 0); height: 29.8px;">Jumpperi; pin; naaras; varren kanssa; 2,54 mm; 1x2; musta</td><td class="xl74" style="border-width: 1px; border-top-style: none; border-left: 1px rgb(0, 0, 0); border-color: rgb(0, 0, 0); height: 29.8px;">6</td><td class="xl66" style="border-width: 1px; border-top-style: none; border-left: 1px rgb(0, 0, 0); border-color: rgb(0, 0, 0); height: 29.8px;">  
</td></tr><tr style="height: 29.8px;"><td style="border-width: 1px; border-top-style: none; border-left: 1px rgb(0, 0, 0); border-color: rgb(0, 0, 0); height: 29.8px;">  
</td><td style="border-width: 1px; border-top-style: none; border-left: 1px rgb(0, 0, 0); border-color: rgb(0, 0, 0); height: 29.8px;">Tarra \[1A...2C\]</td><td style="border-width: 1px; border-top-style: none; border-left: 1px rgb(0, 0, 0); border-color: rgb(0, 0, 0); height: 29.8px;">1</td><td style="border-width: 1px; border-top-style: none; border-left: 1px rgb(0, 0, 0); border-color: rgb(0, 0, 0); height: 29.8px;">Toistaiseksi</td></tr></tbody></table>

<table border="1" cellpadding="0" cellspacing="0" id="bkmrk-integral-tuotekoodi--10" style="border-collapse: collapse; width: 634pt; border-width: 1px; border-spacing: 0px; border-color: rgb(0, 0, 0);" width="846"><colgroup><col style="width: 100px;" width="87"></col><col style="width: 99px;" width="112"></col><col style="width: 395px;" width="527"></col><col style="width: 66px;" width="56"></col><col style="width: 186px;" width="64"></col></colgroup><thead><tr style="height: 15.0pt;"><td class="xl71" height="40" style="height: 30pt; width: 65pt; border-width: 1px; border-color: rgb(0, 0, 0);" width="87">**INTEGRAL tuotekoodi**</td><td class="xl72" style="width: 84pt; border-width: 1px; border-color: rgb(0, 0, 0);" width="112">**Koodi**</td><td class="xl73" style="width: 395pt; border-width: 1px; border-color: rgb(0, 0, 0);" width="527">**Nimi**</td><td class="xl73" style="width: 42pt; border-width: 1px; border-color: rgb(0, 0, 0);" width="56">**Määrä**</td><td class="xl73" style="width: 48pt; border-width: 1px; border-color: rgb(0, 0, 0);" width="64">**Huom!**</td></tr></thead><tbody><tr style="height: 15.0pt;"><td class="xl69" height="40" rowspan="3" style="border-width: 1px; border-bottom: 1px solid rgb(0, 0, 0); height: 30pt; border-top: 1px rgb(0, 0, 0); border-color: rgb(0, 0, 0);"><span style="background-color: rgb(194, 224, 244);">MB20</span>  
<span style="background-color: rgb(194, 224, 244);">[![IM-MBUS20.jpg](https://wiki.bithouse.fi/uploads/images/gallery/2026-03/scaled-1680-/im-mbus20.jpg)](https://wiki.bithouse.fi/uploads/images/gallery/2026-03/im-mbus20.jpg)</span></td><td class="xl67" style="border-width: 1px; border-top: 1px rgb(0, 0, 0); border-left: 1px rgb(0, 0, 0); border-color: rgb(0, 0, 0);">IM-MBUS-10</td><td class="xl66" style="border-width: 1px; border-top: 1px rgb(0, 0, 0); border-left: 1px rgb(0, 0, 0); border-color: rgb(0, 0, 0);">Integral säätimen M-Bus-tasomuunnin 10 mittarille</td><td class="xl66" style="border-width: 1px; border-top: 1px rgb(0, 0, 0); border-left: 1px rgb(0, 0, 0); border-color: rgb(0, 0, 0);">1</td><td class="xl66" style="border-width: 1px; border-top: 1px rgb(0, 0, 0); border-left: 1px rgb(0, 0, 0); border-color: rgb(0, 0, 0);"> </td></tr><tr style="height: 15.0pt;"><td class="xl66" height="20" style="height: 15pt; border-width: 1px; border-top: 1px rgb(0, 0, 0); border-left: 1px rgb(0, 0, 0); border-color: rgb(0, 0, 0);">1792016</td><td class="xl68" style="border-width: 1px; border-top: 1px rgb(0, 0, 0); border-left: 1px rgb(0, 0, 0); border-color: rgb(0, 0, 0);">Pluggable Terminal Block, 5 mm, 2 Ways, 30AWG to 12AWG, 2.5 mm², Screw, 12 A</td><td class="xl66" style="border-width: 1px; border-top: 1px rgb(0, 0, 0); border-left: 1px rgb(0, 0, 0); border-color: rgb(0, 0, 0);">1</td><td class="xl66" style="border-width: 1px; border-top: 1px rgb(0, 0, 0); border-left: 1px rgb(0, 0, 0); border-color: rgb(0, 0, 0);">  
</td></tr><tr><td style="border-width: 1px; border-top-style: none; border-left: 1px rgb(0, 0, 0); border-color: rgb(0, 0, 0);">  
</td><td style="border-width: 1px; border-top-style: none; border-left: 1px rgb(0, 0, 0); border-color: rgb(0, 0, 0);">Tarra \[ME 1 | ME 2\]</td><td style="border-width: 1px; border-top-style: none; border-left: 1px rgb(0, 0, 0); border-color: rgb(0, 0, 0);">1</td><td style="border-width: 1px; border-top-style: none; border-left: 1px rgb(0, 0, 0); border-color: rgb(0, 0, 0);">Toistaiseksi</td></tr></tbody></table>

<table border="1" style="border-collapse: collapse; width: 100%; border-width: 1px; border-color: rgb(0, 0, 0);"><colgroup><col style="width: 12.7081%;"></col><col style="width: 15.0186%;"></col><col style="width: 46.2081%;"></col><col style="width: 6.16451%;"></col><col style="width: 20.0248%;"></col></colgroup><thead><tr><td style="border-color: rgb(0, 0, 0);">**INTEGRAL tuotekoodi**</td><td class="xl72" style="width: 84pt; border-width: 1px; border-color: rgb(0, 0, 0);" width="112">**Koodi**</td><td class="xl73" style="width: 395pt; border-width: 1px; border-color: rgb(0, 0, 0);" width="527">**Nimi**</td><td class="xl73" style="width: 42pt; border-width: 1px; border-color: rgb(0, 0, 0);" width="56">**Määrä**</td><td class="xl73" style="width: 48pt; border-width: 1px; border-color: rgb(0, 0, 0);" width="64">**Huom!**</td></tr></thead><tbody><tr><td class="xl69" height="40" rowspan="3" style="border-width: 1px; border-bottom: 1px solid rgb(0, 0, 0); height: 30pt; border-top: 1px rgb(0, 0, 0); border-color: rgb(0, 0, 0);"><span style="background-color: rgb(194, 224, 244);">MB250</span>  
</td><td class="xl67" style="border-width: 1px; border-top: 1px rgb(0, 0, 0); border-left: 1px rgb(0, 0, 0); border-color: rgb(0, 0, 0);">IM-MBUS-250</td><td class="xl66" style="border-width: 1px; border-top: 1px rgb(0, 0, 0); border-left: 1px rgb(0, 0, 0); border-color: rgb(0, 0, 0);">Integral säätimen M-Bus-tasomuunnin 250 mittarille</td><td class="xl66" style="border-width: 1px; border-top: 1px rgb(0, 0, 0); border-left: 1px rgb(0, 0, 0); border-color: rgb(0, 0, 0);">1</td><td class="xl66" style="border-width: 1px; border-top: 1px rgb(0, 0, 0); border-left: 1px rgb(0, 0, 0); border-color: rgb(0, 0, 0);"> </td></tr><tr><td class="xl66" height="20" style="height: 15pt; border-width: 1px; border-top: 1px rgb(0, 0, 0); border-left: 1px rgb(0, 0, 0); border-color: rgb(0, 0, 0);">1792016</td><td class="xl68" style="border-width: 1px; border-top: 1px rgb(0, 0, 0); border-left: 1px rgb(0, 0, 0); border-color: rgb(0, 0, 0);">Pluggable Terminal Block, 5 mm, 2 Ways, 30AWG to 12AWG, 2.5 mm², Screw, 12 A</td><td class="xl66" style="border-width: 1px; border-top: 1px rgb(0, 0, 0); border-left: 1px rgb(0, 0, 0); border-color: rgb(0, 0, 0);">1</td><td class="xl66" style="border-width: 1px; border-top: 1px rgb(0, 0, 0); border-left: 1px rgb(0, 0, 0); border-color: rgb(0, 0, 0);">  
</td></tr><tr><td style="border-width: 1px; border-top-style: none; border-left: 1px rgb(0, 0, 0); border-color: rgb(0, 0, 0);">  
</td><td style="border-width: 1px; border-top-style: none; border-left: 1px rgb(0, 0, 0); border-color: rgb(0, 0, 0);">Tarra \[ME 1 | ME 2\]</td><td style="border-width: 1px; border-top-style: none; border-left: 1px rgb(0, 0, 0); border-color: rgb(0, 0, 0);">1</td><td style="border-width: 1px; border-top-style: none; border-left: 1px rgb(0, 0, 0); border-color: rgb(0, 0, 0);">Toistaiseksi</td></tr></tbody></table>

<table border="1" cellpadding="0" cellspacing="0" id="bkmrk-integral-tuotekoodi--11" style="border-collapse: collapse; width: 634pt; border-width: 1px; border-spacing: 0px; border-color: rgb(0, 0, 0);" width="846"><colgroup><col style="width: 99px;" width="87"></col><col style="width: 100px;" width="112"></col><col style="width: 397px;" width="527"></col><col style="width: 65px;" width="56"></col><col style="width: 185px;" width="64"></col></colgroup><thead><tr style="height: 15.0pt;"><td class="xl71" height="40" style="height: 30pt; width: 65pt; border-width: 1px; border-color: rgb(0, 0, 0);" width="87">**INTEGRAL tuotekoodi**</td><td class="xl72" style="width: 84pt; border-width: 1px; border-color: rgb(0, 0, 0);" width="112">**Koodi**</td><td class="xl73" style="width: 395pt; border-width: 1px; border-color: rgb(0, 0, 0);" width="527">**Nimi**</td><td class="xl73" style="width: 42pt; border-width: 1px; border-color: rgb(0, 0, 0);" width="56">**Määrä**</td><td class="xl73" style="width: 48pt; border-width: 1px; border-color: rgb(0, 0, 0);" width="64">**Huom!**</td></tr></thead><tbody><tr style="height: 15.0pt;"><td class="xl69" height="40" rowspan="2" style="border-width: 1px; border-bottom: 1px solid rgb(0, 0, 0); height: 30pt; border-top: 1px rgb(0, 0, 0); border-color: rgb(0, 0, 0);"><span style="background-color: rgb(194, 224, 244);">24V</span></td><td class="xl67" style="border-width: 1px; border-top: 1px rgb(0, 0, 0); border-left: 1px rgb(0, 0, 0); border-color: rgb(0, 0, 0);"> </td><td class="xl66" style="border-width: 1px; border-top: 1px rgb(0, 0, 0); border-left: 1px rgb(0, 0, 0); border-color: rgb(0, 0, 0);">IM-24VDC</td><td class="xl66" style="border-width: 1px; border-top: 1px rgb(0, 0, 0); border-left: 1px rgb(0, 0, 0); border-color: rgb(0, 0, 0);">1</td><td class="xl66" style="border-width: 1px; border-top: 1px rgb(0, 0, 0); border-left: 1px rgb(0, 0, 0); border-color: rgb(0, 0, 0);"> </td></tr><tr style="height: 15.0pt;"><td class="xl66" height="20" style="height: 15pt; border-width: 1px; border-top: 1px rgb(0, 0, 0); border-left: 1px rgb(0, 0, 0); border-color: rgb(0, 0, 0);"> </td><td class="xl68" style="border-width: 1px; border-top: 1px rgb(0, 0, 0); border-left: 1px rgb(0, 0, 0); border-color: rgb(0, 0, 0);"> </td><td class="xl66" style="border-width: 1px; border-top: 1px rgb(0, 0, 0); border-left: 1px rgb(0, 0, 0); border-color: rgb(0, 0, 0);"> </td><td class="xl66" style="border-width: 1px; border-top: 1px rgb(0, 0, 0); border-left: 1px rgb(0, 0, 0); border-color: rgb(0, 0, 0);">  
</td></tr></tbody></table>

<table border="1" cellpadding="0" cellspacing="0" id="bkmrk-integral-tuotekoodi--12" style="border-collapse: collapse; width: 634pt; border-spacing: 0px; border: 1px solid rgb(0, 0, 0); height: 246.75px;" width="846"><colgroup><col style="width: 128px;" width="87"></col><col style="width: 118px;" width="112"></col><col style="width: 348px;" width="527"></col><col style="width: 65px;" width="56"></col><col style="width: 187px;" width="64"></col></colgroup><thead><tr style="height: 46.6px;"><td class="xl71" height="40" style="height: 46.6px; width: 65pt; border-width: 1px; border-color: rgb(0, 0, 0);" width="87">**INTEGRAL tuotekoodi**</td><td class="xl72" style="width: 84pt; border-width: 1px; border-color: rgb(0, 0, 0); height: 46.6px;" width="112">**Koodi**</td><td class="xl73" style="width: 395pt; border-width: 1px; border-color: rgb(0, 0, 0); height: 46.6px;" width="527">**Nimi**</td><td class="xl73" style="width: 42pt; border-width: 1px; border-color: rgb(0, 0, 0); height: 46.6px;" width="56">**Määrä**</td><td class="xl73" style="width: 48pt; border-width: 1px; border-color: rgb(0, 0, 0); height: 46.6px;" width="64">**Huom!**</td></tr></thead><tbody><tr style="height: 200.15px;"><td class="xl69" height="40" style="border-width: 1px; border-bottom-style: solid; height: 200.15px; border-top: 1px rgb(0, 0, 0); border-color: rgb(0, 0, 0);"><span style="background-color: rgb(194, 224, 244);">USB</span>

[![IM-USB-4C.jpg](https://wiki.bithouse.fi/uploads/images/gallery/2026-03/scaled-1680-/im-usb-4c.jpg)](https://wiki.bithouse.fi/uploads/images/gallery/2026-03/im-usb-4c.jpg)

</td><td class="xl67" style="border-width: 1px; border-top-style: none; border-left: 1px rgb(0, 0, 0); border-color: rgb(0, 0, 0); height: 200.15px;">IM-USB-C-4P</td><td class="xl66" style="border-width: 1px; border-top-style: none; border-left: 1px rgb(0, 0, 0); border-color: rgb(0, 0, 0); height: 200.15px;">Intergal säätimen sovitin 4:lle USB C-liittimelle</td><td class="xl66" style="border-width: 1px; border-top-style: none; border-left: 1px rgb(0, 0, 0); border-color: rgb(0, 0, 0); height: 200.15px;">1</td><td class="xl66" style="border-width: 1px; border-top-style: none; border-left: 1px rgb(0, 0, 0); border-color: rgb(0, 0, 0); height: 200.15px;">  
</td></tr></tbody></table>

</details>
#### 1.5 Yhteiset osat

<details id="bkmrk-%C2%A0-koodi-nimi%C2%A0-m%C3%A4%C3%A4r%C3%A4-"><summary></summary>


<table border="1" cellpadding="0" cellspacing="0" id="bkmrk-%C2%A0-koodi-nimi%C2%A0-m%C3%A4%C3%A4r%C3%A4--1" style="border-collapse: collapse; width: 711px; border-width: 1px; border-spacing: 0px; border-color: rgb(0, 0, 0); height: 360px;" width="885"><thead><tr style="height: 0.466675px;"><td class="xl71" height="40" style="height: 40.9333px; width: 94.5333px; border-width: 1px; border-color: rgb(0, 0, 0);"> </td><td class="xl72" style="width: 111.2px; border-width: 1px; border-color: rgb(0, 0, 0); height: 40.9333px;">**Koodi**</td><td class="xl73" style="width: 316.2px; border-width: 1px; border-color: rgb(0, 0, 0); height: 40.9333px;">**Nimi** </td><td class="xl72" style="width: 71.2px; border-width: 1px; border-color: rgb(0, 0, 0); height: 40.9333px;">**Määrä**</td><td class="xl74" style="width: 183.2px; border-width: 1px; border-color: rgb(0, 0, 0); height: 40.9333px;">**Huom!**</td></tr></thead><tbody><tr style="height: 29.7167px;"><td class="xl69" height="20" style="height: 29.7167px; border-width: 1px; border-top: 1px rgb(0, 0, 0); border-color: rgb(0, 0, 0); width: 94.5333px;">POHJA</td><td class="xl68" style="border-width: 1px; border-top-style: none; border-left: 1px rgb(0, 0, 0); border-color: rgb(0, 0, 0); height: 29.7167px; width: 111.2px;">P05120201F.BL</td><td class="xl68" style="border-width: 1px; border-top-style: none; border-left: 1px rgb(0, 0, 0); border-color: rgb(0, 0, 0); height: 29.7167px; width: 316.2px;">PANEL MODULBOX WITHOUT FRAME</td><td class="xl68" style="border-width: 1px; border-top-style: none; border-left: 1px rgb(0, 0, 0); border-color: rgb(0, 0, 0); height: 29.7167px; width: 71.2px;">1</td><td class="xl75" style="border-width: 1px; border-top-style: none; border-left: 1px rgb(0, 0, 0); width: 183.2px; border-color: rgb(0, 0, 0); height: 29.7167px;">mustat "klipsut" myös</td></tr><tr style="height: 29.7167px;"><td class="xl69" height="20" style="height: 29.7167px; border-width: 1px; border-top: 1px rgb(0, 0, 0); border-color: rgb(0, 0, 0); width: 94.5333px;">KOTELO</td><td class="xl68" style="border-width: 1px; border-top-style: none; border-left: 1px rgb(0, 0, 0); border-color: rgb(0, 0, 0); height: 29.7167px; width: 111.2px;">25.1202000.BL</td><td class="xl68" style="border-width: 1px; border-top-style: none; border-left: 1px rgb(0, 0, 0); border-color: rgb(0, 0, 0); height: 29.7167px; width: 316.2px;"><span lang="EN-US">Modulbox XTS WITH VENTS 12MH53V-A</span></td><td class="xl68" style="border-width: 1px; border-top-style: none; border-left: 1px rgb(0, 0, 0); border-color: rgb(0, 0, 0); height: 29.7167px; width: 71.2px;">1</td><td class="xl75" style="border-width: 1px; border-top-style: none; border-left: 1px rgb(0, 0, 0); width: 183.2px; border-color: rgb(0, 0, 0); height: 29.7167px;"> </td></tr><tr style="height: 29.7167px;"><td class="xl69" height="20" style="height: 29.7167px; border-width: 1px; border-top: 1px rgb(0, 0, 0); border-color: rgb(0, 0, 0); width: 94.5333px;">PÄÄKORTTI</td><td class="xl68" style="border-width: 1px; border-top-style: none; border-left: 1px rgb(0, 0, 0); border-color: rgb(0, 0, 0); height: 29.7167px; width: 111.2px;">Tora\_Web\_CPU</td><td class="xl68" style="border-width: 1px; border-top-style: none; border-left: 1px rgb(0, 0, 0); border-color: rgb(0, 0, 0); height: 29.7167px; width: 316.2px;">Tora\_Web\_CPU</td><td class="xl68" style="border-width: 1px; border-top-style: none; border-left: 1px rgb(0, 0, 0); border-color: rgb(0, 0, 0); height: 29.7167px; width: 71.2px;">1</td><td class="xl75" style="border-width: 1px; border-top-style: none; border-left: 1px rgb(0, 0, 0); width: 183.2px; border-color: rgb(0, 0, 0); height: 29.7167px;">tarkista kortin versio CPU-SoM-ohjelmointia varten</td></tr><tr style="height: 29.7167px;"><td class="xl69" height="20" style="height: 29.7167px; border-width: 1px; border-top: 1px rgb(0, 0, 0); border-color: rgb(0, 0, 0); width: 94.5333px;">RUUVI</td><td class="xl68" style="border-width: 1px; border-top-style: none; border-left: 1px rgb(0, 0, 0); border-color: rgb(0, 0, 0); height: 29.7167px; width: 111.2px;">2099314</td><td class="xl68" style="border-width: 1px; border-top-style: none; border-left: 1px rgb(0, 0, 0); border-color: rgb(0, 0, 0); height: 29.7167px; width: 316.2px;">Ruuvi; M3x6; 0,5; Pää: kartio; Pozidriv; PZ1; teräs; sinkki; DIN 966A</td><td class="xl68" style="border-width: 1px; border-top-style: none; border-left: 1px rgb(0, 0, 0); border-color: rgb(0, 0, 0); height: 29.7167px; width: 71.2px;">12</td><td class="xl76" style="border-width: 1px; border-top-style: none; border-left: 1px rgb(0, 0, 0); width: 183.2px; border-color: rgb(0, 0, 0); height: 29.7167px;">moduulien kiinnitykseen</td></tr><tr style="height: 29.7167px;"><td class="xl69" height="20" style="height: 29.7167px; border-width: 1px; border-top: 1px rgb(0, 0, 0); border-color: rgb(0, 0, 0); width: 94.5333px;">HOLKKI LYHYT</td><td class="xl68" style="border-width: 1px; border-top-style: none; border-left: 1px rgb(0, 0, 0); border-color: rgb(0, 0, 0); height: 29.7167px; width: 111.2px;">TP-8</td><td class="xl68" style="border-width: 1px; border-top-style: none; border-left: 1px rgb(0, 0, 0); border-color: rgb(0, 0, 0); height: 29.7167px; width: 316.2px;">Kierteitetty väliholkki; kuusikulmainen; polyamidi; M3; M3; 8mm</td><td class="xl68" style="border-width: 1px; border-top-style: none; border-left: 1px rgb(0, 0, 0); border-color: rgb(0, 0, 0); height: 29.7167px; width: 71.2px;">12</td><td class="xl75" style="border-width: 1px; border-top-style: none; border-left: 1px rgb(0, 0, 0); width: 183.2px; border-color: rgb(0, 0, 0); height: 29.7167px;">moduulien kiinnitykseen</td></tr><tr style="height: 29.7167px;"><td class="xl69" height="20" style="height: 29.7167px; border-width: 1px; border-top: 1px rgb(0, 0, 0); border-color: rgb(0, 0, 0); width: 94.5333px;">HOLKKI PITKÄ</td><td class="xl68" style="border-width: 1px; border-top-style: none; border-left: 1px rgb(0, 0, 0); border-color: rgb(0, 0, 0); height: 29.7167px; width: 111.2px;">TP-19</td><td class="xl68" style="border-width: 1px; border-top-style: none; border-left: 1px rgb(0, 0, 0); border-color: rgb(0, 0, 0); height: 29.7167px; width: 316.2px;">Kierteitetty väliholkki; kuusikulmainen; polyamidi; M3; M3; 19mm</td><td class="xl68" style="border-width: 1px; border-top-style: none; border-left: 1px rgb(0, 0, 0); border-color: rgb(0, 0, 0); height: 29.7167px; width: 71.2px;">12</td><td class="xl75" style="border-width: 1px; border-top-style: none; border-left: 1px rgb(0, 0, 0); width: 183.2px; border-color: rgb(0, 0, 0); height: 29.7167px;">moduulien kiinnitykseen</td></tr><tr style="height: 29.7167px;"><td class="xl69" height="20" style="height: 29.7167px; border-width: 1px; border-top: 1px rgb(0, 0, 0); border-color: rgb(0, 0, 0); width: 94.5333px;">PARISTO</td><td class="xl75" style="border-width: 1px; border-top-style: none; border-left: 1px rgb(0, 0, 0); width: 111.2px; border-color: rgb(0, 0, 0); height: 29.7167px;"><span lang="EN-US">CR1220</span></td><td class="xl75" style="border-width: 1px; border-top-style: none; border-left: 1px rgb(0, 0, 0); width: 316.2px; border-color: rgb(0, 0, 0); height: 29.7167px;"><span lang="EN-US">Nappiparisto</span></td><td class="xl75" style="border-width: 1px; border-top-style: none; border-left: 1px rgb(0, 0, 0); width: 71.2px; border-color: rgb(0, 0, 0); height: 29.7167px;">1</td><td class="xl75" style="border-width: 1px; border-top-style: none; border-left: 1px rgb(0, 0, 0); width: 183.2px; border-color: rgb(0, 0, 0); height: 29.7167px;"> </td></tr><tr style="height: 29.7167px;"><td class="xl69" height="20" style="height: 29.7167px; border-width: 1px; border-top: 1px rgb(0, 0, 0); border-color: rgb(0, 0, 0); width: 94.5333px;">LIITIN</td><td class="xl68" style="border-width: 1px; border-top-style: none; border-left: 1px rgb(0, 0, 0); border-color: rgb(0, 0, 0); height: 29.7167px; width: 111.2px;">1757022</td><td class="xl68" style="border-width: 1px; border-top-style: none; border-left: 1px rgb(0, 0, 0); border-color: rgb(0, 0, 0); height: 29.7167px; width: 316.2px;">MSTB2,5/3-ST-5,08<span style="mso-spacerun: yes;"> </span>terminal block</td><td class="xl68" style="border-width: 1px; border-top-style: none; border-left: 1px rgb(0, 0, 0); border-color: rgb(0, 0, 0); height: 29.7167px; width: 71.2px;">1</td><td class="xl75" style="border-width: 1px; border-top-style: none; border-left: 1px rgb(0, 0, 0); width: 183.2px; border-color: rgb(0, 0, 0); height: 29.7167px;">virtaliitin</td></tr><tr style="height: 29.7167px;"><td class="xl69" height="20" style="height: 29.7167px; border-width: 1px; border-top: 1px rgb(0, 0, 0); border-color: rgb(0, 0, 0); width: 94.5333px;">TARRA</td><td class="xl75" style="border-width: 1px; border-top-style: none; border-left: 1px rgb(0, 0, 0); width: 111.2px; border-color: rgb(0, 0, 0); height: 29.7167px;"> </td><td class="xl75" style="border-width: 1px; border-top-style: none; border-left: 1px rgb(0, 0, 0); width: 316.2px; border-color: rgb(0, 0, 0); height: 29.7167px;"><span lang="EN-US">Moduulitarra \[M1...M6\]</span></td><td class="xl75" style="border-width: 1px; border-top-style: none; border-left: 1px rgb(0, 0, 0); width: 71.2px; border-color: rgb(0, 0, 0); height: 29.7167px;">2</td><td class="xl76" style="border-width: 1px; border-top-style: none; border-left: 1px rgb(0, 0, 0); width: 183.2px; border-color: rgb(0, 0, 0); height: 29.7167px;"> </td></tr></tbody></table>

[![PIENkeräily_yhteiset_osat.jpg](https://wiki.bithouse.fi/uploads/images/gallery/2026-03/scaled-1680-/pienkeraily-yhteiset-osat.jpg)](https://wiki.bithouse.fi/uploads/images/gallery/2026-03/pienkeraily-yhteiset-osat.jpg)

</details></details>

### 2. Kokoaminen


<details id="bkmrk-4.1-vakio-osat-4.1.1"><summary></summary>

![Kytkentäkuva-IntegralFI.png](https://wiki.bithouse.fi/uploads/images/gallery/2026-02/scaled-1680-/kytkentakuva-integralfi.png)

##### 2.1.1 Paristo

<details id="bkmrk-aseta-kellon-paristo"><summary></summary>

- Aseta kellon **paristo** paikoilleen.

![paristo1.jpg](https://wiki.bithouse.fi/uploads/images/gallery/2025-12/scaled-1680-/paristo1.jpg)

</details>##### <span style="background-color: rgb(194, 224, 244);">2.1.2 Moduulit</span>

<details id="bkmrk-tarkista-tuotekoodis"><summary></summary>


[![moduulipaikat-simple.png](https://wiki.bithouse.fi/uploads/images/gallery/2026-03/scaled-1680-/moduulipaikat-simple.png)](https://wiki.bithouse.fi/uploads/images/gallery/2026-03/moduulipaikat-simple.png)

- Tarkista tuotekoodista moduulien oikeat paikat pääkortissa: 
    - merkkisarja esimerkiksi <span style="background-color: rgb(194, 224, 244);">\[IO-IO-IO-IO-X-RS\]</span><table border="1" class="align-left" style="border-collapse: collapse; width: 129.422%; height: 177.6px;"><colgroup><col style="width: 45.8878%;"></col><col style="width: 54.1688%;"></col></colgroup><tbody><tr style="height: 29.6px;"><td style="height: 29.6px;">Moduulipaikka 1</td><td style="height: 29.6px;">IM-IO816</td></tr><tr style="height: 29.6px;"><td style="height: 29.6px;">Moduulipaikka 2</td><td style="height: 29.6px;">IM-IO816</td></tr><tr style="height: 29.6px;"><td style="height: 29.6px;">Moduulipaikka 3</td><td style="height: 29.6px;">IM-IO816</td></tr><tr style="height: 29.6px;"><td style="height: 29.6px;">Moduulipaikka 4</td><td style="height: 29.6px;">IM-IO816</td></tr><tr style="height: 29.6px;"><td style="height: 29.6px;">Moduulipaikka 5
        
        </td><td style="height: 29.6px;">ei moduulia</td></tr><tr style="height: 29.6px;"><td style="height: 29.6px;">Moduulipaikka 6</td><td style="height: 29.6px;">IM-RS485-2</td></tr></tbody></table>

<p class="callout info">Jos päätyihin ei tule muuta, laitetaan päätypaikkoihin (moduulipaikat 1 ja 6) tyhjä kortti. Näille ei ole erillistä merkintää tilauskoodissa.</p>

- Kiinnitä moduulikehys pääkorttiin. 
    - Moduulikehyksessä on alapuolella jokaisen moduulin kohdalla neljä tappia. Yläpuolella on tappeja ja ruuvinreikiä.
    - Aseta kehys niin, että ruuvinreiät tulevat pääkorttiin päin.
    - Ruuvaa kehys kiinni pääkorttiin (samat ruuvit kuin näytön lisäkortissa tai vastaavat)
- Kiinnitä moduulit kehykseen, ei ruuveja, vain napsautetaan paikoilleen. 
    - Varo etteivät moduulit irtoa, ne pysyvät kunnolla paikallaan vain kotelon pohjan tuella.

[![moduulikehysPIEN.jpg](https://wiki.bithouse.fi/uploads/images/gallery/2026-07/scaled-1680-/moduulikehyspien.jpg)](https://wiki.bithouse.fi/uploads/images/gallery/2026-07/moduulikehyspien.jpg)

[![moduulikehys-pohjaPIEN.jpg](https://wiki.bithouse.fi/uploads/images/gallery/2026-07/scaled-1680-/moduulikehys-pohjapien.jpg)](https://wiki.bithouse.fi/uploads/images/gallery/2026-07/moduulikehys-pohjapien.jpg)

</details>##### <span style="background-color: rgb(251, 238, 184);">2.1.3 CPU-SoM</span>

<details id="bkmrk-liu%27uta-prosessori-k"><summary></summary>


- Liu'uta prosessori kiinni liittimiin. Paina alas, jolloin se lukittuu paikoilleen.

![CPU_paikoilleen.jpg](https://wiki.bithouse.fi/uploads/images/gallery/2025-04/scaled-1680-/cpu-paikoilleen.jpg)

- Mikäli prosessori ei lukitu kunnolla, nosta lyhyillä sivuilla olevia jousia varovasti esim. ruuvimeisselillä, jolloin jouset pääsevät loksahtamaan paikoilleen.

![CPU-SoM-kiinnitys10.jpg](https://wiki.bithouse.fi/uploads/images/gallery/2026-02/scaled-1680-/cpu-som-kiinnitys10.jpg)

- Tarvittaessa lukituksen voi vapauttaa lyhyillä sivuilla olevista jousista, vetämällä niitä ulospäin.

</details>##### <span style="background-color: rgb(198, 245, 247);">2.2.1 SIM-kortti</span>

<details id="bkmrk-sim-kortti-laitetaan"><summary></summary>

- SIM-kortti laitetaan vain tarvittaessa. 
    - - - Tämän näkee [INTEGRAL PRODUCTION](https://docs.google.com/spreadsheets/d/1pupkZCM5NyyzgvCC0XG2sC6sJNPZkWRU-GR4wH_WI8U/edit?gid=0#gid=0) tiedostossa.

</details>##### <span style="background-color: rgb(191, 237, 210);">2.2.2 Modeemi ja antenni</span>

<details id="bkmrk-modeemi-asennetaan-v"><summary></summary>


Jos laite sisältää modeemin:

- Liu'uta modeemi paikoilleen. Kiinnitä toisesta päästä M2 -ruuveilla.

<p class="callout warning"><span style="color: rgb(0, 0, 0);">HUOM! Ruuvin vastakappaleet ovat ainoastaan kolvauksella kiinni piirilevyssä - kiristä ruuvit napakasti mutta älä käytä liikaa voimaa.</span></p>

![PIEN_modeemi_paikoilleen_ruuvit3.jpg](https://wiki.bithouse.fi/uploads/images/gallery/2026-02/scaled-1680-/pien-modeemi-paikoilleen-ruuvit3.jpg)

- Kiinnitä 4G-antenni kotelon aukkoon mutterilla. Kiristämiseen tarvit kaksi 8mm avainta.

<p class="callout info">Huom! Kiristysvaiheessa kiinnitä huomiota siihen, miten päin antennin liitin on kaapelin päässä. Kiristä antennin kaapeli siihen asentoon, että se on helppo painaa modeemin M-liittimeen.</p>

**![kotelo-ja-kansi-selitteet.png](https://wiki.bithouse.fi/uploads/images/gallery/2025-08/scaled-1680-/kotelo-ja-kansi-selitteet.png)![antenni kiinni koteloon.JPG](https://wiki.bithouse.fi/uploads/images/gallery/2025-08/scaled-1680-/antenni-kiinni-koteloon.JPG)**

![antenni koteloon.jpg](https://wiki.bithouse.fi/uploads/images/gallery/2025-09/scaled-1680-/Q6xantenni-koteloon.jpg)

</details>#### 4.3 <span style="color: rgb(251, 238, 184); background-color: rgb(185, 106, 217);">Laite koteloon</span>


<details id="bkmrk-4.3.1-laitteen-asett"><summary></summary>

##### 2.3.1 Laitteen asettaminen koteloon

- Aseta valmis kortti koteloon. Varmista, että antennikaapeli ei jää mihinkään väliin.

<span style="background-color: rgb(185, 106, 217); color: rgb(251, 238, 184);">kuva</span>

- Aseta kotelon pohja paikalleen. Muista laittaa kiskoklipsit paikoilleen.

![kiskoklipsi1.jpg](https://wiki.bithouse.fi/uploads/images/gallery/2026-03/scaled-1680-/kiskoklipsi1.jpg)

##### <span style="background-color: rgb(191, 237, 210);">4.3.2 Modeemin antennin kytkeminen modeemiin (tarvittaessa)</span>

- Kytke antenni modeemin **M-liittimeen** napakasti painamalla.

### ![kytke_antennipiuha_modeemiin.jpg](https://wiki.bithouse.fi/uploads/images/gallery/2025-04/scaled-1680-/pBAkytke-antennipiuha-modeemiin.jpg)

![https://wiki.bithouse.fi/uploads/images/gallery/2026-02/pienkansiaukiblur.jpg](https://wiki.bithouse.fi/uploads/images/gallery/2026-02/pienkansiaukiblur.jpg)

</details></details>### 3. moduulien Ohjelmointi 

- Ensin menee osoitteeseen **192.168.10.134**  ja varmistaa ettei muuuta laitettaa ole pyörimässä siinä osoitteessä. 
    - Jos muita laitteita ei ole, selainikkuna valittaa time-outista
    - Jos muita laitteita on, ilmestyy kirjautumisikkuna. Tässä saattaa olla myös kyse siitä, että jotain on jäänyt selaimen välimuistiin - muista päivittää ikkuna varmistaaksesi asian.

 Jos ei ole jatka seuraavasti:


<details id="bkmrk-5.1-valmistelut-5.1."><summary></summary>

#### 3.1 Valmistelut


<details id="bkmrk-5.1.1-kytkenn%C3%A4t-kytk"><summary></summary>

[![PIENdevice-setup-setup.jpg](https://wiki.bithouse.fi/uploads/images/gallery/2026-02/scaled-1680-/piendevice-setup-setup.jpg)](https://wiki.bithouse.fi/uploads/images/gallery/2026-02/piendevice-setup-setup.jpg)


##### 3.1.1 Kytkennät

- Kytke virtajohdin virtaliittimestä pistorasiaan. Eth1-porttiin syttyy oranssi valo. **Odota**, että valo sammuu.
- Kytke Ethernet-kaapeli Eth1-portista seinän J10-porttiin.

[![kytke_integral03.jpg](https://wiki.bithouse.fi/uploads/images/gallery/2026-04/scaled-1680-/kytke-integral03.jpg)](https://wiki.bithouse.fi/uploads/images/gallery/2026-04/kytke-integral03.jpg)

##### 3.1.2 Selainikkunan avaaminen

- Linux-koneelta: 
    - [![Workbench-server-icon.png](https://wiki.bithouse.fi/uploads/images/gallery/2026-02/scaled-1680-/workbench-server-icon.png)](https://wiki.bithouse.fi/uploads/images/gallery/2026-02/workbench-server-icon.png) Käynnistä Integral Workbench Server (mustavihreä ikoni). Avautuu teksti-ikkuna.
    - [![Workbench-user-mode-icon.png](https://wiki.bithouse.fi/uploads/images/gallery/2026-02/scaled-1680-/workbench-user-mode-icon.png)](https://wiki.bithouse.fi/uploads/images/gallery/2026-02/workbench-user-mode-icon.png) Käynnistä Workbench user mode (turkoosi vasara). Avautuu selainikkuna.

[![mainmenu.png](https://wiki.bithouse.fi/uploads/images/gallery/2026-04/scaled-1680-/mainmenu.png)](https://wiki.bithouse.fi/uploads/images/gallery/2026-04/mainmenu.png)

</details><p class="callout success">Olet nyt Integral testbenchin Main menussa, ja Integral on kytketty koneeseen.</p>

#### <span style="background-color: rgb(194, 224, 244);">3.2 Moduulien ohjelmointi</span>

<details id="bkmrk-ensin-ohjelmoidaan-m"><summary></summary>

Ensin ohjelmoidaan moduulit:

[![mainmenu-moduleprogramming.png](https://wiki.bithouse.fi/uploads/images/gallery/2026-04/scaled-1680-/mainmenu-moduleprogramming.png)](https://wiki.bithouse.fi/uploads/images/gallery/2026-04/mainmenu-moduleprogramming.png)

- Klikkaa **Run**

**[![module-programming-2.png](https://wiki.bithouse.fi/uploads/images/gallery/2026-02/scaled-1680-/module-programming-2.png)](https://wiki.bithouse.fi/uploads/images/gallery/2026-02/module-programming-2.png)**

- Valitse Integral-moduulit alasvetovalikosta kuhunkin moduulipaikkaan.

<p class="callout warning">Huomioi moduulipaikkojen järjestys! Moduulipaikka 1 on virtaliittimen puoleisessa päädyssä.</p>

[![module-programming-3 - rajattu.png](https://wiki.bithouse.fi/uploads/images/gallery/2026-03/scaled-1680-/module-programming-3-rajattu.png)](https://wiki.bithouse.fi/uploads/images/gallery/2026-03/module-programming-3-rajattu.png) [![moduulipaikat-simple.png](https://wiki.bithouse.fi/uploads/images/gallery/2026-03/scaled-1680-/moduulipaikat-simple.png)](https://wiki.bithouse.fi/uploads/images/gallery/2026-03/moduulipaikat-simple.png)

- <span style="color: rgb(236, 240, 241);">**<span style="background-color: rgb(224, 62, 45);">Huom! USB-C-4P-moduulin ohjelmointi on poikkeuksellinen, ja sen ohjelmointia varten valitse None toistaiseksi!</span>**</span>
- Klikkaa **Confirm**

Ohjelma hakee Dropboxista uusimmat firmwaret ja asentaa ne vastaaviin moduuleihin. Lisäksi ohjelma luo laitteelle sarjanumeron.

[![module-programming-4.png](https://wiki.bithouse.fi/uploads/images/gallery/2026-02/scaled-1680-/module-programming-4.png)](https://wiki.bithouse.fi/uploads/images/gallery/2026-02/module-programming-4.png)

- Klikkaa **Back to home screen**

### **[![module-programming-5.png](https://wiki.bithouse.fi/uploads/images/gallery/2026-02/scaled-1680-/module-programming-5.png)](https://wiki.bithouse.fi/uploads/images/gallery/2026-02/module-programming-5.png)**

##### 3.2.1 Moduulien uudelleenohjelmointi

Jos joudut ohjelmoimaan moduulit uudestaan, paina im-programming -ikkunassa RESET, ja suorita samat vaiheet kuin ensimmäiselläkin kerralla.

</details>
</details>#### 4. Device setup **<span style="color: rgb(251, 238, 184); background-color: rgb(185, 106, 217);">\[=\]</span>**


<details id="bkmrk-seuraavaksi-konfigur"><summary></summary>


Jos integraalin moduulit on jo aikaisemmin on ohjelmoitu, ja nyt haluaisit tehdä DEVICE SETUP, sähköön ja verkkoon kytkimsen jälkeen odottaa 3 mins että laite herää!  
Seuraavaksi konfiguroidaan käyttöjärjestelmä:

[![mainmenu-operatingsystemsetup.png](https://wiki.bithouse.fi/uploads/images/gallery/2026-04/scaled-1680-/mainmenu-operatingsystemsetup.png)](https://wiki.bithouse.fi/uploads/images/gallery/2026-04/mainmenu-operatingsystemsetup.png)

- Klikkaa **Run**

**[![operating-system-setup-2.png](https://wiki.bithouse.fi/uploads/images/gallery/2026-02/scaled-1680-/operating-system-setup-2.png)](https://wiki.bithouse.fi/uploads/images/gallery/2026-02/operating-system-setup-2.png)**

Ohjelma konfiguroi käyttöjärjestelmän. Tämä on monivaiheinen toimenpide, jossa voi kestää 7-8 minuuttia. Eth1-portin vilkkuva oranssi valo kertoo, että toimenpide on edelleen käynnissä.

Toimenpide sisältää seuraavat asiat:

- - MAC-osoitteen asettaminen Eth2-portille
    - Actiweb-ohjelmistoalustan ja siihen liittyvien pakettien asentaminen
    - Palomuurin konfigurointi
    - Kernelin watchdog-ajastimen setup
    - Käyttöliittymän salasanan vaihtaminen
    - Sarjanumeron ym. tallentaminen CSV-tiedostoon

[![operating-system-setup-31.png](https://wiki.bithouse.fi/uploads/images/gallery/2026-02/scaled-1680-/operating-system-setup-31.png)](https://wiki.bithouse.fi/uploads/images/gallery/2026-02/operating-system-setup-31.png)


<p class="callout info">Setup kestää noin 7-8 min. Jos työvaihe on tuttu, voit tehdä esimerkiksi näytön lisäkortin kytkennän tai liittimien tarrojen liimailua tässä kohtaa.</p>

##### 4.1 Operating system setup uudelleen**<span style="color: rgb(251, 238, 184); background-color: rgb(185, 106, 217);">\[=\]</span>**


<details><summary></summary>

**Operating system setup** ‑toimintoa ei voi suorittaa useita kertoja peräkkäin, koska toiminto vaihtaa laitteelle uuden salasanan. Seuraavalla yrityksellä toiminto yrittää kirjautua Integraliin vanhalla salasanalla, mikä estää toiminnon onnistumisen.

Toimi seuraavasti:

- Kytke Integral irti piuhoista.
- Tee tilaa CPU-SoM-kortin irrotusta varten 
    - Irrota antennipiuha modeemista + irrota virtaliitin + ota Integral ulos kotelosta.
    - <span style="background-color: rgb(251, 238, 184);">**TAI**</span>
    - Ruuvaa antennipiuha irti kotelosta (tämä on hankalampi kiristää kunnolla takaisin laitettaessa, mutta on vähemmän vaiheita).
- Irrota CPU-SoM Integralin pääkortista.
- Tee tämän ohjeen kohta 3.3: **Prosessorimoduulin (CPU-SoM) uudelleenohjelmointi.** <span style="background-color: rgb(251, 238, 184);"><span style="background-color: rgb(185, 106, 217); color: rgb(251, 238, 184);">\[linkki tähän\]</span></span>
- Aseta CPU-SoM takaisin Integralin pääkorttiin (liitä takaisin virtaliitin jos olet irrottanut sen 2-kohdassa).
- Tee tämän ohjeen kohta 5.1. - 5.1.2: **Valmistelu.** <span style="background-color: rgb(251, 238, 184);"><span style="background-color: rgb(185, 106, 217); color: rgb(251, 238, 184);">\[linkki tähän\]</span></span>
- Tee tämän ohjeen kohta 5.4: **Device setup.<span style="background-color: rgb(251, 238, 184);"><span style="background-color: rgb(185, 106, 217); color: rgb(251, 238, 184);">\[linkki tähän\]</span></span>**
- Kokoa takaisin aiemmin purkamasi osat.

<p class="callout info">Uudelleen konfiguroidessa toiminto ilmoittaa virheestä: source already added. Tämä kuuluu asiaan.</p>

<p class="callout warning">HUOM! Jos yrittää tehdä **Operating system setup** -toiminnon väärällä salasanalla, laite lukitsee turvallisuussyistä itsensä määräajaksi.</p>

- Mene kahville.

</details></details>
- Lopuksi tarkistetaan että tiedot ovat tallentuneet **Produced\_devices.CSV** -tiedostoon (sijaitsee actiweb-käyttäjän kotihakemistossa):

1. Sarjanumero 
    - - On muotoa \[vuosiluku\]\[kuukausi\]\[päivä\]\[juokseva numero 5 merkkiä\], esim. 2026081500345
2. ID 
    - - On \[lisää tämä myöh\]
3. Admin-salasana
4. Linux-salasana
5. Päivämäärä
6. Eth2 portin MAC-osoite

#### <span style="background-color: rgb(194, 224, 244);">5. Testaukset (niille moduuleille joita laitteessa on) </span>**<span style="color: rgb(251, 238, 184); background-color: rgb(185, 106, 217);">\[=\]</span>**

Sitten testataan moduulit. Testataan ne moduulit, joita laitteeseen on asennettu

##### <span style="background-color: rgb(194, 224, 244);">5.1 IM-IO816</span>

Tulossa

##### <span style="background-color: rgb(194, 224, 244);">5.2 IM-RS485-2P (modbus)</span>

- Kytke IM-RS485-2P -moduulin liittimeen \[se juttu mikä näkyy kuvassa\]

<span style="background-color: rgb(185, 106, 217); color: rgb(251, 238, 184);"><span style="background-color: rgb(185, 106, 217); color: rgb(251, 238, 184);">\[TÄHÄN KUVA MODBUS-Testiliitynnästä\]</span></span>

<span style="background-color: rgb(185, 106, 217); color: rgb(251, 238, 184);">[![mainmenu-modbustest.png](https://wiki.bithouse.fi/uploads/images/gallery/2026-04/scaled-1680-/mainmenu-modbustest.png)](https://wiki.bithouse.fi/uploads/images/gallery/2026-04/mainmenu-modbustest.png)</span>

- Valitse Modbus-testi.

<span style="background-color: rgb(185, 106, 217); color: rgb(251, 238, 184);"><span style="background-color: rgb(185, 106, 217); color: rgb(251, 238, 184);">\[TÄHÄN KUVA MODBUS-TESTAUSVALIKOSTA\]</span></span>

- Klikkaa **Run**.

##### <span style="background-color: rgb(194, 224, 244);">5.3 IM-MBUS-10/250</span>

- Kytke IM-MBUS-10 tai IM-MBUS-250 mittariin, joka on testausta varten kokoamispisteellä.

<span style="background-color: rgb(185, 106, 217); color: rgb(251, 238, 184);"><span style="background-color: rgb(185, 106, 217); color: rgb(251, 238, 184);">\[TÄHÄN KUVA MBUS-Testiliitynnästä\]</span></span>

<span style="background-color: rgb(185, 106, 217); color: rgb(251, 238, 184);">[![mainmenu-mbustest.png](https://wiki.bithouse.fi/uploads/images/gallery/2026-04/scaled-1680-/mainmenu-mbustest.png)](https://wiki.bithouse.fi/uploads/images/gallery/2026-04/mainmenu-mbustest.png)</span>

- Valitse Mbus-testi.

<span style="background-color: rgb(185, 106, 217); color: rgb(251, 238, 184);"><span style="background-color: rgb(185, 106, 217); color: rgb(251, 238, 184);">\[TÄHÄN KUVA MBUS-TESTAUSVALIKOSTA\]</span></span>

- Klikkaa **Run**.

##### <span style="background-color: rgb(194, 224, 244);">5.4 IM-USB-C-4P</span>

- Terminaali auki (ctrl-alt-t)
- ssh actiweb@192.168.10.134
- ei mitään kiini im-usb-4c:ssä
- lsusb -&gt; näyttää kaikki laitteet
- Kiinitetään USB-tikku/-tikut
- lsusb -&gt; näyttää 1/2/3/4 uutta riviä
- tikku/tikut irti
- lsusb -&gt; ei näytä tikkua/tikkuja

####  6. <span class="font-outfit text-xl font-bold my-auto">Bithouse Production Database:</span>

<details id="bkmrk-production-database-"><summary></summary>

Production database (osoitteessa 192.168.0.201) ja sisäänkirjautuminen; tarvitset omat tunnukset.

<span class="font-outfit text-xl font-bold my-auto">Tässä vaiheessa syötä laitteen tiedot Tässä vaiheessa syötä laitteen tiedot tuotantotietokantaan.  
Voit tutustua siihen tästä:</span><span class="font-outfit text-xl font-bold my-auto"> [https://wiki.bithouse.fi/books/bithouse-production-database](https://wiki.bithouse.fi/books/bithouse-production-database)</span>

<span class="font-outfit text-xl font-bold my-auto">Muista Integralin seuraavat tiedot on </span>

- SERIAL BASE (pakollinen)
- SERIAL ENDING(pakollinen)
- SERIAL NUMNER (SERIAL BASE+SERIAL ENDING)(pakollinen)
- DEVICE ID QR (pakollinen)
- ACTIWEB PASS (pakollinen)
- SYSTEM PASS (pakollinen)
- PCB (pakollinen)
- MAC1 (pakollinen)
- CUSTOMER (Jos tiedossa!)
- SITE (Jos tiedossa!)
- NOTE (Jos tiedossa!)

</details>### 7. Näyttö tai kansi


<details id="bkmrk-6.a-laite%2C-jossa-n%C3%A4y"><summary></summary>

#### <span style="background-color: rgb(236, 202, 250);">7.1Laite, jossa näyttö</span>

<details id="bkmrk-6.a.1-n%C3%A4yt%C3%B6n-lis%C3%A4kor"><summary></summary>


##### <span style="background-color: rgb(236, 202, 250);">6.a.2 Lattakaapelin kytkentä</span>

- <span style="color: rgb(52, 73, 94);">Kytke lattakaapeli näytön lisäkorttiin. Tämä vaatii hieman sorminäppäryyttä, taasen ne molempien reunojen napsahdukset paikoilleen.</span>

[![lattakaapeli_lisäkorttiin.jpg](https://wiki.bithouse.fi/uploads/images/gallery/2026-04/scaled-1680-/lattakaapeli-lisakorttiin.jpg)](https://wiki.bithouse.fi/uploads/images/gallery/2026-04/lattakaapeli-lisakorttiin.jpg)

##### <span style="background-color: rgb(236, 202, 250);">6.a.3 Näytön liittäminen koteloon</span>

Napsauta näyttö kiinni koteloon. Kiinnitä huomiota, että kaikki väkäset napsahtavat kunnolla kiinni.

[![näyttö-paikalleen.jpg](https://wiki.bithouse.fi/uploads/images/gallery/2026-03/scaled-1680-/naytto-paikalleen.jpg)](https://wiki.bithouse.fi/uploads/images/gallery/2026-03/naytto-paikalleen.jpg)

</details>#### 7.2 Laite, jossa kansi

<details id="bkmrk-liimaa-kanteen-kansi"><summary></summary>

- Liimaa kanteen kansitarra.
- Napsauta kansi paikoilleen. Huomioi, että kansi osoittaa liityntäpisteet oikein (Virtaliitin, Ethernet-liittimet).![tarrat-kansi.jpg](https://wiki.bithouse.fi/uploads/images/gallery/2025-04/scaled-1680-/tarrat-kansi.jpg)

</details></details>### 8. Liittimet ja tarrat


<details id="bkmrk-7.1-kotelon-tarrat-7"><summary></summary>

#### 7.1 Kotelon tarrat


<details id="bkmrk-7.1.1-moduulipaikkoj"><summary></summary>

##### 7.1.1 Moduulipaikkoja osoittavat tarrat

- Liimaa tarrat 
    - Moduulipaikkoja osoittavat tarrat kannen/näytön molemmin puolin. Huomioi, että tarra osoittaa moduulipaikat oikeinpäin

[![moduulipaikat.png](https://wiki.bithouse.fi/uploads/images/gallery/2026-04/scaled-1680-/moduulipaikat.png)](https://wiki.bithouse.fi/uploads/images/gallery/2026-04/moduulipaikat.png)


##### <span style="background-color: rgb(236, 202, 250);">7.1.2.a Ethernet-portteja ja virtaliittimen liityntäpisteitä osoittava tarra</span>

- Vain näytöllisiin laitteisiin
- Liimaa tarra osoittamaan Ethernet-portit ja virtaliittimen liityntäpisteet.

[![eth_ja_pwr.png](https://wiki.bithouse.fi/uploads/images/gallery/2026-04/scaled-1680-/eth-ja-pwr.png)](https://wiki.bithouse.fi/uploads/images/gallery/2026-04/eth-ja-pwr.png)

</details>#### 7.2 Liittimet


<details id="bkmrk-7.2.1-moduulien-liit"><summary></summary>

##### <span style="background-color: rgb(194, 224, 244);">7.2.1 Moduulien liittimet merkintöineen</span>

<table border="1" id="bkmrk-liitin-moduulin-muka" style="border-collapse: collapse; width: 69.7138%;"><colgroup><col style="width: 33.1909%;"></col><col style="width: 66.7507%;"></col></colgroup><thead><tr><td>**Liitin moduulin mukaan**</td><td>**Kuva tarran asettelusta**</td></tr></thead><tbody><tr><td>IM-IO816 / 1...8</td><td>[![01_08.jpg](https://wiki.bithouse.fi/uploads/images/gallery/2026-04/scaled-1680-/01-08.jpg)](https://wiki.bithouse.fi/uploads/images/gallery/2026-04/01-08.jpg)</td></tr><tr><td>IM-IO816 / 9...16</td><td>[![09_16.jpg](https://wiki.bithouse.fi/uploads/images/gallery/2026-04/scaled-1680-/09-16.jpg)](https://wiki.bithouse.fi/uploads/images/gallery/2026-04/09-16.jpg)</td></tr><tr><td>IM-MBUS-10/250</td><td>[![mbus_new.png](https://wiki.bithouse.fi/uploads/images/gallery/2026-04/scaled-1680-/mbus-new.png)](https://wiki.bithouse.fi/uploads/images/gallery/2026-04/mbus-new.png)</td></tr><tr><td>IM-RS485-2P</td><td>[![rs485.jpg](https://wiki.bithouse.fi/uploads/images/gallery/2026-04/scaled-1680-/rs485.jpg)](https://wiki.bithouse.fi/uploads/images/gallery/2026-04/rs485.jpg)</td></tr><tr><td>IM-USB-C-4P</td><td>  
</td></tr></tbody></table>

##### 7.2.2 Virtaliitin merkintöineen

[![PWR.png](https://wiki.bithouse.fi/uploads/images/gallery/2026-04/scaled-1680-/pwr.png)](https://wiki.bithouse.fi/uploads/images/gallery/2026-04/pwr.png)


##### 7.2.3 Tarkistuskuvat

<p class="callout warning">Tarkista huolellisesti, että tarrat osoittavat liityntäpisteiden symbolit/numerot oikein.</p>

- **IM-IO816**-moduulin liityntäpisteet menevät aina korttiin merkityn järjestyksen mukaan, mutta kortin versiosta riippuen merkinnät saattavat olla selkeämpiä tai vähemmän helppolukuisia. Mikäli kortille on merkitty esim. 51-58, ne ovat vastaavasti liityntäpisteet 01-08 (kts. kuva)

[![liitinmerkinnätIO816 -lähikuva.jpg](https://wiki.bithouse.fi/uploads/images/gallery/2025-09/scaled-1680-/liitinmerkinnatio816-lahikuva.jpg)](https://wiki.bithouse.fi/uploads/images/gallery/2025-09/liitinmerkinnatio816-lahikuva.jpg)

<p class="callout warning">Tarkista, että kaikki tarrojen merkinnät ovat samoin päin.</p>

Jos joku merkintä on eri suuntaan luettava:

- Virtaliittimen tai kotelon tarra on vanhaa mallia
- Tarrat eivät osoita oikeita liityntäpisteitä

[![tarkistus-samasuunta.png](https://wiki.bithouse.fi/uploads/images/gallery/2026-04/scaled-1680-/tarkistus-samasuunta.png)](https://wiki.bithouse.fi/uploads/images/gallery/2026-04/tarkistus-samasuunta.png)

</details>#### 7.3 Sarjanumerotarra**<span style="color: rgb(251, 238, 184); background-color: rgb(185, 106, 217);">\[=\]</span>**


<details id="bkmrk-toistaiseksi%3A-kirjoi"><summary></summary>

Menee tietokantaan 192.168.0.201. Valitse laite ja tulosta tarra.  
Tarra on 24 mm:n musta teksti valkoisella tarralla.

[![image.png](https://wiki.bithouse.fi/uploads/images/gallery/2026-05/scaled-1680-/X0bimage.png)](https://wiki.bithouse.fi/uploads/images/gallery/2026-05/X0bimage.png)

</details></details>### 9. VPN

#### 9.1 VPN-excel

8.1.1 Avaa työpöydässä olevan VPN-excel tiedosto.

<p class="callout warning">Excelin soluja on lukittu eikä mitään virheitä lukuja voi tapahtua siihen.</p>

<p class="callout warning">Excelissä on kaksi punaista solua, johon pitäsisi kopioida kyseisen laitteen "Device ID".</p>

8.1.2 Avaa Produced\_devices.CSV -tiedosto (Actiweb-käyttäjän kotihakemistosta)

<table border="0" cellspacing="0" id="bkmrk-vpn-linkin-luonti-co"><colgroup width="83"></colgroup> <colgroup width="56"></colgroup> <colgroup width="41"></colgroup> <colgroup span="2" width="72"></colgroup> <colgroup width="204"></colgroup> <colgroup width="72"></colgroup> <colgroup width="53"></colgroup> <colgroup width="449"></colgroup><tbody><tr><td align="center" bgcolor="#FFFF00" colspan="9" data-sheets-value="{ "1": 2, "2": "VPN linkin luonti"}" height="37" rowspan="2" style="border: 2px solid #000000;" valign="middle">**<span style="color: #000000; font-size: x-large;">VPN linkin luonti</span>**</td></tr><tr></tr><tr><td align="center" bgcolor="#D9F2D0" colspan="3" data-sheets-value="{ "1": 2, "2": "common name"}" height="18" style="border: 2px solid #000000;" valign="bottom">**<span style="color: #000000;">common name</span>**</td><td align="center" bgcolor="#F2CFEE" colspan="3" data-sheets-value="{ "1": 2, "2": "url"}" style="border: 2px solid #000000;" valign="bottom">**<span style="color: #000000;">url</span>**</td><td align="center" bgcolor="#FBE3D6" colspan="2" data-sheets-value="{ "1": 2, "2": "customer"}" style="border: 2px solid #000000;" valign="bottom">**<span style="color: #000000;">customer</span>**</td><td align="center" bgcolor="#4E95D9" data-sheets-value="{ "1": 2, "2": "address"}" style="border-top: 2px solid #000000; border-bottom: 2px solid #000000; border-left: 2px solid #000000;" valign="bottom">**<span style="color: #000000;">address</span>**</td></tr><tr><td align="center" bgcolor="#FF3838" colspan="3" data-sheets-value="{ "1": 2, "2": "INSERT DEVICE ID"}" height="34" style="border-top: 2px solid #000000; border-bottom: 2px solid #000000; border-left: 2px solid #000000; border-right: 1px solid #000000;" valign="middle"><span style="color: #000000; font-family: Liberation Sans;">INSERT DEVICE ID</span></td><td align="center" bgcolor="#FF3838" colspan="3" data-sheets-value="{ "1": 2, "2": "INSERT DEVICE ID"}" style="border-top: 2px solid #000000; border-bottom: 2px solid #000000; border-left: 1px solid #000000; border-right: 1px solid #000000;" valign="middle"><span style="color: #000000; font-family: Liberation Sans;">INSERT DEVICE ID</span></td><td align="center" bgcolor="#FFFFFF" colspan="2" data-sheets-value="{ "1": 2, "2": "generic"}" style="border-top: 2px solid #000000; border-bottom: 2px solid #000000; border-left: 1px solid #000000; border-right: 1px solid #000000;" valign="middle"><span style="color: #000000; font-size: medium;">generic</span></td><td align="center" bgcolor="#FFFFFF" data-sheets-value="{ "1": 2, "2": ""}" style="border-top: 2px solid #000000; border-bottom: 2px solid #000000;" valign="middle"><span style="color: #000000; font-size: medium;">  
</span></td></tr><tr><td align="center" bgcolor="#FFFFFF" colspan="9" data-sheets-value="{ "1": 2, "2": "Permission key:"}" height="18" style="border-top: 2px solid #000000; border-bottom: 1px solid #000000; border-left: 2px solid #000000; border-right: 2px solid #000000;" valign="bottom"><span style="color: #000000;">Permission key:</span></td></tr><tr><td align="center" bgcolor="#FFFFFF" colspan="9" data-sheets-value="{ "1": 2, "2": "G76NK9645U367R9K6W49"}" height="18" style="border-bottom: 2px solid #000000; border-left: 2px solid #000000; border-right: 2px solid #000000;" valign="bottom"><span style="color: #000000; font-family: Liberation Sans;">G76NK9645U367R9K6W49</span></td></tr><tr><td align="left" bgcolor="#FFFFFF" data-sheets-value="{ "1": 2, "2": ""}" height="18" valign="bottom"><span style="color: #000000;">  
</span></td><td align="left" bgcolor="#FFFFFF" data-sheets-value="{ "1": 2, "2": ""}" valign="bottom"><span style="color: #000000;">  
</span></td></tr><tr><td align="center" bgcolor="#CAEEFB" colspan="9" data-sheets-value="{ "1": 2, "2": "Terminaalissa seuraavat järjestyksessä:"}" height="30" style="border: 2px solid #000000;" valign="middle">**<span style="color: #000000; font-size: large;">Terminaalissa seuraavat järjestyksessä:</span>**</td></tr><tr><td align="center" bgcolor="#FFFFFF" data-sheets-numberformat="{ "1": 2, "2": "0", "3": 1}" data-sheets-value="{ "1": 3, "3": 1}" height="30" style="border-top: 2px solid #000000; border-bottom: 1px solid #000000; border-left: 2px solid #000000; border-right: 1px solid #000000;" valign="middle"><span style="color: #000000;">1</span></td><td align="center" bgcolor="#FFFFFF" colspan="8" data-sheets-value="{ "1": 2, "2": "ssh machine@192.168.0.250"}" style="border-top: 2px solid #000000; border-bottom: 1px solid #000000; border-right: 2px solid #000000;" valign="middle"><span style="color: #000000;">ssh [machine@192.168.0.250](mailto:machine@192.168.0.250)</span></td></tr><tr><td align="center" bgcolor="#FFFFFF" data-sheets-numberformat="{ "1": 2, "2": "0", "3": 1}" data-sheets-value="{ "1": 3, "3": 2}" height="30" style="border-top: 1px solid #000000; border-bottom: 1px solid #000000; border-left: 2px solid #000000; border-right: 1px solid #000000;" valign="middle"><span style="color: #000000;">2</span></td><td align="center" bgcolor="#FFFFFF" colspan="8" data-sheets-value="{ "1": 2, "2": "cd pkigenerator"}" style="border-top: 1px solid #000000; border-bottom: 1px solid #000000; border-right: 2px solid #000000;" valign="middle"><span style="color: #000000;">cd pkigenerator</span></td></tr><tr><td align="center" bgcolor="#FFFFFF" data-sheets-numberformat="{ "1": 2, "2": "0", "3": 1}" data-sheets-value="{ "1": 3, "3": 3}" height="30" style="border-top: 1px solid #000000; border-bottom: 1px solid #000000; border-left: 2px solid #000000; border-right: 1px solid #000000;" valign="middle"><span style="color: #000000;">3</span></td><td align="center" bgcolor="#FFFFFF" colspan="8" data-sheets-value="{ "1": 2, "2": ".\/bit_vpn create --common-name INSERT DEVICE ID --url INSERT DEVICE ID --customer generic --street-address '  '"}" style="border-top: 1px solid #000000; border-bottom: 1px solid #000000; border-right: 2px solid #000000;" valign="middle"><span style="color: #000000;">./bit\_vpn create --common-name INSERT DEVICE ID --url INSERT DEVICE ID --customer generic --street-address ' '</span></td></tr><tr><td align="center" bgcolor="#FFFFFF" data-sheets-numberformat="{ "1": 2, "2": "0", "3": 1}" data-sheets-value="{ "1": 3, "3": 4}" height="30" style="border-top: 1px solid #000000; border-bottom: 1px solid #000000; border-left: 2px solid #000000; border-right: 1px solid #000000;" valign="middle"><span style="color: #000000;">4</span></td><td align="center" bgcolor="#FFFFFF" colspan="8" data-sheets-value="{ "1": 2, "2": "G76NK9645U367R9K6W49"}" style="border-top: 1px solid #000000; border-bottom: 1px solid #000000; border-right: 2px solid #000000;" valign="middle"><span style="color: #000000;">G76NK9645U367R9K6W49</span></td></tr><tr><td align="center" bgcolor="#FFFFFF" data-sheets-numberformat="{ "1": 2, "2": "0", "3": 1}" data-sheets-value="{ "1": 3, "3": 5}" height="30" style="border-top: 1px solid #000000; border-bottom: 1px solid #000000; border-left: 2px solid #000000; border-right: 1px solid #000000;" valign="middle"><span style="color: #000000;">5</span></td><td align="center" bgcolor="#FFFFFF" colspan="8" data-sheets-value="{ "1": 2, "2": ".\/bit_vpn userhosts-reconfigure"}" style="border-top: 1px solid #000000; border-bottom: 1px solid #000000; border-right: 2px solid #000000;" valign="middle"><span style="color: #000000;">./bit\_vpn userhosts-reconfigure</span></td></tr><tr><td align="center" bgcolor="#FFFFFF" data-sheets-numberformat="{ "1": 2, "2": "0", "3": 1}" data-sheets-value="{ "1": 3, "3": 6}" height="30" style="border-top: 1px solid #000000; border-bottom: 1px solid #000000; border-left: 2px solid #000000; border-right: 1px solid #000000;" valign="middle"><span style="color: #000000;">6</span></td><td align="center" bgcolor="#FFFFFF" colspan="8" data-sheets-value="{ "1": 2, "2": ".\/bit_vpn config-push --openvpn --nginx --userhost"}" style="border-top: 1px solid #000000; border-bottom: 1px solid #000000; border-right: 2px solid #000000;" valign="middle"><span style="color: #000000;">./bit\_vpn config-push --openvpn --nginx --userhost</span></td></tr><tr><td align="center" bgcolor="#FFFFFF" data-sheets-numberformat="{ "1": 2, "2": "0", "3": 1}" data-sheets-value="{ "1": 3, "3": 7}" height="30" style="border-top: 1px solid #000000; border-bottom: 1px solid #000000; border-left: 2px solid #000000; border-right: 1px solid #000000;" valign="middle"><span style="color: #000000;">7</span></td><td align="center" bgcolor="#FFFFFF" colspan="8" data-sheets-value="{ "1": 2, "2": ".\/bit_vpn push-to-client -cn INSERT DEVICE ID --ip-address 192.168.0.134"}" style="border-top: 1px solid #000000; border-bottom: 1px solid #000000; border-right: 2px solid #000000;" valign="middle"><span style="color: #000000;">./bit\_vpn push-to-client -cn INSERT DEVICE ID --ip-address 192.168.0.134</span></td></tr><tr><td align="center" bgcolor="#FFFFFF" data-sheets-value="{ "1": 2, "2": ""}" height="30" style="border-top: 1px solid #000000; border-bottom: 1px solid #000000; border-left: 2px solid #000000; border-right: 1px solid #000000;" valign="middle"><span style="color: #000000;">  
</span></td><td align="center" bgcolor="#FFFF6D" colspan="8" data-sheets-value="{ "1": 2, "2": "TÄSSÄ VAIHEESSA KYSY LINUX(SYSTEM) SALASANA!!!!!!!"}" style="border-top: 1px solid #000000; border-bottom: 1px solid #000000; border-right: 2px solid #000000;" valign="middle">**<span style="color: #c9211e;">TÄSSÄ VAIHEESSA KYSY LINUX(SYSTEM) SALASANA!!!!!!!</span>**</td></tr><tr><td align="center" bgcolor="#FFFFFF" data-sheets-numberformat="{ "1": 2, "2": "0", "3": 1}" data-sheets-value="{ "1": 3, "3": 8}" height="30" style="border-top: 1px solid #000000; border-bottom: 1px solid #000000; border-left: 2px solid #000000; border-right: 1px solid #000000;" valign="middle"><span style="color: #000000;">8</span></td><td align="center" bgcolor="#FFFFFF" colspan="8" data-sheets-value="{ "1": 2, "2": "exit"}" style="border-top: 1px solid #000000; border-bottom: 1px solid #000000; border-right: 2px solid #000000;" valign="middle"><span style="color: #000000;">exit</span></td></tr><tr><td align="center" bgcolor="#FFFFFF" data-sheets-numberformat="{ "1": 2, "2": "0", "3": 1}" data-sheets-value="{ "1": 3, "3": 9}" height="30" style="border-top: 1px solid #000000; border-bottom: 1px solid #000000; border-left: 2px solid #000000; border-right: 1px solid #000000;" valign="middle"><span style="color: #000000;">9</span></td><td align="center" bgcolor="#FFFFFF" colspan="8" data-sheets-value="{ "1": 2, "2": "ssh actiweb@192.168.0.134"}" style="border-top: 1px solid #000000; border-bottom: 1px solid #000000; border-right: 2px solid #000000;" valign="middle"><span style="color: #000000;">ssh actiweb@192.168.0.134</span></td></tr><tr><td align="center" bgcolor="#FFFFFF" data-sheets-numberformat="{ "1": 2, "2": "0", "3": 1}" data-sheets-value="{ "1": 3, "3": 10}" height="30" style="border-top: 1px solid #000000; border-bottom: 1px solid #000000; border-left: 2px solid #000000; border-right: 1px solid #000000;" valign="middle"><span style="color: #000000;">10</span></td><td align="center" bgcolor="#FFFFFF" colspan="8" data-sheets-value="{ "1": 2, "2": "sudo .\/clientSetup.sh"}" style="border-top: 1px solid #000000; border-bottom: 1px solid #000000; border-right: 2px solid #000000;" valign="middle"><span style="color: #000000;">sudo ./clientSetup.sh</span></td></tr><tr><td align="center" bgcolor="#FFFFFF" data-sheets-numberformat="{ "1": 2, "2": "0", "3": 1}" data-sheets-value="{ "1": 3, "3": 11}" height="30" style="border-top: 1px solid #000000; border-bottom: 1px solid #000000; border-left: 2px solid #000000; border-right: 1px solid #000000;" valign="middle"><span style="color: #000000;">11</span></td><td align="center" bgcolor="#FFFFFF" colspan="8" data-sheets-value="{ "1": 2, "2": "ip addr show"}" style="border-top: 1px solid #000000; border-bottom: 2px solid #000000; border-right: 2px solid #000000;" valign="middle"><span style="color: #000000;">ip addr show</span></td></tr><tr><td align="left" bgcolor="#FFFFFF" data-sheets-value="{ "1": 2, "2": ""}" height="37" valign="bottom"><span style="color: #000000;">  
</span></td><td align="center" bgcolor="#FFFF6D" colspan="8" data-sheets-value="{ "1": 2, "2": "Tässä tarkistetaan onko VPN yhteys kunnossa! Mene osoitteeseen 192.168.0.60. Device Id on oltavana siinä yleensä alimmana rivinä! Voi mennä hetki ! Päivittele sivu jos ei näöy!"}" style="border-top: 1px solid #000000; border-bottom: 1px solid #000000; border-right: 2px solid #000000;" valign="middle">**<span style="color: #c9211e;">Tässä tarkistetaan onko VPN yhteys kunnossa! Mene osoitteeseen 192.168.0.60. Device Id on oltavana siinä yleensä alimmana rivinä! Voi mennä hetki ! Päivittele sivu jos ei näöy!</span>**</td></tr></tbody></table>

8.1.3 Copy-paste tarvittavat tiedot

- kopioi Produced\_devices.CSV -tiedostosta Device ID
- Liitä se punaisella merkittyihin soluihin exceliin, jolloin excel automaattisesti muokkaa tarvittavat rivit 
    - Mikäli solut vaihtavat väriä (ei enää punainen), tee uudestaan 
        - UNDO ja uus yritys
        - Liitä mieluummin Excelin syöttöriville kuin suoraan soluun, niin onnistuu paremmin

#### 9.2. Terminaali (komentokehoite)

8.2. Miten avataan terminaali

Tähän on monta tapaa

- Näppäimistöltä \[se yks näppäin joka ois windows-näppäin jos tässä ois windows\] + T

8.2. Copy-paste rivi kerrallaan VPN-excelistä

- Kopiointi voi olla vähän ärsyttävää riippuen valitsetko hiiren klikkauksilla 'copy' vai käytätkö näppäimistöltä Ctrl+C 
    - joillain riveillä on tekstiä, joka kopioituu vain valitsemalla excelin syöttöriviltä (ei siis solusta itsestään vaan siitä kohtaa mihin sisältöä kirjoitetaan)
    - joillain riveillä puolestaan ei SAA kopioida sieltä syöttöriviltä koska siinä on automaattisesti päivittyvää sisältöä (juuri ne mitä kopioit aiemmin Produced Devices -tiedostosta ja jotka siitä kopioituivat automaattisesti tarvittaville riveille)
- Paste eli liittäminen terminaaliin pitää valita hiirellä, koska pikanäppäin Ctrl+V ei toimi terminaalissa.

8.2.n mitä minkäkin rivin jälkeen ois tarkoitus tapahtua, miltä onnistunut näyttää?

- Syötettyäsi rivin 3 komennon, kysytään onko tiedot oikein ja haluatko jatkaa y/N. Siinä kohtaa tarkista, että Device id vastaa sitä laitetta, jota olet työstämässä. Vastaa kyllä jos homma ok.
- Syötettyäsi rivin 7 komennon, sinun pitää kopioida **Linux-password** Produced Devices -tiedostosta ja pasteta se terminaaliin.
- Syötettyäsi rivin 10 komennon, kysytään y/N että haluatko jatkaa. Kyllä haluat.

#### 9.3 Tarkistus että onnistui

tässä oli parikin asiaa, ainakin:

8.3.1 Mene osoitteeseen 192.168.0.60

Siellä on lista VPN-yhteyksistä, siellä pitäis näkyä oikee laite (device ID:n perusteella tunnistat).

Luultavasti listan viimeisenä.

Testaa linkki että toimii. linkin kauttaa voit tarkistaa admin/admin(actiweb)salasanalla että pääset sisään. jos ei pääse on tarkistettava!

#### 10. Asiakaskohtaiset asennukset **<span style="color: rgb(251, 238, 184); background-color: rgb(185, 106, 217);">\[=\]</span>**


<details id="bkmrk-mik%C3%A4li-laite-on-meno-1"><summary></summary>

Mikäli laite on menossa jollekulle seuraavista asiakkaista, tehdään asiakaskohtaiset asennukset:

- Högfors GST
- ClimaPri

<span style="color: rgb(251, 238, 184);">[![mainmenu-Climapricustomize.png](https://wiki.bithouse.fi/uploads/images/gallery/2026-04/scaled-1680-/mainmenu-climapricustomize.png)](https://wiki.bithouse.fi/uploads/images/gallery/2026-04/mainmenu-climapricustomize.png)</span>

<span style="color: rgb(0, 0, 0);">**10.1 HögforsGST Oy:**   
Tarvitsee julkisen VPN etäyhteys osoitteen.</span>

[![image.png](https://wiki.bithouse.fi/uploads/images/gallery/2026-05/scaled-1680-/tsjimage.png)](https://wiki.bithouse.fi/uploads/images/gallery/2026-05/tsjimage.png)

<span style="color: rgb(0, 0, 0);">Eli tämä </span>

- <span style="color: rgb(0, 0, 0);">osoitteesta 192.168.0.60</span>
- <span style="color: rgb(0, 0, 0);">valitse DEVICE ID:n perusteella oikea rivi</span>
- <span style="color: rgb(0, 0, 0);">sisältäen https:// osan</span>
- <span style="color: rgb(0, 0, 0);">loppuu .io</span>
    - <span style="color: rgb(0, 0, 0);">EI kauttaviivoja tai mitään sen jälkeen</span>

[![image.png](https://wiki.bithouse.fi/uploads/images/gallery/2026-05/scaled-1680-/1xRimage.png)](https://wiki.bithouse.fi/uploads/images/gallery/2026-05/1xRimage.png)

**10,2 ClimaPri Oy:**

Climapri kustomointia varten täytyy tietää keskuksen LVI-tuotenumero (esim **2018806**)

[![image.png](https://wiki.bithouse.fi/uploads/images/gallery/2026-08/scaled-1680-/fFcimage.png)](https://wiki.bithouse.fi/uploads/images/gallery/2026-08/fFcimage.png)

 Listasta valitaan haluttu tuotenumero, jonka jälkeen painetaan **Confirm**

Asennus kestää noin 20 minuuttia.

</details>#### 11. Viimeistely **<span style="color: rgb(251, 238, 184); background-color: rgb(185, 106, 217);">\[=\]</span>**


<details id="bkmrk-viimeistely-tehd%C3%A4%C3%A4n--1"><summary></summary>

Viimeistely tehdään vasta, kun setup ja customization on varmasti kunnossa. Viimeistely poistaa väliaikaiset avaimet.

- Valitse **Finalize**.

[![mainmenu-finalizedevice.png](https://wiki.bithouse.fi/uploads/images/gallery/2026-04/scaled-1680-/mainmenu-finalizedevice.png)](https://wiki.bithouse.fi/uploads/images/gallery/2026-04/mainmenu-finalizedevice.png)

- Klikkaa **Run**.

<span style="background-color: rgb(185, 106, 217); color: rgb(251, 238, 184);">\[TÄHÄN KUVA FINALISE-VALIKOSTA\]</span>

</details>

# Kun laite on valmis (kasattu, ohjelmoitu, kirjattu tietokantaan)

- Kirjataan tuotanto-exceliin
- Laitetaan hyllyyn, jossa lukee "Valmiit Integralit"

# Troubleshoot

-Mistä löydän osia, jos eivät ole kokoamispisteen hyllyssä

-Mitä teen, jos joku vaihe meni pieleen

# Osien varastopaikkoja jos puuttuu kokoamispisteen hyllystä

- Integral-kotelot, pohjat+klipsut, kannet 
    - Pajan sisäänkäynnin vasemmalla puoleisella seinällä nille nimetyssä hyllyssä
- Paristot 
    - Toimistotarvike / tulostinhuoneessa
- Näytöt 
    - Näyttöjen kasauspisteellä, hallin puolella.
    - <p class="callout warning">Varmista, että ovat kuivuneet 24h.</p>

# Device ID -tarkistus, sarjanumerotarkistus

Jos VPN-linkki Integraliin ei toimi, mutta terminaalilla saa yhteyden

- tarkista, täsmääkö VPN-listassa näkyvä device ID laitteeen sarjanumeroon, vai onko tiedot vahingossa syötetty väärin.

- Terminaali auki (ctrl-alt-t) 
    - ssh [actiweb@192.168.0.134](mailto:actiweb@192.168.0.134)
- <span style="color: rgb(63, 67, 80); font-family: 'Open Sans', sans-serif; font-size: 14px; font-style: normal; font-variant-ligatures: normal; font-variant-caps: normal; font-weight: 400; letter-spacing: normal; orphans: 2; text-align: left; text-indent: 0px; text-transform: none; widows: 2; word-spacing: 0px; -webkit-text-stroke-width: 0px; white-space: pre-wrap; background-color: rgb(255, 255, 255); text-decoration-thickness: initial; text-decoration-style: initial; text-decoration-color: initial; display: inline !important; float: none;">Tarkista device ID</span>
    - <span style="color: rgb(63, 67, 80); font-family: 'Open Sans', sans-serif; font-size: 14px; font-style: normal; font-variant-ligatures: normal; font-variant-caps: normal; font-weight: 400; letter-spacing: normal; orphans: 2; text-align: left; text-indent: 0px; text-transform: none; widows: 2; word-spacing: 0px; -webkit-text-stroke-width: 0px; white-space: pre-wrap; background-color: rgb(255, 255, 255); text-decoration-thickness: initial; text-decoration-style: initial; text-decoration-color: initial; display: inline !important; float: none;">cat /opt/actiweb/etc/dev-id</span>
- <span style="color: rgb(63, 67, 80); font-family: 'Open Sans', sans-serif; font-size: 14px; font-style: normal; font-variant-ligatures: normal; font-variant-caps: normal; font-weight: 400; letter-spacing: normal; orphans: 2; text-align: left; text-indent: 0px; text-transform: none; widows: 2; word-spacing: 0px; -webkit-text-stroke-width: 0px; white-space: pre-wrap; background-color: rgb(255, 255, 255); text-decoration-thickness: initial; text-decoration-style: initial; text-decoration-color: initial; display: inline !important; float: none;">Tarkista sarjanumero</span>
    - <span style="color: rgb(63, 67, 80); font-family: 'Open Sans', sans-serif; font-size: 14px; font-style: normal; font-variant-ligatures: normal; font-variant-caps: normal; font-weight: 400; letter-spacing: normal; orphans: 2; text-align: left; text-indent: 0px; text-transform: none; widows: 2; word-spacing: 0px; -webkit-text-stroke-width: 0px; white-space: pre-wrap; background-color: rgb(255, 255, 255); text-decoration-thickness: initial; text-decoration-style: initial; text-decoration-color: initial; display: inline !important; float: none;">cat /etc/serial</span>

# Integral Universaali Alakeskusprosessori edellinen kokoamisohje väliaikainen kopio

### <span style="background-color: rgb(236, 240, 241);">1. Tarvittavat osat tuotekoodin mukaan</span>


<details id="bkmrk-osat-ovat-hyllyss%C3%A4-k"><summary></summary>


Tuotekoodi on muodossa:

**INTEGRAL D6<span style="background-color: rgb(248, 202, 198);">?? <span style="text-decoration: underline; background-color: rgb(255, 255, 255);">DM</span></span><span style="background-color: rgb(255, 255, 255);"> - X-X-X-X-X-X</span>**

jossa

1. **<span style="background-color: rgb(241, 196, 15);">Integral </span><span style="background-color: rgb(191, 237, 210);"><span style="background-color: rgb(242, 131, 119);">D</span>6 </span><span style="background-color: rgb(255, 255, 255);">= <span style="background-color: rgb(241, 196, 15);">tuotteen nimi<span style="background-color: rgb(194, 224, 244);"><span style="background-color: rgb(242, 131, 119);"> DIN-koteloitu laite </span><span style="background-color: rgb(191, 237, 210);">kuudella moduulipaikalla</span></span></span></span>**
2. <span style="background-color: rgb(248, 202, 198);">**??** = prosessorin tunnus</span>
3. <span style="background-color: rgb(255, 255, 255);">**D** = tuleeko näyttö ( D=kyllä, tyhjä=ei )</span>
4. <span style="background-color: rgb(255, 255, 255);">**M** = tuleeko modeemi ( M=kyllä, tyhjä=ei )</span>
5. <span style="background-color: rgb(255, 255, 255);">**<span style="background-color: rgb(255, 255, 255);"> X-X-X-X-X-X</span>** = moduulipaikat järjestyksessä M1-M6</span>

#### <span style="background-color: rgb(251, 238, 184);">1.1</span> (D6)<span style="background-color: rgb(251, 238, 184);">??</span>... = CPU-SoM

SoMit ovat etukäteen ohjelmoituja, ja niiden pakkauksessa pitäisi lukea sekä ohjelmointipäivämäärä että ohjelmaversio. Jos näitä tietoja ei ole merkitty, SoMit tulisi ohjelmoida [ohjeen ](https://wiki.bithouse.fi/books/integral-universaali-alakeskusprosessori/page/prosessorimoduulin-cpu-som-ohjelmointi)mukaisesti.

<details id="bkmrk-integral-tuotekoodi-"><summary></summary>


<table border="1" cellpadding="0" cellspacing="0" id="bkmrk-integral-tuotekoodi--1" style="border-collapse: collapse; width: 702px; border-width: 1px; border-spacing: 0px; border-color: rgb(0, 0, 0); height: 185px;" width="846"><thead><tr style="height: 0.5px;"><td class="xl66 align-left" height="40" style="height: 47.6px; width: 102.867px; border-width: 1px; border-color: rgb(0, 0, 0);" width="118">**INTEGRAL Tuotekoodi**</td><td class="xl67 align-left" style="width: 72.2px; border-width: 1px; border-color: rgb(0, 0, 0); height: 47.6px;" width="88">**Koodi**</td><td class="xl66 align-left" style="width: 219.2px; border-width: 1px; border-color: rgb(0, 0, 0); height: 47.6px;" width="512">**Nimi**</td><td class="xl66 align-left" style="width: 71.2px; border-width: 1px; border-color: rgb(0, 0, 0); height: 47.6px;" width="64">**Määrä**</td><td class="xl66 align-left" style="width: 302.2px; border-width: 1px; border-color: rgb(0, 0, 0); height: 47.6px;" width="64">**Huom!**</td></tr></thead><tbody><tr style="height: 29.8px;"><td class="xl70 align-left" height="20" style="height: 29.8px; border-width: 1px; border-top: 1px rgb(0, 0, 0); width: 102.867px; border-color: rgb(0, 0, 0);" width="118"><span style="background-color: rgb(251, 238, 184);">D6**<span class="font5">30</span>**</span></td><td class="xl70 align-left" style="border-width: 1px; border-top-style: none; border-left: 1px rgb(0, 0, 0); width: 72.2px; border-color: rgb(0, 0, 0); height: 29.8px;" width="88"> </td><td class="xl71 align-left" style="border-width: 1px; border-top-style: none; border-left: 1px rgb(0, 0, 0); width: 219.2px; border-color: rgb(0, 0, 0); height: 29.8px;" width="512"><span lang="EN-US">Verdin AM62 Dual 1GB ET</span></td><td class="xl72 align-left" style="border-width: 1px; border-top-style: none; border-left: 1px rgb(0, 0, 0); width: 71.2px; border-color: rgb(0, 0, 0); height: 29.8px;" width="64">1</td><td class="xl70 align-left" style="border-width: 1px; border-top-style: none; border-left: 1px rgb(0, 0, 0); width: 302.2px; border-color: rgb(0, 0, 0); height: 29.8px;" width="64"> </td></tr><tr style="height: 29.8px;"><td class="xl70 align-left" height="20" style="height: 29.8px; border-width: 1px; border-top: 1px rgb(0, 0, 0); width: 102.867px; border-color: rgb(0, 0, 0);" width="118"><span style="background-color: rgb(251, 238, 184);">D6**<span class="font5">50</span>**</span></td><td class="xl70 align-left" style="border-width: 1px; border-top-style: none; border-left: 1px rgb(0, 0, 0); width: 72.2px; border-color: rgb(0, 0, 0); height: 29.8px;" width="88">  
</td><td class="xl71 align-left" style="border-width: 1px; border-top-style: none; border-left: 1px rgb(0, 0, 0); width: 219.2px; border-color: rgb(0, 0, 0); height: 29.8px;" width="512"><span lang="EN-US">Verdin AM62 Quad 2GB WB IT</span></td><td class="xl72 align-left" style="border-width: 1px; border-top-style: none; border-left: 1px rgb(0, 0, 0); width: 71.2px; border-color: rgb(0, 0, 0); height: 29.8px;" width="64">1</td><td class="xl70 align-left" style="border-width: 1px; border-top-style: none; border-left: 1px rgb(0, 0, 0); width: 302.2px; border-color: rgb(0, 0, 0); height: 29.8px;" width="64"> </td></tr><tr style="height: 29.8px;"><td style="border-width: 1px; border-top: 1px rgb(0, 0, 0); width: 102.867px; border-color: rgb(0, 0, 0); height: 29.8px;"><span style="background-color: rgb(251, 238, 184);">D6**5<span class="font5">0</span>**</span></td><td style="border-width: 1px; border-top-style: none; border-left: 1px rgb(0, 0, 0); width: 72.2px; border-color: rgb(0, 0, 0); height: 29.8px;">  
</td><td style="border-width: 1px; border-top-style: none; border-left: 1px rgb(0, 0, 0); width: 219.2px; border-color: rgb(0, 0, 0); height: 29.8px;"><span lang="EN-US">Verdin iMX8MM Q 2GB IT</span></td><td style="border-width: 1px; border-top-style: none; border-left: 1px rgb(0, 0, 0); width: 71.2px; border-color: rgb(0, 0, 0); height: 29.8px;">1</td><td style="border-width: 1px; border-top-style: none; border-left: 1px rgb(0, 0, 0); width: 302.2px; border-color: rgb(0, 0, 0); height: 29.8px;">Vain näitä hyllyssä tällä hetkellä</td></tr><tr style="height: 29.8px;"><td class="xl70 align-left" height="20" style="height: 29.8px; border-width: 1px; border-top: 1px rgb(0, 0, 0); width: 102.867px; border-color: rgb(0, 0, 0);" width="118"><span style="background-color: rgb(251, 238, 184);">D6**<span class="font5">70</span>**</span></td><td class="xl70 align-left" style="border-width: 1px; border-top-style: none; border-left: 1px rgb(0, 0, 0); width: 72.2px; border-color: rgb(0, 0, 0); height: 29.8px;" width="88"> </td><td class="xl71 align-left" style="border-width: 1px; border-top-style: none; border-left: 1px rgb(0, 0, 0); width: 219.2px; border-color: rgb(0, 0, 0); height: 29.8px;" width="512"><span lang="EN-US">Verdin iMX8M Plus Quad 8GB WB IT</span></td><td class="xl72 align-left" style="border-width: 1px; border-top-style: none; border-left: 1px rgb(0, 0, 0); width: 71.2px; border-color: rgb(0, 0, 0); height: 29.8px;" width="64">1</td><td class="xl70 align-left" style="border-width: 1px; border-top-style: none; border-left: 1px rgb(0, 0, 0); width: 302.2px; border-color: rgb(0, 0, 0); height: 29.8px;" width="64">  
</td></tr></tbody></table>

</details>
**<span style="background-color: rgb(255, 255, 255);">3. D</span>** = **Näyttö**

  
Jos Integral on näytöllinen, käytä hyllystä löytyvää valmiiksi liimattua näyttöä. Mikäli valmiiksi liimattua näyttöä ei ole saatavilla, näyttö on liimattava vähintään 24 tuntia ennen Integralin kokoamista. Katso näytön valmistus tästä [Ohjeesta!](https://wiki.bithouse.fi/books/integral-universaali-alakeskusprosessori/page/nayton-liimaus)


**<span style="background-color: rgb(236, 202, 250);">3.</span> tyhjä = Ei näyttöä, vain kansi**

<details id="bkmrk-integral-tuotekoodi--4"><summary></summary>


<table border="1" cellpadding="0" cellspacing="0" id="bkmrk-integral-tuotekoodi--5" style="border-collapse: collapse; width: 845px; border-width: 1px; border-spacing: 0px; border-color: rgb(0, 0, 0);" width="834"><thead><tr style="height: 15.0pt;"><td class="xl68" height="40" style="height: 30pt; width: 113.283px; border-width: 1px; border-color: rgb(0, 0, 0);" width="87">**INTEGRAL tuotekoodi**</td><td class="xl69" style="width: 70.6833px; border-width: 1px; border-color: rgb(0, 0, 0);" width="96">**Koodi**</td><td class="xl70" style="width: 158.367px; border-width: 1px; border-color: rgb(0, 0, 0);" width="523">**Nimi**</td><td class="xl70" style="width: 59.45px; border-width: 1px; border-color: rgb(0, 0, 0);" width="64">**Määrä**</td><td class="xl70" style="width: 437.45px; border-width: 1px; border-color: rgb(0, 0, 0);" width="64">**Huom!**</td></tr></thead><tbody><tr style="height: 15.0pt;"><td class="xl71" height="20" style="height: 15pt; border-width: 1px; border-top: 1px rgb(0, 0, 0); border-color: rgb(0, 0, 0); width: 113.283px;"> </td><td class="xl66" style="border-width: 1px; border-top-style: none; border-left: 1px rgb(0, 0, 0); border-color: rgb(0, 0, 0); width: 70.6833px;"> </td><td class="xl66" style="border-width: 1px; border-top-style: none; border-left: 1px rgb(0, 0, 0); border-color: rgb(0, 0, 0); width: 158.367px;">Kansi</td><td class="xl67" style="border-width: 1px; border-top-style: none; border-left: 1px rgb(0, 0, 0); border-color: rgb(0, 0, 0); width: 59.45px;">1</td><td class="xl67" style="border-width: 1px; border-top-style: none; border-left: 1px rgb(0, 0, 0); border-color: rgb(0, 0, 0); width: 437.45px;">  
</td></tr><tr><td style="border-width: 1px; border-top: 1px rgb(0, 0, 0); border-color: rgb(0, 0, 0); width: 113.283px;"><span style="background-color: rgb(191, 237, 210);">  
</span></td><td style="border-width: 1px; border-top-style: none; border-left: 1px rgb(0, 0, 0); border-color: rgb(0, 0, 0); width: 70.6833px;"> </td><td style="border-width: 1px; border-top-style: none; border-left: 1px rgb(0, 0, 0); border-color: rgb(0, 0, 0); width: 158.367px;">Kansitarra</td><td style="border-width: 1px; border-top-style: none; border-left: 1px rgb(0, 0, 0); border-color: rgb(0, 0, 0); width: 59.45px;">1</td><td style="border-width: 1px; border-top-style: none; border-left: 1px rgb(0, 0, 0); border-color: rgb(0, 0, 0); width: 437.45px;">Toistaisesksi!  
**Tulevaisuudessa saamme kannet, joissa tarra on valmiiksi painettuna.**  
</td></tr></tbody></table>

</details>
**<span style="background-color: rgb(191, 237, 210);">4.</span> <span style="background-color: rgb(191, 237, 210);">M</span> = Modeemi**

<details id="bkmrk-integral-tuotekoodi--6"><summary></summary>


<table border="1" cellpadding="0" cellspacing="0" id="bkmrk-integral-tuotekoodi--7" style="border-collapse: collapse; width: 738px; border-width: 1px; border-spacing: 0px; border-color: rgb(0, 0, 0); height: 137px;" width="834"><thead><tr style="height: 15.0pt;"><td class="xl68" height="40" style="height: 30pt; width: 86.0833px; border-width: 1px; border-color: rgb(0, 0, 0);">**INTEGRAL tuotekoodi**</td><td class="xl69" style="width: 102.483px; border-width: 1px; border-color: rgb(0, 0, 0);">**Koodi**</td><td class="xl70" style="width: 421.167px; border-width: 1px; border-color: rgb(0, 0, 0);">**Nimi**</td><td class="xl70" style="width: 62.25px; border-width: 1px; border-color: rgb(0, 0, 0);">**Määrä**</td><td class="xl70" style="width: 116.25px; border-width: 1px; border-color: rgb(0, 0, 0);">**Huom!**</td></tr></thead><tbody><tr style="height: 15.0pt;"><td class="xl71" height="20" style="height: 15pt; border-width: 1px; border-top: 1px rgb(0, 0, 0); border-color: rgb(0, 0, 0); width: 86.0833px;"><span style="background-color: rgb(191, 237, 210);">**M**</span></td><td class="xl66" style="border-width: 1px; border-top-style: none; border-left: 1px rgb(0, 0, 0); border-color: rgb(0, 0, 0); width: 102.483px;">11461tai 11462 </td><td class="xl66" style="border-width: 1px; border-top-style: none; border-left: 1px rgb(0, 0, 0); border-color: rgb(0, 0, 0); width: 421.167px;"><span lang="EN-US">Fibocom NL668-EU-05 LTE Cat-4 mPCIe</span></td><td class="xl67" style="border-width: 1px; border-top-style: none; border-left: 1px rgb(0, 0, 0); border-color: rgb(0, 0, 0); width: 62.25px;">1</td><td class="xl67" style="border-width: 1px; border-top-style: none; border-left: 1px rgb(0, 0, 0); border-color: rgb(0, 0, 0); width: 116.25px;">  
</td></tr><tr><td style="border-width: 1px; border-top: 1px rgb(0, 0, 0); border-color: rgb(0, 0, 0); width: 86.0833px;"><span style="background-color: rgb(191, 237, 210);">  
</span></td><td style="border-width: 1px; border-top-style: none; border-left: 1px rgb(0, 0, 0); border-color: rgb(0, 0, 0); width: 102.483px;">170216-01</td><td style="border-width: 1px; border-top-style: none; border-left: 1px rgb(0, 0, 0); border-color: rgb(0, 0, 0); width: 421.167px;"><span lang="EN-US">RF Interface Cable SMA/IPEX MHF, 8 cm (antennipiuha)</span></td><td style="border-width: 1px; border-top-style: none; border-left: 1px rgb(0, 0, 0); border-color: rgb(0, 0, 0); width: 62.25px;">1</td><td style="border-width: 1px; border-top-style: none; border-left: 1px rgb(0, 0, 0); border-color: rgb(0, 0, 0); width: 116.25px;">rikka+mutteri</td></tr><tr><td style="border-width: 1px; border-top: 1px rgb(0, 0, 0); border-color: rgb(0, 0, 0); width: 86.0833px;"><span style="background-color: rgb(191, 237, 210);">  
</span></td><td style="border-width: 1px; border-top-style: none; border-left: 1px rgb(0, 0, 0); border-color: rgb(0, 0, 0); width: 102.483px;">  
</td><td style="border-width: 1px; border-top-style: none; border-left: 1px rgb(0, 0, 0); border-color: rgb(0, 0, 0); width: 421.167px;"><span lang="EN-US">Ruuvit M2</span></td><td style="border-width: 1px; border-top-style: none; border-left: 1px rgb(0, 0, 0); border-color: rgb(0, 0, 0); width: 62.25px;">2</td><td style="border-width: 1px; border-top-style: none; border-left: 1px rgb(0, 0, 0); border-color: rgb(0, 0, 0); width: 116.25px;">  
</td></tr></tbody></table>

</details>
**<span style="background-color: rgb(194, 224, 244);">5. </span><span style="background-color: rgb(255, 255, 255);"><span style="background-color: rgb(255, 255, 255);">X-X-X-X-X-X</span> = moduulipaikat järjestyksessä M1-M6</span>**

<details id="bkmrk-valmiiksi-merkityt-l"><summary></summary>


<table border="1" cellpadding="0" cellspacing="0" id="bkmrk-integral-tuotekoodi--8" style="border-collapse: collapse; width: 634pt; border-width: 1px; border-spacing: 0px; border-color: rgb(0, 0, 0); height: 182.6px;" width="846"><colgroup><col style="width: 99px;" width="87"></col><col style="width: 80px;" width="112"></col><col style="width: 320px;" width="527"></col><col style="width: 63px;" width="56"></col><col style="width: 284px;" width="64"></col></colgroup><thead><tr style="height: 46.6px;"><td class="xl71" height="40" style="height: 46.6px; width: 65pt; border-width: 1px; border-color: rgb(0, 0, 0);" width="87">**INTEGRAL tuotekoodi**</td><td class="xl72" style="width: 84pt; border-width: 1px; border-color: rgb(0, 0, 0); height: 46.6px;" width="112">**Koodi**</td><td class="xl73" style="width: 395pt; border-width: 1px; border-color: rgb(0, 0, 0); height: 46.6px;" width="527">**Nimi**</td><td class="xl73" style="width: 42pt; border-width: 1px; border-color: rgb(0, 0, 0); height: 46.6px;" width="56">**Määrä**</td><td class="xl73" style="width: 48pt; border-width: 1px; border-color: rgb(0, 0, 0); height: 46.6px;" width="64">**Huom!**</td></tr></thead><tbody><tr style="height: 29.8px;"><td class="xl69" height="40" rowspan="4" style="border-width: 1px; border-bottom-style: solid; height: 136px; border-top: 1px rgb(0, 0, 0); border-color: rgb(0, 0, 0);" width="87"><span style="background-color: rgb(194, 224, 244);">IO</span><span style="background-color: rgb(194, 224, 244);">  
</span><span style="background-color: rgb(194, 224, 244);">[![IM-IO816.jpg](https://wiki.bithouse.fi/uploads/images/gallery/2026-03/scaled-1680-/im-io816.jpg)](https://wiki.bithouse.fi/uploads/images/gallery/2026-03/im-io816.jpg)</span></td><td class="xl67" style="border-width: 1px; border-top-style: none; border-left: 1px rgb(0, 0, 0); border-color: rgb(0, 0, 0); height: 29.8px;">IM-IO816</td><td class="xl66" style="border-width: 1px; border-top-style: none; border-left: 1px rgb(0, 0, 0); border-color: rgb(0, 0, 0); height: 29.8px;">Integral säätimen I/O-moduuli</td><td class="xl66" style="border-width: 1px; border-top-style: none; border-left: 1px rgb(0, 0, 0); border-color: rgb(0, 0, 0); height: 29.8px;">1</td><td class="xl66" style="border-width: 1px; border-top-style: none; border-left: 1px rgb(0, 0, 0); border-color: rgb(0, 0, 0); height: 29.8px;">  
</td></tr><tr style="height: 46.6px;"><td class="xl67" height="20" style="height: 46.6px; border-width: 1px; border-top-style: none; border-left: 1px rgb(0, 0, 0); border-color: rgb(0, 0, 0);">1862917</td><td class="xl68" style="border-width: 1px; border-top-style: none; border-left: 1px rgb(0, 0, 0); border-color: rgb(0, 0, 0); height: 46.6px;">Pluggable Terminal Block, 3.5 mm, 8 Ways, 28AWG to 16AWG, 1.5 mm², Screw, 8 A</td><td class="xl66" style="border-width: 1px; border-top-style: none; border-left: 1px rgb(0, 0, 0); border-color: rgb(0, 0, 0); height: 46.6px;">2</td><td class="xl66" style="border-width: 1px; border-top-style: none; border-left: 1px rgb(0, 0, 0); border-color: rgb(0, 0, 0); height: 46.6px;">  
</td></tr><tr style="height: 29.8px;"><td style="border-width: 1px; border-top-style: none; border-left: 1px rgb(0, 0, 0); border-color: rgb(0, 0, 0); height: 29.8px;">  
</td><td style="border-width: 1px; border-top-style: none; border-left: 1px rgb(0, 0, 0); border-color: rgb(0, 0, 0); height: 29.8px;">Tarra \[1...8\]</td><td style="border-width: 1px; border-top-style: none; border-left: 1px rgb(0, 0, 0); border-color: rgb(0, 0, 0); height: 29.8px;">1</td><td style="border-width: 1px; border-top-style: none; border-left: 1px rgb(0, 0, 0); border-color: rgb(0, 0, 0); height: 29.8px;">Toistaiseksi  
**Valmiiksi liittimet tulostetuilla merkeilla on tulossa 8.2026**</td></tr><tr style="height: 29.8px;"><td style="border-width: 1px; border-top-style: none; border-left: 1px rgb(0, 0, 0); border-color: rgb(0, 0, 0); height: 29.8px;">  
</td><td style="border-width: 1px; border-top-style: none; border-left: 1px rgb(0, 0, 0); border-color: rgb(0, 0, 0); height: 29.8px;">Tarra \[9...16\]</td><td style="border-width: 1px; border-top-style: none; border-left: 1px rgb(0, 0, 0); border-color: rgb(0, 0, 0); height: 29.8px;">1</td><td style="border-width: 1px; border-top-style: none; border-left: 1px rgb(0, 0, 0); border-color: rgb(0, 0, 0); height: 29.8px;">Toistaiseksi**Valmiiksi liittimet tulostetuilla merkeilla on tulossa 8.2026**</td></tr></tbody></table>

<table border="1" cellpadding="0" cellspacing="0" id="bkmrk-integral-tuotekoodi--9" style="border-collapse: collapse; width: 634pt; border-width: 1px; border-spacing: 0px; border-color: rgb(0, 0, 0); height: 182.6px;" width="846"><colgroup><col style="width: 100px;" width="87"></col><col style="width: 99px;" width="112"></col><col style="width: 396px;" width="527"></col><col style="width: 65px;" width="56"></col><col style="width: 186px;" width="64"></col></colgroup><thead><tr style="height: 46.6px;"><td class="xl71" height="40" style="height: 46.6px; width: 65pt; border-width: 1px; border-color: rgb(0, 0, 0);" width="87">**INTEGRAL tuotekoodi**</td><td class="xl72" style="width: 84pt; border-width: 1px; border-color: rgb(0, 0, 0); height: 46.6px;" width="112">**Koodi**</td><td class="xl73" style="width: 395pt; border-width: 1px; border-color: rgb(0, 0, 0); height: 46.6px;" width="527">**Nimi**</td><td class="xl73" style="width: 42pt; border-width: 1px; border-color: rgb(0, 0, 0); height: 46.6px;" width="56">**Määrä**</td><td class="xl73" style="width: 48pt; border-width: 1px; border-color: rgb(0, 0, 0); height: 46.6px;" width="64">**Huom!**</td></tr></thead><tbody><tr style="height: 29.8px;"><td class="xl68" height="60" rowspan="4" style="border-width: 1px; border-bottom-style: solid; height: 136px; border-top: 1px rgb(0, 0, 0); border-color: rgb(0, 0, 0);"><span style="background-color: rgb(194, 224, 244);">RS2</span>  
<span style="background-color: rgb(194, 224, 244);">[![IM-RS485-2.jpg](https://wiki.bithouse.fi/uploads/images/gallery/2026-03/scaled-1680-/im-rs485-2.jpg)](https://wiki.bithouse.fi/uploads/images/gallery/2026-03/im-rs485-2.jpg)</span></td><td class="xl67" style="border-width: 1px; border-top-style: none; border-left: 1px rgb(0, 0, 0); border-color: rgb(0, 0, 0); height: 29.8px;">IM-RS485-2P</td><td class="xl66" style="border-width: 1px; border-top-style: none; border-left: 1px rgb(0, 0, 0); border-color: rgb(0, 0, 0); height: 29.8px;">Integral säätimen RS485-väyläsovitin, 2 väylää</td><td class="xl66" style="border-width: 1px; border-top-style: none; border-left: 1px rgb(0, 0, 0); border-color: rgb(0, 0, 0); height: 29.8px;">1</td><td class="xl66" style="border-width: 1px; border-top-style: none; border-left: 1px rgb(0, 0, 0); border-color: rgb(0, 0, 0); height: 29.8px;"> </td></tr><tr style="height: 46.6px;"><td class="xl74" height="20" style="height: 46.6px; border-width: 1px; border-top-style: none; border-left: 1px rgb(0, 0, 0); border-color: rgb(0, 0, 0);">1862894</td><td class="xl74" style="border-width: 1px; border-top-style: none; border-left: 1px rgb(0, 0, 0); border-color: rgb(0, 0, 0); height: 46.6px;">Pluggable Terminal Block, 3.5 mm, 6 Ways, 28AWG to 16AWG, 1.5 mm², Screw, 8 A</td><td class="xl74" style="border-width: 1px; border-top-style: none; border-left: 1px rgb(0, 0, 0); border-color: rgb(0, 0, 0); height: 46.6px;">1</td><td class="xl66" style="border-width: 1px; border-top-style: none; border-left: 1px rgb(0, 0, 0); border-color: rgb(0, 0, 0); height: 46.6px;"> </td></tr><tr style="height: 29.8px;"><td class="xl75" height="20" style="height: 29.8px; border-width: 1px; border-top-style: none; border-left: 1px rgb(0, 0, 0); border-color: rgb(0, 0, 0);">JUMPER-H/B</td><td class="xl75" style="border-width: 1px; border-top-style: none; border-left: 1px rgb(0, 0, 0); border-color: rgb(0, 0, 0); height: 29.8px;">Jumpperi; pin; naaras; varren kanssa; 2,54 mm; 1x2; musta</td><td class="xl74" style="border-width: 1px; border-top-style: none; border-left: 1px rgb(0, 0, 0); border-color: rgb(0, 0, 0); height: 29.8px;">6</td><td class="xl66" style="border-width: 1px; border-top-style: none; border-left: 1px rgb(0, 0, 0); border-color: rgb(0, 0, 0); height: 29.8px;">  
</td></tr><tr style="height: 29.8px;"><td style="border-width: 1px; border-top-style: none; border-left: 1px rgb(0, 0, 0); border-color: rgb(0, 0, 0); height: 29.8px;">  
</td><td style="border-width: 1px; border-top-style: none; border-left: 1px rgb(0, 0, 0); border-color: rgb(0, 0, 0); height: 29.8px;">Tarra \[1A...2C\]</td><td style="border-width: 1px; border-top-style: none; border-left: 1px rgb(0, 0, 0); border-color: rgb(0, 0, 0); height: 29.8px;">1</td><td style="border-width: 1px; border-top-style: none; border-left: 1px rgb(0, 0, 0); border-color: rgb(0, 0, 0); height: 29.8px;">Toistaiseksi</td></tr></tbody></table>

<table border="1" cellpadding="0" cellspacing="0" id="bkmrk-integral-tuotekoodi--10" style="border-collapse: collapse; width: 634pt; border-width: 1px; border-spacing: 0px; border-color: rgb(0, 0, 0);" width="846"><colgroup><col style="width: 100px;" width="87"></col><col style="width: 99px;" width="112"></col><col style="width: 395px;" width="527"></col><col style="width: 66px;" width="56"></col><col style="width: 186px;" width="64"></col></colgroup><thead><tr style="height: 15.0pt;"><td class="xl71" height="40" style="height: 30pt; width: 65pt; border-width: 1px; border-color: rgb(0, 0, 0);" width="87">**INTEGRAL tuotekoodi**</td><td class="xl72" style="width: 84pt; border-width: 1px; border-color: rgb(0, 0, 0);" width="112">**Koodi**</td><td class="xl73" style="width: 395pt; border-width: 1px; border-color: rgb(0, 0, 0);" width="527">**Nimi**</td><td class="xl73" style="width: 42pt; border-width: 1px; border-color: rgb(0, 0, 0);" width="56">**Määrä**</td><td class="xl73" style="width: 48pt; border-width: 1px; border-color: rgb(0, 0, 0);" width="64">**Huom!**</td></tr></thead><tbody><tr style="height: 15.0pt;"><td class="xl69" height="40" rowspan="3" style="border-width: 1px; border-bottom: 1px solid rgb(0, 0, 0); height: 30pt; border-top: 1px rgb(0, 0, 0); border-color: rgb(0, 0, 0);"><span style="background-color: rgb(194, 224, 244);">MB20</span>  
<span style="background-color: rgb(194, 224, 244);">[![IM-MBUS20.jpg](https://wiki.bithouse.fi/uploads/images/gallery/2026-03/scaled-1680-/im-mbus20.jpg)](https://wiki.bithouse.fi/uploads/images/gallery/2026-03/im-mbus20.jpg)</span></td><td class="xl67" style="border-width: 1px; border-top: 1px rgb(0, 0, 0); border-left: 1px rgb(0, 0, 0); border-color: rgb(0, 0, 0);">IM-MBUS-10</td><td class="xl66" style="border-width: 1px; border-top: 1px rgb(0, 0, 0); border-left: 1px rgb(0, 0, 0); border-color: rgb(0, 0, 0);">Integral säätimen M-Bus-tasomuunnin 10 mittarille</td><td class="xl66" style="border-width: 1px; border-top: 1px rgb(0, 0, 0); border-left: 1px rgb(0, 0, 0); border-color: rgb(0, 0, 0);">1</td><td class="xl66" style="border-width: 1px; border-top: 1px rgb(0, 0, 0); border-left: 1px rgb(0, 0, 0); border-color: rgb(0, 0, 0);"> </td></tr><tr style="height: 15.0pt;"><td class="xl66" height="20" style="height: 15pt; border-width: 1px; border-top: 1px rgb(0, 0, 0); border-left: 1px rgb(0, 0, 0); border-color: rgb(0, 0, 0);">1792016</td><td class="xl68" style="border-width: 1px; border-top: 1px rgb(0, 0, 0); border-left: 1px rgb(0, 0, 0); border-color: rgb(0, 0, 0);">Pluggable Terminal Block, 5 mm, 2 Ways, 30AWG to 12AWG, 2.5 mm², Screw, 12 A</td><td class="xl66" style="border-width: 1px; border-top: 1px rgb(0, 0, 0); border-left: 1px rgb(0, 0, 0); border-color: rgb(0, 0, 0);">1</td><td class="xl66" style="border-width: 1px; border-top: 1px rgb(0, 0, 0); border-left: 1px rgb(0, 0, 0); border-color: rgb(0, 0, 0);">  
</td></tr><tr><td style="border-width: 1px; border-top-style: none; border-left: 1px rgb(0, 0, 0); border-color: rgb(0, 0, 0);">  
</td><td style="border-width: 1px; border-top-style: none; border-left: 1px rgb(0, 0, 0); border-color: rgb(0, 0, 0);">Tarra \[ME 1 | ME 2\]</td><td style="border-width: 1px; border-top-style: none; border-left: 1px rgb(0, 0, 0); border-color: rgb(0, 0, 0);">1</td><td style="border-width: 1px; border-top-style: none; border-left: 1px rgb(0, 0, 0); border-color: rgb(0, 0, 0);">Toistaiseksi</td></tr></tbody></table>

<table border="1" style="border-collapse: collapse; width: 100%; border-width: 1px; border-color: rgb(0, 0, 0);"><colgroup><col style="width: 12.7081%;"></col><col style="width: 15.0186%;"></col><col style="width: 46.2081%;"></col><col style="width: 6.16451%;"></col><col style="width: 20.0248%;"></col></colgroup><thead><tr><td style="border-color: rgb(0, 0, 0);">**INTEGRAL tuotekoodi**</td><td class="xl72" style="width: 84pt; border-width: 1px; border-color: rgb(0, 0, 0);" width="112">**Koodi**</td><td class="xl73" style="width: 395pt; border-width: 1px; border-color: rgb(0, 0, 0);" width="527">**Nimi**</td><td class="xl73" style="width: 42pt; border-width: 1px; border-color: rgb(0, 0, 0);" width="56">**Määrä**</td><td class="xl73" style="width: 48pt; border-width: 1px; border-color: rgb(0, 0, 0);" width="64">**Huom!**</td></tr></thead><tbody><tr><td class="xl69" height="40" rowspan="3" style="border-width: 1px; border-bottom: 1px solid rgb(0, 0, 0); height: 30pt; border-top: 1px rgb(0, 0, 0); border-color: rgb(0, 0, 0);"><span style="background-color: rgb(194, 224, 244);">MB250</span>  
</td><td class="xl67" style="border-width: 1px; border-top: 1px rgb(0, 0, 0); border-left: 1px rgb(0, 0, 0); border-color: rgb(0, 0, 0);">IM-MBUS-250</td><td class="xl66" style="border-width: 1px; border-top: 1px rgb(0, 0, 0); border-left: 1px rgb(0, 0, 0); border-color: rgb(0, 0, 0);">Integral säätimen M-Bus-tasomuunnin 250 mittarille</td><td class="xl66" style="border-width: 1px; border-top: 1px rgb(0, 0, 0); border-left: 1px rgb(0, 0, 0); border-color: rgb(0, 0, 0);">1</td><td class="xl66" style="border-width: 1px; border-top: 1px rgb(0, 0, 0); border-left: 1px rgb(0, 0, 0); border-color: rgb(0, 0, 0);"> </td></tr><tr><td class="xl66" height="20" style="height: 15pt; border-width: 1px; border-top: 1px rgb(0, 0, 0); border-left: 1px rgb(0, 0, 0); border-color: rgb(0, 0, 0);">1792016</td><td class="xl68" style="border-width: 1px; border-top: 1px rgb(0, 0, 0); border-left: 1px rgb(0, 0, 0); border-color: rgb(0, 0, 0);">Pluggable Terminal Block, 5 mm, 2 Ways, 30AWG to 12AWG, 2.5 mm², Screw, 12 A</td><td class="xl66" style="border-width: 1px; border-top: 1px rgb(0, 0, 0); border-left: 1px rgb(0, 0, 0); border-color: rgb(0, 0, 0);">1</td><td class="xl66" style="border-width: 1px; border-top: 1px rgb(0, 0, 0); border-left: 1px rgb(0, 0, 0); border-color: rgb(0, 0, 0);">  
</td></tr><tr><td style="border-width: 1px; border-top-style: none; border-left: 1px rgb(0, 0, 0); border-color: rgb(0, 0, 0);">  
</td><td style="border-width: 1px; border-top-style: none; border-left: 1px rgb(0, 0, 0); border-color: rgb(0, 0, 0);">Tarra \[ME 1 | ME 2\]</td><td style="border-width: 1px; border-top-style: none; border-left: 1px rgb(0, 0, 0); border-color: rgb(0, 0, 0);">1</td><td style="border-width: 1px; border-top-style: none; border-left: 1px rgb(0, 0, 0); border-color: rgb(0, 0, 0);">Toistaiseksi</td></tr></tbody></table>

<table border="1" cellpadding="0" cellspacing="0" id="bkmrk-integral-tuotekoodi--11" style="border-collapse: collapse; width: 634pt; border-width: 1px; border-spacing: 0px; border-color: rgb(0, 0, 0);" width="846"><colgroup><col style="width: 99px;" width="87"></col><col style="width: 100px;" width="112"></col><col style="width: 397px;" width="527"></col><col style="width: 65px;" width="56"></col><col style="width: 185px;" width="64"></col></colgroup><thead><tr style="height: 15.0pt;"><td class="xl71" height="40" style="height: 30pt; width: 65pt; border-width: 1px; border-color: rgb(0, 0, 0);" width="87">**INTEGRAL tuotekoodi**</td><td class="xl72" style="width: 84pt; border-width: 1px; border-color: rgb(0, 0, 0);" width="112">**Koodi**</td><td class="xl73" style="width: 395pt; border-width: 1px; border-color: rgb(0, 0, 0);" width="527">**Nimi**</td><td class="xl73" style="width: 42pt; border-width: 1px; border-color: rgb(0, 0, 0);" width="56">**Määrä**</td><td class="xl73" style="width: 48pt; border-width: 1px; border-color: rgb(0, 0, 0);" width="64">**Huom!**</td></tr></thead><tbody><tr style="height: 15.0pt;"><td class="xl69" height="40" rowspan="2" style="border-width: 1px; border-bottom: 1px solid rgb(0, 0, 0); height: 30pt; border-top: 1px rgb(0, 0, 0); border-color: rgb(0, 0, 0);"><span style="background-color: rgb(194, 224, 244);">24V</span></td><td class="xl67" style="border-width: 1px; border-top: 1px rgb(0, 0, 0); border-left: 1px rgb(0, 0, 0); border-color: rgb(0, 0, 0);"> </td><td class="xl66" style="border-width: 1px; border-top: 1px rgb(0, 0, 0); border-left: 1px rgb(0, 0, 0); border-color: rgb(0, 0, 0);">IM-24VDC</td><td class="xl66" style="border-width: 1px; border-top: 1px rgb(0, 0, 0); border-left: 1px rgb(0, 0, 0); border-color: rgb(0, 0, 0);">1</td><td class="xl66" style="border-width: 1px; border-top: 1px rgb(0, 0, 0); border-left: 1px rgb(0, 0, 0); border-color: rgb(0, 0, 0);"> </td></tr><tr style="height: 15.0pt;"><td class="xl66" height="20" style="height: 15pt; border-width: 1px; border-top: 1px rgb(0, 0, 0); border-left: 1px rgb(0, 0, 0); border-color: rgb(0, 0, 0);"> </td><td class="xl68" style="border-width: 1px; border-top: 1px rgb(0, 0, 0); border-left: 1px rgb(0, 0, 0); border-color: rgb(0, 0, 0);"> </td><td class="xl66" style="border-width: 1px; border-top: 1px rgb(0, 0, 0); border-left: 1px rgb(0, 0, 0); border-color: rgb(0, 0, 0);"> </td><td class="xl66" style="border-width: 1px; border-top: 1px rgb(0, 0, 0); border-left: 1px rgb(0, 0, 0); border-color: rgb(0, 0, 0);">  
</td></tr></tbody></table>

<table border="1" cellpadding="0" cellspacing="0" id="bkmrk-integral-tuotekoodi--12" style="border-collapse: collapse; width: 634pt; border-spacing: 0px; border: 1px solid rgb(0, 0, 0); height: 246.75px;" width="846"><colgroup><col style="width: 128px;" width="87"></col><col style="width: 118px;" width="112"></col><col style="width: 348px;" width="527"></col><col style="width: 65px;" width="56"></col><col style="width: 187px;" width="64"></col></colgroup><thead><tr style="height: 46.6px;"><td class="xl71" height="40" style="height: 46.6px; width: 65pt; border-width: 1px; border-color: rgb(0, 0, 0);" width="87">**INTEGRAL tuotekoodi**</td><td class="xl72" style="width: 84pt; border-width: 1px; border-color: rgb(0, 0, 0); height: 46.6px;" width="112">**Koodi**</td><td class="xl73" style="width: 395pt; border-width: 1px; border-color: rgb(0, 0, 0); height: 46.6px;" width="527">**Nimi**</td><td class="xl73" style="width: 42pt; border-width: 1px; border-color: rgb(0, 0, 0); height: 46.6px;" width="56">**Määrä**</td><td class="xl73" style="width: 48pt; border-width: 1px; border-color: rgb(0, 0, 0); height: 46.6px;" width="64">**Huom!**</td></tr></thead><tbody><tr style="height: 200.15px;"><td class="xl69" height="40" style="border-width: 1px; border-bottom-style: solid; height: 200.15px; border-top: 1px rgb(0, 0, 0); border-color: rgb(0, 0, 0);"><span style="background-color: rgb(194, 224, 244);">USB</span>

[![IM-USB-4C.jpg](https://wiki.bithouse.fi/uploads/images/gallery/2026-03/scaled-1680-/im-usb-4c.jpg)](https://wiki.bithouse.fi/uploads/images/gallery/2026-03/im-usb-4c.jpg)

</td><td class="xl67" style="border-width: 1px; border-top-style: none; border-left: 1px rgb(0, 0, 0); border-color: rgb(0, 0, 0); height: 200.15px;">IM-USB-C-4P</td><td class="xl66" style="border-width: 1px; border-top-style: none; border-left: 1px rgb(0, 0, 0); border-color: rgb(0, 0, 0); height: 200.15px;">Intergal säätimen sovitin 4:lle USB C-liittimelle</td><td class="xl66" style="border-width: 1px; border-top-style: none; border-left: 1px rgb(0, 0, 0); border-color: rgb(0, 0, 0); height: 200.15px;">1</td><td class="xl66" style="border-width: 1px; border-top-style: none; border-left: 1px rgb(0, 0, 0); border-color: rgb(0, 0, 0); height: 200.15px;">  
</td></tr></tbody></table>

</details>
#### 1.5 Yhteiset osat

<details id="bkmrk-%C2%A0-koodi-nimi%C2%A0-m%C3%A4%C3%A4r%C3%A4-"><summary></summary>


<table border="1" cellpadding="0" cellspacing="0" id="bkmrk-%C2%A0-koodi-nimi%C2%A0-m%C3%A4%C3%A4r%C3%A4--1" style="border-collapse: collapse; width: 711px; border-width: 1px; border-spacing: 0px; border-color: rgb(0, 0, 0); height: 360px;" width="885"><thead><tr style="height: 0.466675px;"><td class="xl71" height="40" style="height: 40.9333px; width: 94.5333px; border-width: 1px; border-color: rgb(0, 0, 0);"> </td><td class="xl72" style="width: 111.2px; border-width: 1px; border-color: rgb(0, 0, 0); height: 40.9333px;">**Koodi**</td><td class="xl73" style="width: 316.2px; border-width: 1px; border-color: rgb(0, 0, 0); height: 40.9333px;">**Nimi** </td><td class="xl72" style="width: 71.2px; border-width: 1px; border-color: rgb(0, 0, 0); height: 40.9333px;">**Määrä**</td><td class="xl74" style="width: 183.2px; border-width: 1px; border-color: rgb(0, 0, 0); height: 40.9333px;">**Huom!**</td></tr></thead><tbody><tr style="height: 29.7167px;"><td class="xl69" height="20" style="height: 29.7167px; border-width: 1px; border-top: 1px rgb(0, 0, 0); border-color: rgb(0, 0, 0); width: 94.5333px;">POHJA</td><td class="xl68" style="border-width: 1px; border-top-style: none; border-left: 1px rgb(0, 0, 0); border-color: rgb(0, 0, 0); height: 29.7167px; width: 111.2px;">P05120201F.BL</td><td class="xl68" style="border-width: 1px; border-top-style: none; border-left: 1px rgb(0, 0, 0); border-color: rgb(0, 0, 0); height: 29.7167px; width: 316.2px;">PANEL MODULBOX WITHOUT FRAME</td><td class="xl68" style="border-width: 1px; border-top-style: none; border-left: 1px rgb(0, 0, 0); border-color: rgb(0, 0, 0); height: 29.7167px; width: 71.2px;">1</td><td class="xl75" style="border-width: 1px; border-top-style: none; border-left: 1px rgb(0, 0, 0); width: 183.2px; border-color: rgb(0, 0, 0); height: 29.7167px;">mustat "klipsut" myös</td></tr><tr style="height: 29.7167px;"><td class="xl69" height="20" style="height: 29.7167px; border-width: 1px; border-top: 1px rgb(0, 0, 0); border-color: rgb(0, 0, 0); width: 94.5333px;">KOTELO</td><td class="xl68" style="border-width: 1px; border-top-style: none; border-left: 1px rgb(0, 0, 0); border-color: rgb(0, 0, 0); height: 29.7167px; width: 111.2px;">25.1202000.BL</td><td class="xl68" style="border-width: 1px; border-top-style: none; border-left: 1px rgb(0, 0, 0); border-color: rgb(0, 0, 0); height: 29.7167px; width: 316.2px;"><span lang="EN-US">Modulbox XTS WITH VENTS 12MH53V-A</span></td><td class="xl68" style="border-width: 1px; border-top-style: none; border-left: 1px rgb(0, 0, 0); border-color: rgb(0, 0, 0); height: 29.7167px; width: 71.2px;">1</td><td class="xl75" style="border-width: 1px; border-top-style: none; border-left: 1px rgb(0, 0, 0); width: 183.2px; border-color: rgb(0, 0, 0); height: 29.7167px;"> </td></tr><tr style="height: 29.7167px;"><td class="xl69" height="20" style="height: 29.7167px; border-width: 1px; border-top: 1px rgb(0, 0, 0); border-color: rgb(0, 0, 0); width: 94.5333px;">PÄÄKORTTI</td><td class="xl68" style="border-width: 1px; border-top-style: none; border-left: 1px rgb(0, 0, 0); border-color: rgb(0, 0, 0); height: 29.7167px; width: 111.2px;">Tora\_Web\_CPU</td><td class="xl68" style="border-width: 1px; border-top-style: none; border-left: 1px rgb(0, 0, 0); border-color: rgb(0, 0, 0); height: 29.7167px; width: 316.2px;">Tora\_Web\_CPU</td><td class="xl68" style="border-width: 1px; border-top-style: none; border-left: 1px rgb(0, 0, 0); border-color: rgb(0, 0, 0); height: 29.7167px; width: 71.2px;">1</td><td class="xl75" style="border-width: 1px; border-top-style: none; border-left: 1px rgb(0, 0, 0); width: 183.2px; border-color: rgb(0, 0, 0); height: 29.7167px;">tarkista kortin versio CPU-SoM-ohjelmointia varten</td></tr><tr style="height: 29.7167px;"><td class="xl69" height="20" style="height: 29.7167px; border-width: 1px; border-top: 1px rgb(0, 0, 0); border-color: rgb(0, 0, 0); width: 94.5333px;">RUUVI</td><td class="xl68" style="border-width: 1px; border-top-style: none; border-left: 1px rgb(0, 0, 0); border-color: rgb(0, 0, 0); height: 29.7167px; width: 111.2px;">2099314</td><td class="xl68" style="border-width: 1px; border-top-style: none; border-left: 1px rgb(0, 0, 0); border-color: rgb(0, 0, 0); height: 29.7167px; width: 316.2px;">Ruuvi; M3x6; 0,5; Pää: kartio; Pozidriv; PZ1; teräs; sinkki; DIN 966A</td><td class="xl68" style="border-width: 1px; border-top-style: none; border-left: 1px rgb(0, 0, 0); border-color: rgb(0, 0, 0); height: 29.7167px; width: 71.2px;">12</td><td class="xl76" style="border-width: 1px; border-top-style: none; border-left: 1px rgb(0, 0, 0); width: 183.2px; border-color: rgb(0, 0, 0); height: 29.7167px;">moduulien kiinnitykseen</td></tr><tr style="height: 29.7167px;"><td class="xl69" height="20" style="height: 29.7167px; border-width: 1px; border-top: 1px rgb(0, 0, 0); border-color: rgb(0, 0, 0); width: 94.5333px;">HOLKKI LYHYT</td><td class="xl68" style="border-width: 1px; border-top-style: none; border-left: 1px rgb(0, 0, 0); border-color: rgb(0, 0, 0); height: 29.7167px; width: 111.2px;">TP-8</td><td class="xl68" style="border-width: 1px; border-top-style: none; border-left: 1px rgb(0, 0, 0); border-color: rgb(0, 0, 0); height: 29.7167px; width: 316.2px;">Kierteitetty väliholkki; kuusikulmainen; polyamidi; M3; M3; 8mm</td><td class="xl68" style="border-width: 1px; border-top-style: none; border-left: 1px rgb(0, 0, 0); border-color: rgb(0, 0, 0); height: 29.7167px; width: 71.2px;">12</td><td class="xl75" style="border-width: 1px; border-top-style: none; border-left: 1px rgb(0, 0, 0); width: 183.2px; border-color: rgb(0, 0, 0); height: 29.7167px;">moduulien kiinnitykseen</td></tr><tr style="height: 29.7167px;"><td class="xl69" height="20" style="height: 29.7167px; border-width: 1px; border-top: 1px rgb(0, 0, 0); border-color: rgb(0, 0, 0); width: 94.5333px;">HOLKKI PITKÄ</td><td class="xl68" style="border-width: 1px; border-top-style: none; border-left: 1px rgb(0, 0, 0); border-color: rgb(0, 0, 0); height: 29.7167px; width: 111.2px;">TP-19</td><td class="xl68" style="border-width: 1px; border-top-style: none; border-left: 1px rgb(0, 0, 0); border-color: rgb(0, 0, 0); height: 29.7167px; width: 316.2px;">Kierteitetty väliholkki; kuusikulmainen; polyamidi; M3; M3; 19mm</td><td class="xl68" style="border-width: 1px; border-top-style: none; border-left: 1px rgb(0, 0, 0); border-color: rgb(0, 0, 0); height: 29.7167px; width: 71.2px;">12</td><td class="xl75" style="border-width: 1px; border-top-style: none; border-left: 1px rgb(0, 0, 0); width: 183.2px; border-color: rgb(0, 0, 0); height: 29.7167px;">moduulien kiinnitykseen</td></tr><tr style="height: 29.7167px;"><td class="xl69" height="20" style="height: 29.7167px; border-width: 1px; border-top: 1px rgb(0, 0, 0); border-color: rgb(0, 0, 0); width: 94.5333px;">PARISTO</td><td class="xl75" style="border-width: 1px; border-top-style: none; border-left: 1px rgb(0, 0, 0); width: 111.2px; border-color: rgb(0, 0, 0); height: 29.7167px;"><span lang="EN-US">CR1220</span></td><td class="xl75" style="border-width: 1px; border-top-style: none; border-left: 1px rgb(0, 0, 0); width: 316.2px; border-color: rgb(0, 0, 0); height: 29.7167px;"><span lang="EN-US">Nappiparisto</span></td><td class="xl75" style="border-width: 1px; border-top-style: none; border-left: 1px rgb(0, 0, 0); width: 71.2px; border-color: rgb(0, 0, 0); height: 29.7167px;">1</td><td class="xl75" style="border-width: 1px; border-top-style: none; border-left: 1px rgb(0, 0, 0); width: 183.2px; border-color: rgb(0, 0, 0); height: 29.7167px;"> </td></tr><tr style="height: 29.7167px;"><td class="xl69" height="20" style="height: 29.7167px; border-width: 1px; border-top: 1px rgb(0, 0, 0); border-color: rgb(0, 0, 0); width: 94.5333px;">LIITIN</td><td class="xl68" style="border-width: 1px; border-top-style: none; border-left: 1px rgb(0, 0, 0); border-color: rgb(0, 0, 0); height: 29.7167px; width: 111.2px;">1757022</td><td class="xl68" style="border-width: 1px; border-top-style: none; border-left: 1px rgb(0, 0, 0); border-color: rgb(0, 0, 0); height: 29.7167px; width: 316.2px;">MSTB2,5/3-ST-5,08<span style="mso-spacerun: yes;"> </span>terminal block</td><td class="xl68" style="border-width: 1px; border-top-style: none; border-left: 1px rgb(0, 0, 0); border-color: rgb(0, 0, 0); height: 29.7167px; width: 71.2px;">1</td><td class="xl75" style="border-width: 1px; border-top-style: none; border-left: 1px rgb(0, 0, 0); width: 183.2px; border-color: rgb(0, 0, 0); height: 29.7167px;">virtaliitin</td></tr><tr style="height: 29.7167px;"><td class="xl69" height="20" style="height: 29.7167px; border-width: 1px; border-top: 1px rgb(0, 0, 0); border-color: rgb(0, 0, 0); width: 94.5333px;">TARRA</td><td class="xl75" style="border-width: 1px; border-top-style: none; border-left: 1px rgb(0, 0, 0); width: 111.2px; border-color: rgb(0, 0, 0); height: 29.7167px;"> </td><td class="xl75" style="border-width: 1px; border-top-style: none; border-left: 1px rgb(0, 0, 0); width: 316.2px; border-color: rgb(0, 0, 0); height: 29.7167px;"><span lang="EN-US">Moduulitarra \[M1...M6\]</span></td><td class="xl75" style="border-width: 1px; border-top-style: none; border-left: 1px rgb(0, 0, 0); width: 71.2px; border-color: rgb(0, 0, 0); height: 29.7167px;">2</td><td class="xl76" style="border-width: 1px; border-top-style: none; border-left: 1px rgb(0, 0, 0); width: 183.2px; border-color: rgb(0, 0, 0); height: 29.7167px;"> </td></tr></tbody></table>

[![PIENkeräily_yhteiset_osat.jpg](https://wiki.bithouse.fi/uploads/images/gallery/2026-03/scaled-1680-/pienkeraily-yhteiset-osat.jpg)](https://wiki.bithouse.fi/uploads/images/gallery/2026-03/pienkeraily-yhteiset-osat.jpg)

</details></details>

### 2. Kokoaminen


<details id="bkmrk-4.1-vakio-osat-4.1.1"><summary></summary>

![Kytkentäkuva-IntegralFI.png](https://wiki.bithouse.fi/uploads/images/gallery/2026-02/scaled-1680-/kytkentakuva-integralfi.png)

##### 2.1.1 Paristo

<details id="bkmrk-aseta-kellon-paristo"><summary></summary>

- Aseta kellon **paristo** paikoilleen.

![paristo1.jpg](https://wiki.bithouse.fi/uploads/images/gallery/2025-12/scaled-1680-/paristo1.jpg)

</details>##### <span style="background-color: rgb(194, 224, 244);">2.1.2 Moduulit</span>

<details id="bkmrk-tarkista-tuotekoodis"><summary></summary>


[![moduulipaikat-simple.png](https://wiki.bithouse.fi/uploads/images/gallery/2026-03/scaled-1680-/moduulipaikat-simple.png)](https://wiki.bithouse.fi/uploads/images/gallery/2026-03/moduulipaikat-simple.png)

- Tarkista tuotekoodista moduulien oikeat paikat pääkortissa: 
    - merkkisarja esimerkiksi <span style="background-color: rgb(194, 224, 244);">\[IO-IO-IO-IO-X-RS\]</span><table border="1" class="align-left" style="border-collapse: collapse; width: 129.422%; height: 177.6px;"><colgroup><col style="width: 45.8878%;"></col><col style="width: 54.1688%;"></col></colgroup><tbody><tr style="height: 29.6px;"><td style="height: 29.6px;">Moduulipaikka 1</td><td style="height: 29.6px;">IM-IO816</td></tr><tr style="height: 29.6px;"><td style="height: 29.6px;">Moduulipaikka 2</td><td style="height: 29.6px;">IM-IO816</td></tr><tr style="height: 29.6px;"><td style="height: 29.6px;">Moduulipaikka 3</td><td style="height: 29.6px;">IM-IO816</td></tr><tr style="height: 29.6px;"><td style="height: 29.6px;">Moduulipaikka 4</td><td style="height: 29.6px;">IM-IO816</td></tr><tr style="height: 29.6px;"><td style="height: 29.6px;">Moduulipaikka 5
        
        </td><td style="height: 29.6px;">ei moduulia</td></tr><tr style="height: 29.6px;"><td style="height: 29.6px;">Moduulipaikka 6</td><td style="height: 29.6px;">IM-RS485-2</td></tr></tbody></table>

<p class="callout info">Jos päätyihin ei tule muuta, laitetaan päätypaikkoihin (moduulipaikat 1 ja 6) tyhjä kortti. Näille ei ole erillistä merkintää tilauskoodissa.</p>

- Kiinnitä moduulikehys pääkorttiin. 
    - Moduulikehyksessä on alapuolella jokaisen moduulin kohdalla neljä tappia. Yläpuolella on tappeja ja ruuvinreikiä.
    - Aseta kehys niin, että ruuvinreiät tulevat pääkorttiin päin.
    - Ruuvaa kehys kiinni pääkorttiin (samat ruuvit kuin näytön lisäkortissa tai vastaavat)
- Kiinnitä moduulit kehykseen, ei ruuveja, vain napsautetaan paikoilleen. 
    - Varo etteivät moduulit irtoa, ne pysyvät kunnolla paikallaan vain kotelon pohjan tuella.

[![moduulikehysPIEN.jpg](https://wiki.bithouse.fi/uploads/images/gallery/2026-07/scaled-1680-/moduulikehyspien.jpg)](https://wiki.bithouse.fi/uploads/images/gallery/2026-07/moduulikehyspien.jpg)

[![moduulikehys-pohjaPIEN.jpg](https://wiki.bithouse.fi/uploads/images/gallery/2026-07/scaled-1680-/moduulikehys-pohjapien.jpg)](https://wiki.bithouse.fi/uploads/images/gallery/2026-07/moduulikehys-pohjapien.jpg)

</details>##### <span style="background-color: rgb(251, 238, 184);">2.1.3 CPU-SoM</span>

<details id="bkmrk-liu%27uta-prosessori-k"><summary></summary>


- Liu'uta prosessori kiinni liittimiin. Paina alas, jolloin se lukittuu paikoilleen.

![CPU_paikoilleen.jpg](https://wiki.bithouse.fi/uploads/images/gallery/2025-04/scaled-1680-/cpu-paikoilleen.jpg)

- Mikäli prosessori ei lukitu kunnolla, nosta lyhyillä sivuilla olevia jousia varovasti esim. ruuvimeisselillä, jolloin jouset pääsevät loksahtamaan paikoilleen.

![CPU-SoM-kiinnitys10.jpg](https://wiki.bithouse.fi/uploads/images/gallery/2026-02/scaled-1680-/cpu-som-kiinnitys10.jpg)

- Tarvittaessa lukituksen voi vapauttaa lyhyillä sivuilla olevista jousista, vetämällä niitä ulospäin.

</details>##### <span style="background-color: rgb(198, 245, 247);">2.2.1 SIM-kortti</span>

<details id="bkmrk-sim-kortti-laitetaan"><summary></summary>

- SIM-kortti laitetaan vain tarvittaessa. 
    - - - Tämän näkee [INTEGRAL PRODUCTION](https://docs.google.com/spreadsheets/d/1pupkZCM5NyyzgvCC0XG2sC6sJNPZkWRU-GR4wH_WI8U/edit?gid=0#gid=0) tiedostossa.

</details>##### <span style="background-color: rgb(191, 237, 210);">2.2.2 Modeemi ja antenni</span>

<details id="bkmrk-modeemi-asennetaan-v"><summary></summary>


Jos laite sisältää modeemin:

- Liu'uta modeemi paikoilleen. Kiinnitä toisesta päästä M2 -ruuveilla.

<p class="callout warning"><span style="color: rgb(0, 0, 0);">HUOM! Ruuvin vastakappaleet ovat ainoastaan kolvauksella kiinni piirilevyssä - kiristä ruuvit napakasti mutta älä käytä liikaa voimaa.</span></p>

![PIEN_modeemi_paikoilleen_ruuvit3.jpg](https://wiki.bithouse.fi/uploads/images/gallery/2026-02/scaled-1680-/pien-modeemi-paikoilleen-ruuvit3.jpg)

- Kiinnitä 4G-antenni kotelon aukkoon mutterilla. Kiristämiseen tarvit kaksi 8mm avainta.

<p class="callout info">Huom! Kiristysvaiheessa kiinnitä huomiota siihen, miten päin antennin liitin on kaapelin päässä. Kiristä antennin kaapeli siihen asentoon, että se on helppo painaa modeemin M-liittimeen.</p>

**![kotelo-ja-kansi-selitteet.png](https://wiki.bithouse.fi/uploads/images/gallery/2025-08/scaled-1680-/kotelo-ja-kansi-selitteet.png)![antenni kiinni koteloon.JPG](https://wiki.bithouse.fi/uploads/images/gallery/2025-08/scaled-1680-/antenni-kiinni-koteloon.JPG)**

![antenni koteloon.jpg](https://wiki.bithouse.fi/uploads/images/gallery/2025-09/scaled-1680-/Q6xantenni-koteloon.jpg)

</details>#### 4.3 <span style="color: rgb(251, 238, 184); background-color: rgb(185, 106, 217);">Laite koteloon</span>


<details id="bkmrk-4.3.1-laitteen-asett"><summary></summary>

##### 2.3.1 Laitteen asettaminen koteloon

- Aseta valmis kortti koteloon. Varmista, että antennikaapeli ei jää mihinkään väliin.

<span style="background-color: rgb(185, 106, 217); color: rgb(251, 238, 184);">kuva</span>

- Aseta kotelon pohja paikalleen. Muista laittaa kiskoklipsit paikoilleen.

![kiskoklipsi1.jpg](https://wiki.bithouse.fi/uploads/images/gallery/2026-03/scaled-1680-/kiskoklipsi1.jpg)

##### <span style="background-color: rgb(191, 237, 210);">4.3.2 Modeemin antennin kytkeminen modeemiin (tarvittaessa)</span>

- Kytke antenni modeemin **M-liittimeen** napakasti painamalla.

### ![kytke_antennipiuha_modeemiin.jpg](https://wiki.bithouse.fi/uploads/images/gallery/2025-04/scaled-1680-/pBAkytke-antennipiuha-modeemiin.jpg)

![https://wiki.bithouse.fi/uploads/images/gallery/2026-02/pienkansiaukiblur.jpg](https://wiki.bithouse.fi/uploads/images/gallery/2026-02/pienkansiaukiblur.jpg)

</details></details>### 3. moduulien Ohjelmointi 

- Ensin menee osoitteeseen **192.168.10.134**  ja varmistaa ettei muuuta laitettaa ole pyörimässä siinä osoitteessä. 
    - Jos muita laitteita ei ole, selainikkuna valittaa time-outista
    - Jos muita laitteita on, ilmestyy kirjautumisikkuna. Tässä saattaa olla myös kyse siitä, että jotain on jäänyt selaimen välimuistiin - muista päivittää ikkuna varmistaaksesi asian.

 Jos ei ole jatka seuraavasti:


<details id="bkmrk-5.1-valmistelut-5.1."><summary></summary>

#### 3.1 Valmistelut


<details id="bkmrk-5.1.1-kytkenn%C3%A4t-kytk"><summary></summary>

[![PIENdevice-setup-setup.jpg](https://wiki.bithouse.fi/uploads/images/gallery/2026-02/scaled-1680-/piendevice-setup-setup.jpg)](https://wiki.bithouse.fi/uploads/images/gallery/2026-02/piendevice-setup-setup.jpg)


##### 3.1.1 Kytkennät

- Kytke virtajohdin virtaliittimestä pistorasiaan. Eth1-porttiin syttyy oranssi valo. **Odota**, että valo sammuu.
- Kytke Ethernet-kaapeli Eth1-portista seinän J10-porttiin.

[![kytke_integral03.jpg](https://wiki.bithouse.fi/uploads/images/gallery/2026-04/scaled-1680-/kytke-integral03.jpg)](https://wiki.bithouse.fi/uploads/images/gallery/2026-04/kytke-integral03.jpg)

##### 3.1.2 Selainikkunan avaaminen

- Linux-koneelta: 
    - [![Workbench-server-icon.png](https://wiki.bithouse.fi/uploads/images/gallery/2026-02/scaled-1680-/workbench-server-icon.png)](https://wiki.bithouse.fi/uploads/images/gallery/2026-02/workbench-server-icon.png) Käynnistä Integral Workbench Server (mustavihreä ikoni). Avautuu teksti-ikkuna.
    - [![Workbench-user-mode-icon.png](https://wiki.bithouse.fi/uploads/images/gallery/2026-02/scaled-1680-/workbench-user-mode-icon.png)](https://wiki.bithouse.fi/uploads/images/gallery/2026-02/workbench-user-mode-icon.png) Käynnistä Workbench user mode (turkoosi vasara). Avautuu selainikkuna.

[![mainmenu.png](https://wiki.bithouse.fi/uploads/images/gallery/2026-04/scaled-1680-/mainmenu.png)](https://wiki.bithouse.fi/uploads/images/gallery/2026-04/mainmenu.png)

</details><p class="callout success">Olet nyt Integral testbenchin Main menussa, ja Integral on kytketty koneeseen.</p>

#### <span style="background-color: rgb(194, 224, 244);">3.2 Moduulien ohjelmointi</span>

<details id="bkmrk-ensin-ohjelmoidaan-m"><summary></summary>

Ensin ohjelmoidaan moduulit:

[![mainmenu-moduleprogramming.png](https://wiki.bithouse.fi/uploads/images/gallery/2026-04/scaled-1680-/mainmenu-moduleprogramming.png)](https://wiki.bithouse.fi/uploads/images/gallery/2026-04/mainmenu-moduleprogramming.png)

- Klikkaa **Run**

**[![module-programming-2.png](https://wiki.bithouse.fi/uploads/images/gallery/2026-02/scaled-1680-/module-programming-2.png)](https://wiki.bithouse.fi/uploads/images/gallery/2026-02/module-programming-2.png)**

- Valitse Integral-moduulit alasvetovalikosta kuhunkin moduulipaikkaan.

<p class="callout warning">Huomioi moduulipaikkojen järjestys! Moduulipaikka 1 on virtaliittimen puoleisessa päädyssä.</p>

[![module-programming-3 - rajattu.png](https://wiki.bithouse.fi/uploads/images/gallery/2026-03/scaled-1680-/module-programming-3-rajattu.png)](https://wiki.bithouse.fi/uploads/images/gallery/2026-03/module-programming-3-rajattu.png) [![moduulipaikat-simple.png](https://wiki.bithouse.fi/uploads/images/gallery/2026-03/scaled-1680-/moduulipaikat-simple.png)](https://wiki.bithouse.fi/uploads/images/gallery/2026-03/moduulipaikat-simple.png)

- <span style="color: rgb(236, 240, 241);">**<span style="background-color: rgb(224, 62, 45);">Huom! USB-C-4P-moduulin ohjelmointi on poikkeuksellinen, ja sen ohjelmointia varten valitse None toistaiseksi!</span>**</span>
- Klikkaa **Confirm**

Ohjelma hakee Dropboxista uusimmat firmwaret ja asentaa ne vastaaviin moduuleihin. Lisäksi ohjelma luo laitteelle sarjanumeron.

[![module-programming-4.png](https://wiki.bithouse.fi/uploads/images/gallery/2026-02/scaled-1680-/module-programming-4.png)](https://wiki.bithouse.fi/uploads/images/gallery/2026-02/module-programming-4.png)

- Klikkaa **Back to home screen**

### **[![module-programming-5.png](https://wiki.bithouse.fi/uploads/images/gallery/2026-02/scaled-1680-/module-programming-5.png)](https://wiki.bithouse.fi/uploads/images/gallery/2026-02/module-programming-5.png)**

##### 3.2.1 Moduulien uudelleenohjelmointi

Jos joudut ohjelmoimaan moduulit uudestaan, paina im-programming -ikkunassa RESET, ja suorita samat vaiheet kuin ensimmäiselläkin kerralla.

</details>
</details>#### 4. Device setup **<span style="color: rgb(251, 238, 184); background-color: rgb(185, 106, 217);">\[=\]</span>**


<details id="bkmrk-seuraavaksi-konfigur"><summary></summary>


Jos integraalin moduulit on jo aikaisemmin on ohjelmoitu, ja nyt haluaisit tehdä DEVICE SETUP, sähköön ja verkkoon kytkimsen jälkeen odottaa 3 mins että laite herää!  
Seuraavaksi konfiguroidaan käyttöjärjestelmä:

[![mainmenu-operatingsystemsetup.png](https://wiki.bithouse.fi/uploads/images/gallery/2026-04/scaled-1680-/mainmenu-operatingsystemsetup.png)](https://wiki.bithouse.fi/uploads/images/gallery/2026-04/mainmenu-operatingsystemsetup.png)

- Klikkaa **Run**

**[![operating-system-setup-2.png](https://wiki.bithouse.fi/uploads/images/gallery/2026-02/scaled-1680-/operating-system-setup-2.png)](https://wiki.bithouse.fi/uploads/images/gallery/2026-02/operating-system-setup-2.png)**

Ohjelma konfiguroi käyttöjärjestelmän. Tämä on monivaiheinen toimenpide, jossa voi kestää 7-8 minuuttia. Eth1-portin vilkkuva oranssi valo kertoo, että toimenpide on edelleen käynnissä.

Toimenpide sisältää seuraavat asiat:

- - MAC-osoitteen asettaminen Eth2-portille
    - Actiweb-ohjelmistoalustan ja siihen liittyvien pakettien asentaminen
    - Palomuurin konfigurointi
    - Kernelin watchdog-ajastimen setup
    - Käyttöliittymän salasanan vaihtaminen
    - Sarjanumeron ym. tallentaminen CSV-tiedostoon

[![operating-system-setup-31.png](https://wiki.bithouse.fi/uploads/images/gallery/2026-02/scaled-1680-/operating-system-setup-31.png)](https://wiki.bithouse.fi/uploads/images/gallery/2026-02/operating-system-setup-31.png)


<p class="callout info">Setup kestää noin 7-8 min. Jos työvaihe on tuttu, voit tehdä esimerkiksi näytön lisäkortin kytkennän tai liittimien tarrojen liimailua tässä kohtaa.</p>

##### 4.1 Operating system setup uudelleen**<span style="color: rgb(251, 238, 184); background-color: rgb(185, 106, 217);">\[=\]</span>**


<details><summary></summary>

**Operating system setup** ‑toimintoa ei voi suorittaa useita kertoja peräkkäin, koska toiminto vaihtaa laitteelle uuden salasanan. Seuraavalla yrityksellä toiminto yrittää kirjautua Integraliin vanhalla salasanalla, mikä estää toiminnon onnistumisen.

Toimi seuraavasti:

- Kytke Integral irti piuhoista.
- Tee tilaa CPU-SoM-kortin irrotusta varten 
    - Irrota antennipiuha modeemista + irrota virtaliitin + ota Integral ulos kotelosta.
    - <span style="background-color: rgb(251, 238, 184);">**TAI**</span>
    - Ruuvaa antennipiuha irti kotelosta (tämä on hankalampi kiristää kunnolla takaisin laitettaessa, mutta on vähemmän vaiheita).
- Irrota CPU-SoM Integralin pääkortista.
- Tee tämän ohjeen kohta 3.3: **Prosessorimoduulin (CPU-SoM) uudelleenohjelmointi.** <span style="background-color: rgb(251, 238, 184);"><span style="background-color: rgb(185, 106, 217); color: rgb(251, 238, 184);">\[linkki tähän\]</span></span>
- Aseta CPU-SoM takaisin Integralin pääkorttiin (liitä takaisin virtaliitin jos olet irrottanut sen 2-kohdassa).
- Tee tämän ohjeen kohta 5.1. - 5.1.2: **Valmistelu.** <span style="background-color: rgb(251, 238, 184);"><span style="background-color: rgb(185, 106, 217); color: rgb(251, 238, 184);">\[linkki tähän\]</span></span>
- Tee tämän ohjeen kohta 5.4: **Device setup.<span style="background-color: rgb(251, 238, 184);"><span style="background-color: rgb(185, 106, 217); color: rgb(251, 238, 184);">\[linkki tähän\]</span></span>**
- Kokoa takaisin aiemmin purkamasi osat.

<p class="callout info">Uudelleen konfiguroidessa toiminto ilmoittaa virheestä: source already added. Tämä kuuluu asiaan.</p>

<p class="callout warning">HUOM! Jos yrittää tehdä **Operating system setup** -toiminnon väärällä salasanalla, laite lukitsee turvallisuussyistä itsensä määräajaksi.</p>

- Mene kahville.

</details></details>
- Lopuksi tarkistetaan että tiedot ovat tallentuneet **Produced\_devices.CSV** -tiedostoon (sijaitsee actiweb-käyttäjän kotihakemistossa):

1. Sarjanumero 
    - - On muotoa \[vuosiluku\]\[kuukausi\]\[päivä\]\[juokseva numero 5 merkkiä\], esim. 2026081500345
2. ID 
    - - On \[lisää tämä myöh\]
3. Admin-salasana
4. Linux-salasana
5. Päivämäärä
6. Eth2 portin MAC-osoite

#### <span style="background-color: rgb(194, 224, 244);">5. Testaukset (niille moduuleille joita laitteessa on) </span>**<span style="color: rgb(251, 238, 184); background-color: rgb(185, 106, 217);">\[=\]</span>**

Sitten testataan moduulit. Testataan ne moduulit, joita laitteeseen on asennettu

##### <span style="background-color: rgb(194, 224, 244);">5.1 IM-IO816</span>

Tulossa

##### <span style="background-color: rgb(194, 224, 244);">5.2 IM-RS485-2P (modbus)</span>

- Kytke IM-RS485-2P -moduulin liittimeen \[se juttu mikä näkyy kuvassa\]

<span style="background-color: rgb(185, 106, 217); color: rgb(251, 238, 184);"><span style="background-color: rgb(185, 106, 217); color: rgb(251, 238, 184);">\[TÄHÄN KUVA MODBUS-Testiliitynnästä\]</span></span>

<span style="background-color: rgb(185, 106, 217); color: rgb(251, 238, 184);">[![mainmenu-modbustest.png](https://wiki.bithouse.fi/uploads/images/gallery/2026-04/scaled-1680-/mainmenu-modbustest.png)](https://wiki.bithouse.fi/uploads/images/gallery/2026-04/mainmenu-modbustest.png)</span>

- Valitse Modbus-testi.

<span style="background-color: rgb(185, 106, 217); color: rgb(251, 238, 184);"><span style="background-color: rgb(185, 106, 217); color: rgb(251, 238, 184);">\[TÄHÄN KUVA MODBUS-TESTAUSVALIKOSTA\]</span></span>

- Klikkaa **Run**.

##### <span style="background-color: rgb(194, 224, 244);">5.3 IM-MBUS-10/250</span>

- Kytke IM-MBUS-10 tai IM-MBUS-250 mittariin, joka on testausta varten kokoamispisteellä.

<span style="background-color: rgb(185, 106, 217); color: rgb(251, 238, 184);"><span style="background-color: rgb(185, 106, 217); color: rgb(251, 238, 184);">\[TÄHÄN KUVA MBUS-Testiliitynnästä\]</span></span>

<span style="background-color: rgb(185, 106, 217); color: rgb(251, 238, 184);">[![mainmenu-mbustest.png](https://wiki.bithouse.fi/uploads/images/gallery/2026-04/scaled-1680-/mainmenu-mbustest.png)](https://wiki.bithouse.fi/uploads/images/gallery/2026-04/mainmenu-mbustest.png)</span>

- Valitse Mbus-testi.

<span style="background-color: rgb(185, 106, 217); color: rgb(251, 238, 184);"><span style="background-color: rgb(185, 106, 217); color: rgb(251, 238, 184);">\[TÄHÄN KUVA MBUS-TESTAUSVALIKOSTA\]</span></span>

- Klikkaa **Run**.

##### <span style="background-color: rgb(194, 224, 244);">5.4 IM-USB-C-4P</span>

- Terminaali auki (ctrl-alt-t)
- ssh actiweb@192.168.10.134
- ei mitään kiini im-usb-4c:ssä
- lsusb -&gt; näyttää kaikki laitteet
- Kiinitetään USB-tikku/-tikut
- lsusb -&gt; näyttää 1/2/3/4 uutta riviä
- tikku/tikut irti
- lsusb -&gt; ei näytä tikkua/tikkuja

####  6. <span class="font-outfit text-xl font-bold my-auto">Bithouse Production Database:</span>

<details id="bkmrk-production-database-"><summary></summary>

Production database (osoitteessa 192.168.0.201) ja sisäänkirjautuminen; tarvitset omat tunnukset.

<span class="font-outfit text-xl font-bold my-auto">Tässä vaiheessa syötä laitteen tiedot Tässä vaiheessa syötä laitteen tiedot tuotantotietokantaan.  
Voit tutustua siihen tästä:</span><span class="font-outfit text-xl font-bold my-auto"> [https://wiki.bithouse.fi/books/bithouse-production-database](https://wiki.bithouse.fi/books/bithouse-production-database)</span>

<span class="font-outfit text-xl font-bold my-auto">Muista Integralin seuraavat tiedot on </span>

- SERIAL BASE (pakollinen)
- SERIAL ENDING(pakollinen)
- SERIAL NUMNER (SERIAL BASE+SERIAL ENDING)(pakollinen)
- DEVICE ID QR (pakollinen)
- ACTIWEB PASS (pakollinen)
- SYSTEM PASS (pakollinen)
- PCB (pakollinen)
- MAC1 (pakollinen)
- CUSTOMER (Jos tiedossa!)
- SITE (Jos tiedossa!)
- NOTE (Jos tiedossa!)

</details>### 7. Näyttö tai kansi


<details id="bkmrk-6.a-laite%2C-jossa-n%C3%A4y"><summary></summary>

#### <span style="background-color: rgb(236, 202, 250);">7.1Laite, jossa näyttö</span>

<details id="bkmrk-6.a.1-n%C3%A4yt%C3%B6n-lis%C3%A4kor"><summary></summary>


##### <span style="background-color: rgb(236, 202, 250);">6.a.2 Lattakaapelin kytkentä</span>

- <span style="color: rgb(52, 73, 94);">Kytke lattakaapeli näytön lisäkorttiin. Tämä vaatii hieman sorminäppäryyttä, taasen ne molempien reunojen napsahdukset paikoilleen.</span>

[![lattakaapeli_lisäkorttiin.jpg](https://wiki.bithouse.fi/uploads/images/gallery/2026-04/scaled-1680-/lattakaapeli-lisakorttiin.jpg)](https://wiki.bithouse.fi/uploads/images/gallery/2026-04/lattakaapeli-lisakorttiin.jpg)

##### <span style="background-color: rgb(236, 202, 250);">6.a.3 Näytön liittäminen koteloon</span>

Napsauta näyttö kiinni koteloon. Kiinnitä huomiota, että kaikki väkäset napsahtavat kunnolla kiinni.

[![näyttö-paikalleen.jpg](https://wiki.bithouse.fi/uploads/images/gallery/2026-03/scaled-1680-/naytto-paikalleen.jpg)](https://wiki.bithouse.fi/uploads/images/gallery/2026-03/naytto-paikalleen.jpg)

</details>#### 7.2 Laite, jossa kansi

<details id="bkmrk-liimaa-kanteen-kansi"><summary></summary>

- Liimaa kanteen kansitarra.
- Napsauta kansi paikoilleen. Huomioi, että kansi osoittaa liityntäpisteet oikein (Virtaliitin, Ethernet-liittimet).![tarrat-kansi.jpg](https://wiki.bithouse.fi/uploads/images/gallery/2025-04/scaled-1680-/tarrat-kansi.jpg)

</details></details>### 8. Liittimet ja tarrat


<details id="bkmrk-7.1-kotelon-tarrat-7"><summary></summary>

#### 7.1 Kotelon tarrat


<details id="bkmrk-7.1.1-moduulipaikkoj"><summary></summary>

##### 7.1.1 Moduulipaikkoja osoittavat tarrat

- Liimaa tarrat 
    - Moduulipaikkoja osoittavat tarrat kannen/näytön molemmin puolin. Huomioi, että tarra osoittaa moduulipaikat oikeinpäin

[![moduulipaikat.png](https://wiki.bithouse.fi/uploads/images/gallery/2026-04/scaled-1680-/moduulipaikat.png)](https://wiki.bithouse.fi/uploads/images/gallery/2026-04/moduulipaikat.png)


##### <span style="background-color: rgb(236, 202, 250);">7.1.2.a Ethernet-portteja ja virtaliittimen liityntäpisteitä osoittava tarra</span>

- Vain näytöllisiin laitteisiin
- Liimaa tarra osoittamaan Ethernet-portit ja virtaliittimen liityntäpisteet.

[![eth_ja_pwr.png](https://wiki.bithouse.fi/uploads/images/gallery/2026-04/scaled-1680-/eth-ja-pwr.png)](https://wiki.bithouse.fi/uploads/images/gallery/2026-04/eth-ja-pwr.png)

</details>#### 7.2 Liittimet


<details id="bkmrk-7.2.1-moduulien-liit"><summary></summary>

##### <span style="background-color: rgb(194, 224, 244);">7.2.1 Moduulien liittimet merkintöineen</span>

<table border="1" id="bkmrk-liitin-moduulin-muka" style="border-collapse: collapse; width: 69.7138%;"><colgroup><col style="width: 33.1909%;"></col><col style="width: 66.7507%;"></col></colgroup><thead><tr><td>**Liitin moduulin mukaan**</td><td>**Kuva tarran asettelusta**</td></tr></thead><tbody><tr><td>IM-IO816 / 1...8</td><td>[![01_08.jpg](https://wiki.bithouse.fi/uploads/images/gallery/2026-04/scaled-1680-/01-08.jpg)](https://wiki.bithouse.fi/uploads/images/gallery/2026-04/01-08.jpg)</td></tr><tr><td>IM-IO816 / 9...16</td><td>[![09_16.jpg](https://wiki.bithouse.fi/uploads/images/gallery/2026-04/scaled-1680-/09-16.jpg)](https://wiki.bithouse.fi/uploads/images/gallery/2026-04/09-16.jpg)</td></tr><tr><td>IM-MBUS-10/250</td><td>[![mbus_new.png](https://wiki.bithouse.fi/uploads/images/gallery/2026-04/scaled-1680-/mbus-new.png)](https://wiki.bithouse.fi/uploads/images/gallery/2026-04/mbus-new.png)</td></tr><tr><td>IM-RS485-2P</td><td>[![rs485.jpg](https://wiki.bithouse.fi/uploads/images/gallery/2026-04/scaled-1680-/rs485.jpg)](https://wiki.bithouse.fi/uploads/images/gallery/2026-04/rs485.jpg)</td></tr><tr><td>IM-USB-C-4P</td><td>  
</td></tr></tbody></table>

##### 7.2.2 Virtaliitin merkintöineen

[![PWR.png](https://wiki.bithouse.fi/uploads/images/gallery/2026-04/scaled-1680-/pwr.png)](https://wiki.bithouse.fi/uploads/images/gallery/2026-04/pwr.png)


##### 7.2.3 Tarkistuskuvat

<p class="callout warning">Tarkista huolellisesti, että tarrat osoittavat liityntäpisteiden symbolit/numerot oikein.</p>

- **IM-IO816**-moduulin liityntäpisteet menevät aina korttiin merkityn järjestyksen mukaan, mutta kortin versiosta riippuen merkinnät saattavat olla selkeämpiä tai vähemmän helppolukuisia. Mikäli kortille on merkitty esim. 51-58, ne ovat vastaavasti liityntäpisteet 01-08 (kts. kuva)

[![liitinmerkinnätIO816 -lähikuva.jpg](https://wiki.bithouse.fi/uploads/images/gallery/2025-09/scaled-1680-/liitinmerkinnatio816-lahikuva.jpg)](https://wiki.bithouse.fi/uploads/images/gallery/2025-09/liitinmerkinnatio816-lahikuva.jpg)

<p class="callout warning">Tarkista, että kaikki tarrojen merkinnät ovat samoin päin.</p>

Jos joku merkintä on eri suuntaan luettava:

- Virtaliittimen tai kotelon tarra on vanhaa mallia
- Tarrat eivät osoita oikeita liityntäpisteitä

[![tarkistus-samasuunta.png](https://wiki.bithouse.fi/uploads/images/gallery/2026-04/scaled-1680-/tarkistus-samasuunta.png)](https://wiki.bithouse.fi/uploads/images/gallery/2026-04/tarkistus-samasuunta.png)

</details>#### 7.3 Sarjanumerotarra**<span style="color: rgb(251, 238, 184); background-color: rgb(185, 106, 217);">\[=\]</span>**


<details id="bkmrk-toistaiseksi%3A-kirjoi"><summary></summary>

Menee tietokantaan 192.168.0.201. Valitse laite ja tulosta tarra.  
Tarra on 24 mm:n musta teksti valkoisella tarralla.

[![image.png](https://wiki.bithouse.fi/uploads/images/gallery/2026-05/scaled-1680-/X0bimage.png)](https://wiki.bithouse.fi/uploads/images/gallery/2026-05/X0bimage.png)

</details></details>### 9. VPN

#### 9.1 VPN-excel

8.1.1 Avaa työpöydässä olevan VPN-excel tiedosto.

<p class="callout warning">Excelin soluja on lukittu eikä mitään virheitä lukuja voi tapahtua siihen.</p>

<p class="callout warning">Excelissä on kaksi punaista solua, johon pitäsisi kopioida kyseisen laitteen "Device ID".</p>

8.1.2 Avaa Produced\_devices.CSV -tiedosto (Actiweb-käyttäjän kotihakemistosta)

<table border="0" cellspacing="0" id="bkmrk-vpn-linkin-luonti-co"><colgroup width="83"></colgroup> <colgroup width="56"></colgroup> <colgroup width="41"></colgroup> <colgroup span="2" width="72"></colgroup> <colgroup width="204"></colgroup> <colgroup width="72"></colgroup> <colgroup width="53"></colgroup> <colgroup width="449"></colgroup><tbody><tr><td align="center" bgcolor="#FFFF00" colspan="9" data-sheets-value="{ "1": 2, "2": "VPN linkin luonti"}" height="37" rowspan="2" style="border: 2px solid #000000;" valign="middle">**<span style="color: #000000; font-size: x-large;">VPN linkin luonti</span>**</td></tr><tr></tr><tr><td align="center" bgcolor="#D9F2D0" colspan="3" data-sheets-value="{ "1": 2, "2": "common name"}" height="18" style="border: 2px solid #000000;" valign="bottom">**<span style="color: #000000;">common name</span>**</td><td align="center" bgcolor="#F2CFEE" colspan="3" data-sheets-value="{ "1": 2, "2": "url"}" style="border: 2px solid #000000;" valign="bottom">**<span style="color: #000000;">url</span>**</td><td align="center" bgcolor="#FBE3D6" colspan="2" data-sheets-value="{ "1": 2, "2": "customer"}" style="border: 2px solid #000000;" valign="bottom">**<span style="color: #000000;">customer</span>**</td><td align="center" bgcolor="#4E95D9" data-sheets-value="{ "1": 2, "2": "address"}" style="border-top: 2px solid #000000; border-bottom: 2px solid #000000; border-left: 2px solid #000000;" valign="bottom">**<span style="color: #000000;">address</span>**</td></tr><tr><td align="center" bgcolor="#FF3838" colspan="3" data-sheets-value="{ "1": 2, "2": "INSERT DEVICE ID"}" height="34" style="border-top: 2px solid #000000; border-bottom: 2px solid #000000; border-left: 2px solid #000000; border-right: 1px solid #000000;" valign="middle"><span style="color: #000000; font-family: Liberation Sans;">INSERT DEVICE ID</span></td><td align="center" bgcolor="#FF3838" colspan="3" data-sheets-value="{ "1": 2, "2": "INSERT DEVICE ID"}" style="border-top: 2px solid #000000; border-bottom: 2px solid #000000; border-left: 1px solid #000000; border-right: 1px solid #000000;" valign="middle"><span style="color: #000000; font-family: Liberation Sans;">INSERT DEVICE ID</span></td><td align="center" bgcolor="#FFFFFF" colspan="2" data-sheets-value="{ "1": 2, "2": "generic"}" style="border-top: 2px solid #000000; border-bottom: 2px solid #000000; border-left: 1px solid #000000; border-right: 1px solid #000000;" valign="middle"><span style="color: #000000; font-size: medium;">generic</span></td><td align="center" bgcolor="#FFFFFF" data-sheets-value="{ "1": 2, "2": ""}" style="border-top: 2px solid #000000; border-bottom: 2px solid #000000;" valign="middle"><span style="color: #000000; font-size: medium;">  
</span></td></tr><tr><td align="center" bgcolor="#FFFFFF" colspan="9" data-sheets-value="{ "1": 2, "2": "Permission key:"}" height="18" style="border-top: 2px solid #000000; border-bottom: 1px solid #000000; border-left: 2px solid #000000; border-right: 2px solid #000000;" valign="bottom"><span style="color: #000000;">Permission key:</span></td></tr><tr><td align="center" bgcolor="#FFFFFF" colspan="9" data-sheets-value="{ "1": 2, "2": "G76NK9645U367R9K6W49"}" height="18" style="border-bottom: 2px solid #000000; border-left: 2px solid #000000; border-right: 2px solid #000000;" valign="bottom"><span style="color: #000000; font-family: Liberation Sans;">G76NK9645U367R9K6W49</span></td></tr><tr><td align="left" bgcolor="#FFFFFF" data-sheets-value="{ "1": 2, "2": ""}" height="18" valign="bottom"><span style="color: #000000;">  
</span></td><td align="left" bgcolor="#FFFFFF" data-sheets-value="{ "1": 2, "2": ""}" valign="bottom"><span style="color: #000000;">  
</span></td></tr><tr><td align="center" bgcolor="#CAEEFB" colspan="9" data-sheets-value="{ "1": 2, "2": "Terminaalissa seuraavat järjestyksessä:"}" height="30" style="border: 2px solid #000000;" valign="middle">**<span style="color: #000000; font-size: large;">Terminaalissa seuraavat järjestyksessä:</span>**</td></tr><tr><td align="center" bgcolor="#FFFFFF" data-sheets-numberformat="{ "1": 2, "2": "0", "3": 1}" data-sheets-value="{ "1": 3, "3": 1}" height="30" style="border-top: 2px solid #000000; border-bottom: 1px solid #000000; border-left: 2px solid #000000; border-right: 1px solid #000000;" valign="middle"><span style="color: #000000;">1</span></td><td align="center" bgcolor="#FFFFFF" colspan="8" data-sheets-value="{ "1": 2, "2": "ssh machine@192.168.0.250"}" style="border-top: 2px solid #000000; border-bottom: 1px solid #000000; border-right: 2px solid #000000;" valign="middle"><span style="color: #000000;">ssh [machine@192.168.0.250](mailto:machine@192.168.0.250)</span></td></tr><tr><td align="center" bgcolor="#FFFFFF" data-sheets-numberformat="{ "1": 2, "2": "0", "3": 1}" data-sheets-value="{ "1": 3, "3": 2}" height="30" style="border-top: 1px solid #000000; border-bottom: 1px solid #000000; border-left: 2px solid #000000; border-right: 1px solid #000000;" valign="middle"><span style="color: #000000;">2</span></td><td align="center" bgcolor="#FFFFFF" colspan="8" data-sheets-value="{ "1": 2, "2": "cd pkigenerator"}" style="border-top: 1px solid #000000; border-bottom: 1px solid #000000; border-right: 2px solid #000000;" valign="middle"><span style="color: #000000;">cd pkigenerator</span></td></tr><tr><td align="center" bgcolor="#FFFFFF" data-sheets-numberformat="{ "1": 2, "2": "0", "3": 1}" data-sheets-value="{ "1": 3, "3": 3}" height="30" style="border-top: 1px solid #000000; border-bottom: 1px solid #000000; border-left: 2px solid #000000; border-right: 1px solid #000000;" valign="middle"><span style="color: #000000;">3</span></td><td align="center" bgcolor="#FFFFFF" colspan="8" data-sheets-value="{ "1": 2, "2": ".\/bit_vpn create --common-name INSERT DEVICE ID --url INSERT DEVICE ID --customer generic --street-address '  '"}" style="border-top: 1px solid #000000; border-bottom: 1px solid #000000; border-right: 2px solid #000000;" valign="middle"><span style="color: #000000;">./bit\_vpn create --common-name INSERT DEVICE ID --url INSERT DEVICE ID --customer generic --street-address ' '</span></td></tr><tr><td align="center" bgcolor="#FFFFFF" data-sheets-numberformat="{ "1": 2, "2": "0", "3": 1}" data-sheets-value="{ "1": 3, "3": 4}" height="30" style="border-top: 1px solid #000000; border-bottom: 1px solid #000000; border-left: 2px solid #000000; border-right: 1px solid #000000;" valign="middle"><span style="color: #000000;">4</span></td><td align="center" bgcolor="#FFFFFF" colspan="8" data-sheets-value="{ "1": 2, "2": "G76NK9645U367R9K6W49"}" style="border-top: 1px solid #000000; border-bottom: 1px solid #000000; border-right: 2px solid #000000;" valign="middle"><span style="color: #000000;">G76NK9645U367R9K6W49</span></td></tr><tr><td align="center" bgcolor="#FFFFFF" data-sheets-numberformat="{ "1": 2, "2": "0", "3": 1}" data-sheets-value="{ "1": 3, "3": 5}" height="30" style="border-top: 1px solid #000000; border-bottom: 1px solid #000000; border-left: 2px solid #000000; border-right: 1px solid #000000;" valign="middle"><span style="color: #000000;">5</span></td><td align="center" bgcolor="#FFFFFF" colspan="8" data-sheets-value="{ "1": 2, "2": ".\/bit_vpn userhosts-reconfigure"}" style="border-top: 1px solid #000000; border-bottom: 1px solid #000000; border-right: 2px solid #000000;" valign="middle"><span style="color: #000000;">./bit\_vpn userhosts-reconfigure</span></td></tr><tr><td align="center" bgcolor="#FFFFFF" data-sheets-numberformat="{ "1": 2, "2": "0", "3": 1}" data-sheets-value="{ "1": 3, "3": 6}" height="30" style="border-top: 1px solid #000000; border-bottom: 1px solid #000000; border-left: 2px solid #000000; border-right: 1px solid #000000;" valign="middle"><span style="color: #000000;">6</span></td><td align="center" bgcolor="#FFFFFF" colspan="8" data-sheets-value="{ "1": 2, "2": ".\/bit_vpn config-push --openvpn --nginx --userhost"}" style="border-top: 1px solid #000000; border-bottom: 1px solid #000000; border-right: 2px solid #000000;" valign="middle"><span style="color: #000000;">./bit\_vpn config-push --openvpn --nginx --userhost</span></td></tr><tr><td align="center" bgcolor="#FFFFFF" data-sheets-numberformat="{ "1": 2, "2": "0", "3": 1}" data-sheets-value="{ "1": 3, "3": 7}" height="30" style="border-top: 1px solid #000000; border-bottom: 1px solid #000000; border-left: 2px solid #000000; border-right: 1px solid #000000;" valign="middle"><span style="color: #000000;">7</span></td><td align="center" bgcolor="#FFFFFF" colspan="8" data-sheets-value="{ "1": 2, "2": ".\/bit_vpn push-to-client -cn INSERT DEVICE ID --ip-address 192.168.0.134"}" style="border-top: 1px solid #000000; border-bottom: 1px solid #000000; border-right: 2px solid #000000;" valign="middle"><span style="color: #000000;">./bit\_vpn push-to-client -cn INSERT DEVICE ID --ip-address 192.168.0.134</span></td></tr><tr><td align="center" bgcolor="#FFFFFF" data-sheets-value="{ "1": 2, "2": ""}" height="30" style="border-top: 1px solid #000000; border-bottom: 1px solid #000000; border-left: 2px solid #000000; border-right: 1px solid #000000;" valign="middle"><span style="color: #000000;">  
</span></td><td align="center" bgcolor="#FFFF6D" colspan="8" data-sheets-value="{ "1": 2, "2": "TÄSSÄ VAIHEESSA KYSY LINUX(SYSTEM) SALASANA!!!!!!!"}" style="border-top: 1px solid #000000; border-bottom: 1px solid #000000; border-right: 2px solid #000000;" valign="middle">**<span style="color: #c9211e;">TÄSSÄ VAIHEESSA KYSY LINUX(SYSTEM) SALASANA!!!!!!!</span>**</td></tr><tr><td align="center" bgcolor="#FFFFFF" data-sheets-numberformat="{ "1": 2, "2": "0", "3": 1}" data-sheets-value="{ "1": 3, "3": 8}" height="30" style="border-top: 1px solid #000000; border-bottom: 1px solid #000000; border-left: 2px solid #000000; border-right: 1px solid #000000;" valign="middle"><span style="color: #000000;">8</span></td><td align="center" bgcolor="#FFFFFF" colspan="8" data-sheets-value="{ "1": 2, "2": "exit"}" style="border-top: 1px solid #000000; border-bottom: 1px solid #000000; border-right: 2px solid #000000;" valign="middle"><span style="color: #000000;">exit</span></td></tr><tr><td align="center" bgcolor="#FFFFFF" data-sheets-numberformat="{ "1": 2, "2": "0", "3": 1}" data-sheets-value="{ "1": 3, "3": 9}" height="30" style="border-top: 1px solid #000000; border-bottom: 1px solid #000000; border-left: 2px solid #000000; border-right: 1px solid #000000;" valign="middle"><span style="color: #000000;">9</span></td><td align="center" bgcolor="#FFFFFF" colspan="8" data-sheets-value="{ "1": 2, "2": "ssh actiweb@192.168.0.134"}" style="border-top: 1px solid #000000; border-bottom: 1px solid #000000; border-right: 2px solid #000000;" valign="middle"><span style="color: #000000;">ssh actiweb@192.168.0.134</span></td></tr><tr><td align="center" bgcolor="#FFFFFF" data-sheets-numberformat="{ "1": 2, "2": "0", "3": 1}" data-sheets-value="{ "1": 3, "3": 10}" height="30" style="border-top: 1px solid #000000; border-bottom: 1px solid #000000; border-left: 2px solid #000000; border-right: 1px solid #000000;" valign="middle"><span style="color: #000000;">10</span></td><td align="center" bgcolor="#FFFFFF" colspan="8" data-sheets-value="{ "1": 2, "2": "sudo .\/clientSetup.sh"}" style="border-top: 1px solid #000000; border-bottom: 1px solid #000000; border-right: 2px solid #000000;" valign="middle"><span style="color: #000000;">sudo ./clientSetup.sh</span></td></tr><tr><td align="center" bgcolor="#FFFFFF" data-sheets-numberformat="{ "1": 2, "2": "0", "3": 1}" data-sheets-value="{ "1": 3, "3": 11}" height="30" style="border-top: 1px solid #000000; border-bottom: 1px solid #000000; border-left: 2px solid #000000; border-right: 1px solid #000000;" valign="middle"><span style="color: #000000;">11</span></td><td align="center" bgcolor="#FFFFFF" colspan="8" data-sheets-value="{ "1": 2, "2": "ip addr show"}" style="border-top: 1px solid #000000; border-bottom: 2px solid #000000; border-right: 2px solid #000000;" valign="middle"><span style="color: #000000;">ip addr show</span></td></tr><tr><td align="left" bgcolor="#FFFFFF" data-sheets-value="{ "1": 2, "2": ""}" height="37" valign="bottom"><span style="color: #000000;">  
</span></td><td align="center" bgcolor="#FFFF6D" colspan="8" data-sheets-value="{ "1": 2, "2": "Tässä tarkistetaan onko VPN yhteys kunnossa! Mene osoitteeseen 192.168.0.60. Device Id on oltavana siinä yleensä alimmana rivinä! Voi mennä hetki ! Päivittele sivu jos ei näöy!"}" style="border-top: 1px solid #000000; border-bottom: 1px solid #000000; border-right: 2px solid #000000;" valign="middle">**<span style="color: #c9211e;">Tässä tarkistetaan onko VPN yhteys kunnossa! Mene osoitteeseen 192.168.0.60. Device Id on oltavana siinä yleensä alimmana rivinä! Voi mennä hetki ! Päivittele sivu jos ei näöy!</span>**</td></tr></tbody></table>

8.1.3 Copy-paste tarvittavat tiedot

- kopioi Produced\_devices.CSV -tiedostosta Device ID
- Liitä se punaisella merkittyihin soluihin exceliin, jolloin excel automaattisesti muokkaa tarvittavat rivit 
    - Mikäli solut vaihtavat väriä (ei enää punainen), tee uudestaan 
        - UNDO ja uus yritys
        - Liitä mieluummin Excelin syöttöriville kuin suoraan soluun, niin onnistuu paremmin

#### 9.2. Terminaali (komentokehoite)

8.2. Miten avataan terminaali

Tähän on monta tapaa

- Näppäimistöltä \[se yks näppäin joka ois windows-näppäin jos tässä ois windows\] + T

8.2. Copy-paste rivi kerrallaan VPN-excelistä

- Kopiointi voi olla vähän ärsyttävää riippuen valitsetko hiiren klikkauksilla 'copy' vai käytätkö näppäimistöltä Ctrl+C 
    - joillain riveillä on tekstiä, joka kopioituu vain valitsemalla excelin syöttöriviltä (ei siis solusta itsestään vaan siitä kohtaa mihin sisältöä kirjoitetaan)
    - joillain riveillä puolestaan ei SAA kopioida sieltä syöttöriviltä koska siinä on automaattisesti päivittyvää sisältöä (juuri ne mitä kopioit aiemmin Produced Devices -tiedostosta ja jotka siitä kopioituivat automaattisesti tarvittaville riveille)
- Paste eli liittäminen terminaaliin pitää valita hiirellä, koska pikanäppäin Ctrl+V ei toimi terminaalissa.

8.2.n mitä minkäkin rivin jälkeen ois tarkoitus tapahtua, miltä onnistunut näyttää?

- Syötettyäsi rivin 3 komennon, kysytään onko tiedot oikein ja haluatko jatkaa y/N. Siinä kohtaa tarkista, että Device id vastaa sitä laitetta, jota olet työstämässä. Vastaa kyllä jos homma ok.
- Syötettyäsi rivin 7 komennon, sinun pitää kopioida **Linux-password** Produced Devices -tiedostosta ja pasteta se terminaaliin.
- Syötettyäsi rivin 10 komennon, kysytään y/N että haluatko jatkaa. Kyllä haluat.

#### 9.3 Tarkistus että onnistui

tässä oli parikin asiaa, ainakin:

8.3.1 Mene osoitteeseen 192.168.0.60

Siellä on lista VPN-yhteyksistä, siellä pitäis näkyä oikee laite (device ID:n perusteella tunnistat).

Luultavasti listan viimeisenä.

Testaa linkki että toimii. linkin kauttaa voit tarkistaa admin/admin(actiweb)salasanalla että pääset sisään. jos ei pääse on tarkistettava!

#### 10. Asiakaskohtaiset asennukset **<span style="color: rgb(251, 238, 184); background-color: rgb(185, 106, 217);">\[=\]</span>**


<details id="bkmrk-mik%C3%A4li-laite-on-meno-1"><summary></summary>

Mikäli laite on menossa jollekulle seuraavista asiakkaista, tehdään asiakaskohtaiset asennukset:

- Högfors GST
- ClimaPri

<span style="color: rgb(251, 238, 184);">[![mainmenu-Climapricustomize.png](https://wiki.bithouse.fi/uploads/images/gallery/2026-04/scaled-1680-/mainmenu-climapricustomize.png)](https://wiki.bithouse.fi/uploads/images/gallery/2026-04/mainmenu-climapricustomize.png)</span>

<span style="color: rgb(0, 0, 0);">**10.1 HögforsGST Oy:**   
Tarvitsee julkisen VPN etäyhteys osoitteen.</span>

[![image.png](https://wiki.bithouse.fi/uploads/images/gallery/2026-05/scaled-1680-/tsjimage.png)](https://wiki.bithouse.fi/uploads/images/gallery/2026-05/tsjimage.png)

<span style="color: rgb(0, 0, 0);">Eli tämä </span>

- <span style="color: rgb(0, 0, 0);">osoitteesta 192.168.0.60</span>
- <span style="color: rgb(0, 0, 0);">valitse DEVICE ID:n perusteella oikea rivi</span>
- <span style="color: rgb(0, 0, 0);">sisältäen https:// osan</span>
- <span style="color: rgb(0, 0, 0);">loppuu .io</span>
    - <span style="color: rgb(0, 0, 0);">EI kauttaviivoja tai mitään sen jälkeen</span>

[![image.png](https://wiki.bithouse.fi/uploads/images/gallery/2026-05/scaled-1680-/1xRimage.png)](https://wiki.bithouse.fi/uploads/images/gallery/2026-05/1xRimage.png)

**10,2 ClimaPri Oy:**

tällä hetkellä vain Risto Kokkola tekee tämän vaihen. Toimitathan valmis laite hänelle tämän vaiheen suoritettavaksi!)

<span style="color: rgb(0, 0, 0);">  
</span>

</details>#### 11. Viimeistely **<span style="color: rgb(251, 238, 184); background-color: rgb(185, 106, 217);">\[=\]</span>**


<details id="bkmrk-viimeistely-tehd%C3%A4%C3%A4n--1"><summary></summary>

Viimeistely tehdään vasta, kun setup ja customization on varmasti kunnossa. Viimeistely poistaa väliaikaiset avaimet.

- Valitse **Finalize**.

[![mainmenu-finalizedevice.png](https://wiki.bithouse.fi/uploads/images/gallery/2026-04/scaled-1680-/mainmenu-finalizedevice.png)](https://wiki.bithouse.fi/uploads/images/gallery/2026-04/mainmenu-finalizedevice.png)

- Klikkaa **Run**.

<span style="background-color: rgb(185, 106, 217); color: rgb(251, 238, 184);">\[TÄHÄN KUVA FINALISE-VALIKOSTA\]</span>

</details>

# Muutostarpeet ohjeeseen

Tähän voi listata muutoksia, joita pitäisi tehdä. Jos on kiireellistä niin Leealle suoraan viestiä.